You know you’re a mom when not only do you a) have a favorite chicken nugget recipe, but b) you have a favorite baked chicken nugget recipe. What’s that you see in my driveway? A minivan? Someone save me before I buy any mom jeans!
Just kidding! I love motherhood. Wouldn’t trade it. My house is often filled with little ones, and chicken is usually something you can bet at least half of them will like. (Coincidentally, my toddler decided to boycott chicken the last time I made these.) I think most moms would say they prefer baked recipes instead of fried ones, even though usually the fried stuff tastes so much better (check out this CFA knock-off recipe, it looks amazing). But behold, a tasty baked chicken nugget recipe!
This is my go-to chicken nugget recipe for play dates, parties, snack time and easy dinners. If you keep Panko breadcrumbs on hand, you probably have everything you need to make these in a pinch. If I’m serving them for a group, I like to provide ketchup, honey, barbecue sauce and honey mustard for dipping. Kids (and most adults, right?) love dipping sauces, so they’re a must to have on hand.
Finally, a kid-friendly nugget recipe you can feel good about.
Now excuse me while I go adhere a family of stick figures to the back of my van.
(Just a joke! Love to all the mamas out there with van decals.)
adapted from Martha Stewart- http://www.marthastewart.com/318646/panko-crusted-chicken-bites-with-apricot
Author: Oven Love
Recipe type: Main
Serves: 8
Ingredients
Nonstick cooking spray
½ cup flour (you can use all-purpose, whole wheat, all purpose, etc)
1 teaspoon garlic powder
½ teaspoon smoked paprika (use regular paprika or cayenne pepper as a substitute)
Coarse salt and freshly ground pepper
2 large eggs
1½ cups panko breadcrumbs
2 tablespoons extra-virgin olive oil
½ cup freshly grated Parmesan cheese
4 large boneless, skinless chicken breast halves (about 2 pounds), cut into 1-inch cubes
Instructions
Preheat oven to 375 degrees. Line a baking sheet with parchment paper and fit with a wire rack. Spray with cooking spray; set aside.
Place flour, garlic powder and smoked paprika in a large bowl and season very generously with salt and pepper. Whisk eggs in another large bowl with 2 tablespoons water until well combined. Place the breadcrumbs in a third large bowl, and drizzle with olive oil; toss to coat. Stir in cheese and cayenne and mix well.
Place chicken pieces in the seasoned flour and toss to coat. Working in 3 batches, shake off any excess flour from chicken pieces and transfer to egg mixture; stir to combine. Transfer coated chicken pieces with a slotted spoon to the breadcrumb mixture and toss until completely coated. Place the breaded chicken pieces on a rack-lined baking sheet, spacing them evenly apart. Repeat process until all the chicken is breaded. Bake until golden brown and chicken is cooked through, 18 to 20 minutes.
Strawberry Ice Cream. Let’s continue to tell ourselves that anything containing fruit is healthy. Perhaps it will come true!
Four very delicious reasons to break out the ice cream maker, or not, and make some homemade ice cream. Your tummy will thank you (but your thighs might not).
I’m starting a new little series for you guys this week called Inside the Oven. It’s basically just to give you a peek into what’s going on in our lives at the Oven Love house, not just what we have on our plates! I’ll probably share pictures, thoughts, links.. whatever I think might be interesting to you (and hopefully it is). Here goes!
Hubby and I went blues dancing for the first time this weekend. My brother-in-law and his sweet girlfriend are into the dancing scene (swing, blues, etc) and took us along. It was fun and brought back some good memories for us (we had our wedding reception at the venue), but it was also similar to couples therapy at times- some activities are not quite the same after you get married, you know?
This week, I’m starting Week 6 of the Couch-2-5k Program. Anyone out there do the C25K? I like it because it gets you back into running without burning you out right away. I am getting dangerously close to the part where there is no more walking in the workouts.. time to put my big girl pants on!
I really enjoyed this article recently- 10 Ways for Moms to Respect Their Boys. I spend a lot of time thinking about discipline, but respect is just as important. A good read for moms of boys!
Favorite recent Pin: This painted wooden bead necklace. I love the look and I really want to try this soon. I need some kid-friendly jewelry!
Are there any gardeners, homebrewers or homesteaders out there? I’m looking forward to sharing some of business that’s going on in our backyard and in our closet (gotta keep that brew in the dark!) if you guys are interested. Maybe you’ll get to hear from the hubs, too- he’s the green thumb and the master brewer, after all.
That’s all for now. If you have any questions, comments or inquiries for me, please share below- I adore you all and love hearing from you!
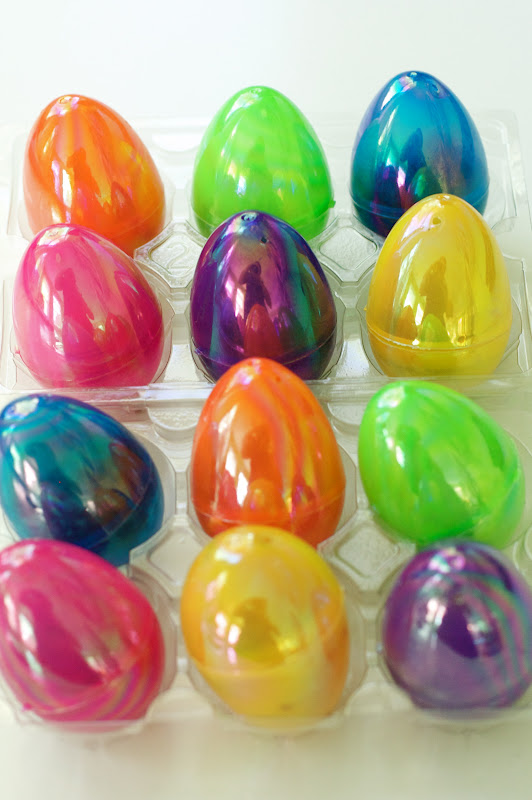
Is anyone else out there getting ready for some holiday traveling? We are heading out on the long (LONG) drive from GA to PA soon. I knew I would need something to help the little man from going crazy on the ride, so I came up with a little Easter-themed plan.
What would you guess is inside these shiny little eggs?
Whether you’ve got a toddler or not, you probably don’t want to stuff your kid full of sugar on a long drive. I picked up a dozen plastic Easter eggs at the grocery store and filled each one with a different snack- some sweet, some not so sweet. The plan is to give him one egg every hour or so until the trip is done. Older kids would probably appreciate this even more than he will- and you can teach them about the passing of time while you’re at it! Hopefully they won’t be asking “are we there yet?” as much as usual. (But they might be asking “when do I get another egg?”)You could also fill them with little toys or the pieces to a puzzle that will be completed when you get to your destination.
Most of the snacks are probably already in your cabinet!
(This is also a great way to get rid of the last few crackers in the box, etc).
Pictured clockwise above are Hershey Kisses (Creme de Menthe flavor), a granola bite (try this recipe or break off half a granola bar), pistachios, Kashi crackers, dried cranberries and Cheerios.
You can get as creative as you want with this! I’m using this as a travel tool, but these are also great ideas for toddler egg hunts if you don’t want them to have too many sweets (a few are okay, though, it’s a holiday!) Leave out the chocolate if you’re hiding eggs outside.
Pictured clockwise above are a marshmallow, Annie’s gummy rabbits, Annie’s cheddar bunnies, chocolate chips, yogurt raisins and almonds.
And HEY! I am NOT advocating that you give your toddler nuts unless you know for sure they can chew them and swallow them successfully. Especially in the car! (My son got his teeth quickly and early and he is very good at using them, so nuts are okay in our house). Use your judgment, of course.
I hope you have fun preparing for Easter this week. All of the little themed stuff is fun to do, but take some time to thank Jesus and remember what Easter is really all about- the good news that God sent his son Jesus to rescue undeserving sinners. Praise God for this amazing holiday- it is definitely cause for celebration!
Sometimes I see a recipe somewhere and it just gets stuck in my head. I’ll think about making it time and time again; then it will start showing up in my dreams.. just another sign that I spend too much time thinking about food, yikes!
A while back, I saw these cheesecake bites on Tessa’s blog and pinned them right away. From then on, every time I looked at my pins for dessert inspiration, I would see those cheesecake bites staring me down. I was just waiting for all of the right ingredients to be in my house at the same time- we often have cream cheese and graham crackers, but not always at the same time. That perfect storm finally happened in my kitchen this weekend and I couldn’t wait to try this recipe.
There are a few separate steps with some waiting involved, but I assure you- these are worth the wait. I made the cheesecake portion the night before I served them (they spent the night firming up in the freezer) and did the chocolate dipping the next morning. The dipping brought back some serious memories for me from my teenage years. I was in a girls’ youth group called Job’s Daughters (any former Jobies out there??) and every spring, we made chocolate covered peanut butter eggs as a fundraiser. It’s funny that my muscles still remember how to dip things in chocolate after all these years! The secret is to use a fork for dipping (and if you’re doing a lot of dipping, take an old fork and bend back the two middle tines- that’s the best tool for dipping, hands down).
This recipe is pretty close to Tessa’s, but I changed the cheesecake mixture to include Greek yogurt instead of sour cream. The main reason for doing so was because I didn’t have sour cream on hand, but I loved the subtle tang it gave to the cheesecake. And anything with Greek yogurt in it is obviously healthy. You’re welcome.
These little bites would be great for Easter. I wouldn’t recommend sticking them in any Easter eggs, though, unless you’re hiding your Easter eggs in the freezer (an excellent hiding spot!). They will start to get soft at room temperature, so they’re best kept in the fridge or freezer until right before you’re ready to serve them. I prefer the freezer- the cheesecake really firms up and the squares stay in tact as you eat them.
It would also be fun to try out different cheesecake flavors- I’d love to try a raspberry swirl or peanut butter.. or salted caramel.. cover any kind of cheesecake in chocolate and I’m on board.Thanks, Tessa, for the tasty inspiration!
Chocolate Covered Cheesecake Bites
by Oven Love, adapted from Handle the Heat Makes about 36 squares
For the crust:
1 cup graham cracker crumbs (from 1 sleeve or 9 crackers)
1 stick butter, melted and cooled
For the filling:
13 oz cream cheese, at room temperature
1/2 cup sugar
1/2 cup plain Greek yogurt
2 large eggs
2 teaspoons pure vanilla extract
For chocolate coating:
15 ounces semi-sweet chocolate (about two heaping cups of chocolate chips)
Preheat oven to 350 degrees F. Line an 8×8 square baking dish with foil and spray with non-stick cooking spray.
In a small bowl combine graham cracker crumbs and butter. Press mixture evenly into prepared pan. Bake 8-10 minutes, or until light golden and fragrant. Reduce heat to 325 degrees F.
To make filling:
Using an electric mixer, beat cream cheese and sugar until smooth, 2-3 minutes. Add in yogurt, eggs, and vanilla and beat until just combined. Pour mixture over crust and bake for 35-40 minutes, or until cheesecake is slightly puffed and center is set. Cool completely on a wire rack. Refrigerate until chilled, at least two hours. Freeze 8 hours or overnight.
To coat:
Once frozen, lift cheesecake out of pan and gently peel away foil. Using a sharp knife, cut cheesecake into 36 bite-size squares. If squares become too soft, freeze until chilled again.
Place the chocolate and coconut oil in a microwave-safe bowl and heat for 1-2 minutes, stirring every 20 seconds, until melted and smooth. Place parchment paper or a silicone baking mat on a baking sheet. Dip cheesecake squares, one at a time, in melted chocolate mixture. Let excess drip off and place on prepared sheet. Repeat for all the squares then refrigerate or freeze until chocolate is set. Store squares in an airtight container in the fridge or freezer.
Have you ever tried to type something with one hand (like a blog post, for instance) while nursing a baby, hoping that you can clear your mind and get some thoughts down before your toddler wakes up? This is probably my fifth attempt in three days to do so and I’m almost positive I’ll be interrupted by something in the next few minutes. How do you mamas of 3, 4, 5+ babies do it all?
But I will soldier on- you guys deserve some attention, too!
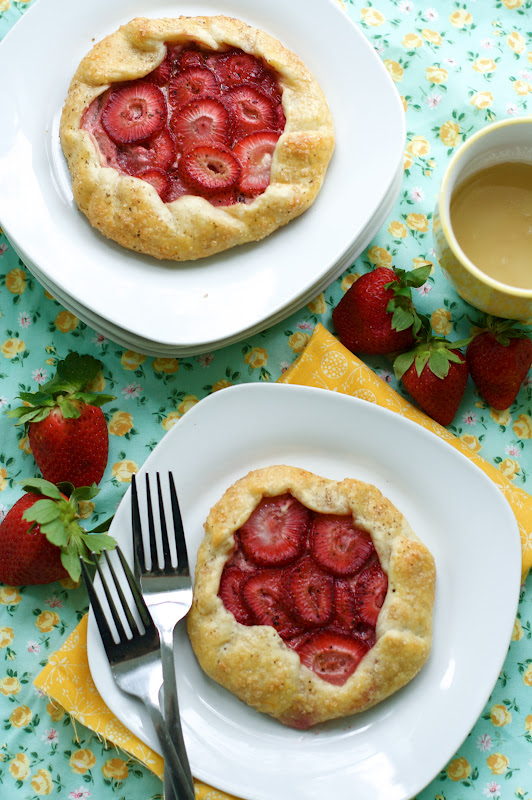
Say hello to my second round of mini galettes this week. To follow up my savory breakfast galettes, I present something a little sweeter- but not too sweet. These galettes are made with a layer of ricotta, a drizzle of honey and topped with beautiful fresh strawberries. I know I’ve lived in the South for a few years, but I still can’t believe strawberries are in season this early down here. I’m a lucky lady.
If you are a person who doesn’t like overly sweet treats, this one’s for you. You can eat it for breakfast or dessert, depending on your mood. I like it served hot with an extra drizzle of honey on top- I’m sure I would have added some ice cream or whipped cream, though, if we had any on hand. This is another great choice for brunch as well- perhaps Easter brunch?
If you don’t like the idea of the ricotta cheese, you can substitute mascarpone cheese or cream cheese as well- just make sure the cream cheese is very soft and spreadable so you don’t tear the pie dough.
I hope this recipe gets you excited for spring. Spring is my second favorite season, ya’ll (after Fall, which is the best of the best)! Spring means strawberry picking, birds chirping, playground equipment that isn’t burning hot, slightly fewer annoying bugs, sidewalk chalk, fruit in my water when I feel fancy, toenail polish, asparagus and green, green grass. Spring for the win!
1 batch pie dough (You need enough for a single crust. See this post for my pie crust comparison- http://ovenlove.blogspot.com/2011/05/pie-crust-comparison.html – Note: a store-bought crust may not make as many galettes.)
1 cup ricotta cheese
4 tsp honey
12-16 strawberries, rinsed, hulled and sliced
1 egg, beaten
coarse sugar and fresh cracked pepper for seasoning
honey, mascarpone cheese, whipped cream or ice cream for serving
Instructions
Preheat the oven to 350 degrees. Prepare a baking sheet with parchment paper.
Separate your pie dough into 4 sections. Roll each section into a small circle, about ¼ inch thick. Place your dough circles onto the prepared baking sheet.
Spread each circle with ¼ cup ricotta cheese, leaving about an inch of dough around the edge. Drizzle the ricotta with 1 teaspoon honey per galette and layer with strawberry slices. Fold up the edges of the dough, sealing the dough up around the filling. Brush the dough with the beaten egg and sprinkle with coarse sugar and black pepper.
Bake the galettes for 25-30 minutes until the crust is golden. Serve hot with a drizzle of honey, a dollop of mascarpone cheese or whipped cream, or a scoop of ice cream.
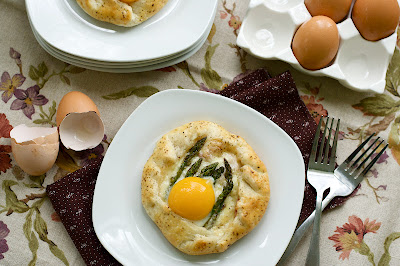
Oh, good morning, HEAVEN. How did you end up on my breakfast plate?
Ya’ll know I love me some breakfast and brunch. They’re the meals best known for being awesome. I have whipped up some tasty breakfasts and brunches in the past, but I think I hit the jackpot on this one, people. Picture it with me:
Flaky, buttery pie crust. Creamy Fontina and Ricotta cheese. Salty prosciutto. Drippy egg yolk. Roasted asparagus. And you can have them all in one bite. Droolfest 2012, my friends.
After reading this post a few months ago, I could not get the idea of a breakfast galette out of my head. I decided to make it my own by creating a single serving version- that way each person is guaranteed a good amount of crust and a whole egg yolk to themselves. I cannot get enough of drippy egg yolks, especially when they come from my own happy chickens. (Yes, all of the beautiful eggs pictured are from our fine, feathered gals in the backyard.)
I’m somewhat obsessed with the egg yolks in this recipe; but I love the asparagus, as well (it reminds me of one of my favorite spring dishes, this Asparagus and Gruyere Tart). I can think of nothing better on a spring morning than eating one of these galettes, fresh out of the oven. I downed one just minutes after I took these photos. It’s a good thing I only made two of them. It is a bit decadent, but worth every bite.
You could go vegetarian with these, but I beg you- don’t leave the prosciutto out! It adds the perfect, salty undertone to the egg yolk. It’s like bacon and eggs, only 1,000 times better. How’s that for an endorsement?
I also experimented with some sweet galettes which I’ll be showing you soon. I love galettes- they are impossible to mess up and always find a way to look fancy. Try serving them up at your next breakfast or brunch gathering- you can make them ahead, then reheat in the oven and add the egg yolks before serving. Or how sweet would it be to make these for breakfast-in-bed? You will definitely get extra points when your hubby takes a bite.
And just so you know..
This post was sponsored by Frigidaire. When you check out Suzanne Goin’s springtime recipes at www.maketimeforchange.com, Frigidaire will donate $1 to Save the Children’s U.S. programs. Plus, you’ll be entered for a chance to win the new Frigidaire Range with SymmetryTM Double Ovens – featuring two large ovens (that can each fit up to a 28 pound turkey!), providing the flexibility to cook multiple dishes at the same time at different temperatures, so you can get more on the table at the same time.
1 batch pie dough (You need enough for a single crust. See this post for my pie crust comparison- http://ovenlove.blogspot.com/2011/05/pie-crust-comparison.html – Note: a store-bought crust may not make as many galettes.)
1 cup ricotta cheese
4 slices prosciutto (about ¼ pound)
1 cup shredded Fontina cheese
1 bunch asparagus, cut off 2-3 inches below the tip (you can use the rest of the spears in another recipe)
1 egg, beaten
sea salt and fresh cracked pepper
4 egg yolks
Instructions
Preheat the oven to 350 degrees. Prepare a baking sheet with parchment paper.
Separate your pie dough into 4 sections. Roll each section into a small circle, about ¼ inch thick. Place your dough circles onto the prepared baking sheet.
Spread each circle with ¼ cup ricotta cheese, leaving about an inch of dough around the edge. Layer with a slice of prosciutto, ¼ cup Fontina cheese and a few asparagus tips (I used about 6 for each galette). Fold up the edges of the dough, sealing the dough up around the filling. Brush the dough with the beaten egg and season with salt and pepper.
Bake the galettes for 25-30 minutes until the crust is golden. Remove them from the oven, gently add one egg yolk to each galette and continue to cook for 3-4 minutes or until the yolk is set. Serve hot.
To me, planning kids’ birthday parties is one of the fun parts of parenting. I’ve always loved birthdays, but it is extra special to celebrate the little growing lives of your children. Elliott’s birthday is not actually on St. Patrick’s Day, but this year, his party was scheduled for March 17. I had two previous ideas for his party- a big red ball theme and a ‘Go Dog Go’ theme- but he outgrew them by the time his birthday rolled around. I decided to embrace the holiday and plan a green-themed “lucky day” party.
I focused more on the green idea than the St. Patrick’s Day theme, though I did throw in some shamrocks here and there for good measure. There was green food, green activities and everyone was asked to wear green to the party (the “Little Charmer” t-shirt you’ll see on the birthday boy is from Target).
I had a lot of fun coming up with the food ideas. I needed semi-healthy snack foods that were simple to throw together- you never know what will happen when you have two kids, a party to prepare for and a house to keep clean. It gets a little crazy- I’m lucky I remembered to snap these photos!
These Shamrock Shake cupcakes are some of my favorites and certainly a hit with our guests. I found the wrappers at Hobby Lobby and the pearlized sprinkles at Michael’s.
I sent everyone home with Lucky Charm Treats (made with the natural version of Lucky Charms if you’re wondering why they look a little different) and some homemade green play dough for each child (you’ll see them pictured below). I used this great tutorial from How Does She to make the play dough- it takes just a few minutes, lasts forever and is much more pleasant than the store-bought type.
I made the No. 2 pinata with this tutorial from Oh Happy Day. I filled it with chocolate coins, Creme de Menthe Hershey Kisses, stickers and small toys. It was easy to construct, but make sure you don’t tape it up too tight if you’re making it for young kids. It was a little difficult for our kids to break, even though I only used clear tape to seal it up. I made some paper shamrocks, fringed streamers and a “Lucky Number Two” bunting as well, but none of those decorations managed to show up in my photos- we were too busy enjoying ourselves!
The main activity we set up for the kids (besides the pinata) was a big balloon pit. We blew up around 150 balloons with my husband’s compressor (no way were we blowing them all up ourselves!) and corralled them in our sunroom. The kids went nuts for it! They loved “swimming” in the balloons, playing catch and kicking them into the air.
Since I was keeping things low-key, I didn’t go crazy with a cake for the birthday boy. I just baked up some of the extra cupcake batter into a small round pan and used the extra frosting to make a tiny-layer-cake version of the Shamrock Shake cupcakes. He only had one bite anyway, so I’m glad I didn’t spend much time working on it.
Even though it was a simple theme, the kids had a blast and the adults did, too- especially when we decided to break out the Guinness (it was St. Patrick’s Day, after all). Hopefully this gives you some inspiration for your next St. Patrick’s Day or green-themed party.
Happy second birthday, little man! It was your Lucky Day, but I think we are the lucky ones.
We are experiencing a crazy March heat wave down here. I am not ready for summer.
I mean, come on.. I’m not done making soup yet!
We got a big bunch of turnips last week from our farmer. At that time, it wasn’t 85 degrees, so this was the perfect lunch. I used my typical method for making smooth vegetable soups- saute some onion, add the veggies with broth and any seasonings, simmer until the veggies are tender and then puree with a stick blender. Works every time.
The soup is simple in flavor- make sure you season it well with salt and pepper or it could turn out quite bland. I made the cheese toasts on a whim- the smoky taste goes great with the simple soup.
I hope you get to try this out before it’s too hot! Or just bookmark it for next year.. it seems weird to eat turnip soup with a tank top on.
In a stockpot or dutch oven, heat olive oil over medium heat. Add onion and cook until softened, 3-5 minutes. Add garlic and cook, 1-2 minutes. Add turnips, potatoes, thyme, rosemary (tie them together with twine if you want the removal to be easier) and stock and bring to a boil. Turn the heat down and simmer until vegetables are tender, 20-30 minutes. Remove the thyme and rosemary stalks. Turn off the heat and blend with a stick blender until smooth. Season well with salt and pepper and serve warm.
Turn the broiler on high. Mix butter, cheese, paprika, salt and pepper together in a small bowl. Spread the butter mixture onto the bread. Broil for 2-4 minutes, watching carefully so they don’t burn. Serve warm.
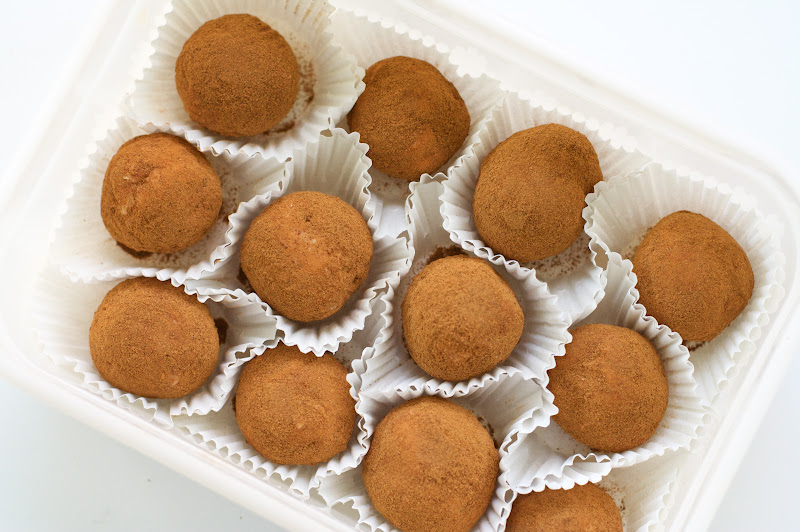
Forget the corned beef and cabbage. This is how to celebrate St. Paddy’s Day.
I’m assuming that if you’re not from Philly or Central PA, you’ve probably never heard of Irish Potatoes. Or maybe you have (sorry for assuming, you well-informed-blog-reader, you!) Either way, you’re in for a Philadelphia-style treat.
As a Pennsylvania native, I can fondly recall little boxes of Oh Ryan’s Irish Potatoes popping up in convenience stores in early March. For a long time, I just dismissed them because frankly, who wants to eat something that looks like it’s covered in dirt? Then I discovered it was cinnamon and never looked back. I have fond memories of my college roommate Fisher rushing to the 7-11 near our workplace to scoop them up for us before they sold out. So good.
This recipe doesn’t actually contain potato as an ingredient, although Wikipedia tells us that the original candies did include some cooked potato. The main ingredients here are cream cheese, sugar, coconut and cinnamon and they’re a breeze to put together.
If you’re making these for the first time, I would suggest halving the recipe like I did. I got about 16 candies and that is plenty for our house. They are pretty sweet little bites- you usually only need one (or half of one) to satisfy your sweet tooth.
This recipe is making me miss Philly and it’s St. Patrick’s Day celebrations. Shout out to my favorite Irish things in Philadelphia- the Malloys, the Irish Pub and my girl Fisher! I wish I could share these with you over a Guinness.
Beat together butter and cream cheese. Slowly add the confectioners sugar.
Add the vanilla.
Add the coconut and mix until combined.
You may want to chill the coconut mixture a little before you roll them. I like to use a small ice cream scoop. These are really rich, so you want them to be small.
Roll the coconut mixture into a ball.
Roll the coconut mixture into the cinnamon and put on a parchment lined baking sheet.
Milk Street on Instagram: "This bright red chicken and orzo soup gets rich, Turkish-inspired flavor from a few simple ingredients: tomato paste, garlic, sweet paprika, and a touch of dried mint. A simple, warming balance of spice, savoriness, and herbs. Best enjoyed with crusty bread. Get the recipe for Chicken and Orzo Soup With Garlic and Paprika via our link in bio. Photography: @cbcreativesphoto Food Styling: @tobinfood #milkstreet #milkstreetrecipes #chicken #chickenrecipes #or