So St. Patrick’s Day fast approaches.. do you celebrate?
I am in the midst of planning a very lucky, very green birthday party for my 2-year-old. His party falls on St. Patrick’s this year, so we decided to embrace the theme and get our green on. As you might imagine, we won’t be serving corned beef and cabbage to a room full of toddlers, so I decided to roast up some cabbage for us a few days early.
I wanted to add little flavor to the roasted cabbage, so I decided on a quick balsamic reduction. For a true reduction, all you need to do is put some balsamic vinegar on the stove and and wait patiently for it to reduce. I wanted something a little faster, so I added some extra sugar to move the process along. If you’re looking to try something a little bit different with your corned beef, this side dish fits the bill.
I’m not Irish and neither is my husband, but I think St. Patrick was pretty awesome- so cheers to his memory! I’m looking forward to sharing all of our St. Paddy’s party details with you next week- and if you play your cards right, I’ll have an ‘Irish’ treat for you tomorrow, too!
Preheat your oven to 375 degrees. Cover a large baking sheet with aluminum foil. Pour olive oil on the cabbage to cover. Place in one layer on the baking sheet and season with salt and pepper. Bake at 375 for 30-40 minutes or until the cabbage is soft, flipping over once during cooking.
For the reduction, combine balsamic vinegar and brown sugar in a small saucepan. Simmer over medium heat for about 15 minutes until it reaches your desired thickness. Watch it closely toward the end so it does not burn.
When the cabbage comes out of the oven, drizzle each slice with the balsamic reduction and serve immediately.
Recently, I’ve been getting into baking full-size cakes. It seems like there are never enough occasions that call for a big, beautiful cake. After having my cupcake business in Ohio, I am much more inclined to bake cakes than cupcakes now (like the rainbow cake and the strawberry cake).
Since I was experimenting with beets last week (see my sweet beet pancakes), I wanted to try out Joy the Baker‘s beet cake recipe that I’d been eyeing for a while. The recipe is similar to a basic chocolate cake with the addition of grated beets into the batter and the frosting- not too much extra effort to try something new and different.
As the beets were in the oven, I was getting a little nervous- my house was smelling like roasted dirt. But apparently, that’s normal when you’re dealing with beets. Smells were deceiving in this case- the cake certainly does not taste like dirt. Each chocolate-filled bite is strangely light and dense at the same time. You’ll have to bake it to see what I mean.
I served this cake to guests and didn’t reveal the secret ingredient until after. Everyone seemed pleasantly surprised.. or maybe just relieved that it wasn’t something worse than beets.
For the Cake: 2 medium beets, unpeeled but trimmed of their greens
1 teaspoon vegetable oil
6 ounces (3/4 cup) unsalted butter, softened, plus more for greasing the pans
1 cup packed brown sugar
¾ cup granulated sugar
2 large eggs
1 teaspoon pure vanilla extract
2 cups all-purpose flour, plus more for dusting the pans
⅔ cup unsweetened cocoa powder
1 teaspoon baking soda
½ teaspoon baking powder
1 teaspoon salt
1¼ cups buttermilk
For the Frosting: 1 cup (2 sticks) unsalted butter, softened
8 ounces (1 brick) cream cheese, softened
4 to 5 cups powdered sugar, sifted
2 tablespoons finely grated beets, mashed with a fork
1 teaspoon pure vanilla extract or scrapings of one vanilla bean pod
1-2 teaspoons milk, depending on desired consistency
½ teaspoon fresh lemon juice
pinch of salt
Instructions
Place a rack in the center and upper third of the oven. Preheat oven to 375 degrees F.
Thoroughly wash beets under running water, and trim their leaves, leaving about ½ inch of stem. Place clean beets in a piece of foil. Drizzle with just a bit of vegetable oil. Seal up foil. Place on a baking sheet in the oven. Roast until beets are tender when pierced with a knife, about 1 hour.
Remove the beets from the oven. Open the foil and allow beets to cool completely. Beets will be easy to peel (just using a paring knife) once completely cooled.
Using a box grater, grate the peeled beets on the finest grating plane. Measure ¾ cup of grated beets for the cake and 2 tablespoons for the frosting. Set aside.
Reduce the oven temperature to 350 degrees F. Use butter to grease two 8 or 9-inch round baking pans. Trace a piece of parchment paper so it is the same size as the bottom of the cake pan. Cut it out and place inside the cake pan. Butter the parchment paper. Add a dusting of flour to coat the pan. Set pans aside while you prepare the cake.
In the bowl of an electric stand mixer, fitted with a paddle attachment, cream together butter and sugars. Beat on medium speed until pale and fluffy, about 3 to 5 minutes. Beat in eggs, one at a time, for one minute after each addition. Stop the mixer and scrape down the sides of the bowl as necessary. Once eggs are incorporated, beat in beets and vanilla extract until thoroughly combined.In a medium bowl, whisk together flour, cocoa powder, baking soda, baking powder, and salt.
Add half of the dry ingredients to the butter and egg mixture. Beating on low speed , slowly add the buttermilk. Once just incorporated, add the other half of the dry ingredients. Beat on medium speed until milk and dry ingredients are just incorporated. Try not to overmix the batter. Bowl can be removed from the mixer and mixture folded with a spatula to finish incorporating ingredients. Cake batter will be on the thick side… not pourable.
Divide the batter between the two prepared cake pans. Bake for 23 to 25 minutes (for a 9-inch pan) or 30-32 minutes (for an 8-inch pan). Cake is done when a skewer inserted in the center comes out clean. Remove cakes from the oven and allow to rest for 10 minutes. Invert cakes onto a cooling rack to cool completely before frosting and assembling the cake.
To make the Frosting: In the bowl of an electric stand mixer, fitted with a paddle attachment, beat cream cheese for 30 seconds, until pliable and smooth. Add the butter and beat for another 30 seconds, until well combined. Stop the mixer and scrape down the bowl as necessary. Beat in the beets. Add the powdered sugar, vanilla extract, milk, lemon juice, and salt. Beat on medium speed until smooth and silky. Refrigerate the frosting for 30 minutes before frosting the cooled cakes.
To assemble the cake, place one layer of cake on a cake stand or cake plate. Top with a generous amount of pink frosting. Spread evenly. Place the other cake on top of the frosting. Top with frosting. Work frosting onto the sides of the cake. You will have extra frosting left over. Refrigerate for an hour before serving (it will make the cake easier to slice). Cake will last, well wrapped in the refrigerator, for up to 4 days.
Reasons to try this recipe: It’s full of healthy greens.
Dark, beautiful, curly kale and a little family-friendly broccoli. I like greens on their own, but when you add pasta and cheese? That’s a win.
It’s freezable.
I made the full recipe; baking up half of it for our meal and freezing half of it for a future dinner. I love that I only had to cook once, but I get to eat it twice (and not as leftovers). It’s tasty.
Big bites of pasta, creamy ricotta cheese, perfectly moist chicken and dark, flavorful greens. Pair it with a salad and you can feel great about what you’re feeding your family.This is a solid weeknight meal- try it soon.
(And do not fear the kale! It’s your body’s best friend, I swear.)
adapted from Martha Stewart- http://www.marthastewart.com/862208/chicken-and-kale-casserole
Author: Oven Love
Recipe type: Main
Serves: 4
Ingredients
¾ lb. large or jumbo pasta shells
2 tablespoons olive oil
1 large onion, diced
3 garlic cloves, minced or pressed
1 bunch kale, stems and ribs removed, coarsely chopped
1 head broccoli, chopped into florets
2 cups cooked chicken, shredded or chopped
1 large container ricotta cheese
zest of 1 lemon
¾ cup grated Parmesan cheese
Instructions
Preheat oven to 350 degrees. In a large pot of boiling salted water, cook pasta according to package instructions. Drain; return to pot. In a large skillet, heat olive oil over medium-high. Add onion and garlic; cook until onion is beginning to soften, 4 minutes. Add kale and broccoli, cover, and cook until almost tender, about 5 minutes. Transfer to pot with pasta.
Stir in chicken, ricotta, lemon zest, and ½ cup Parmesan; season with salt and pepper. Transfer mixture to a 9-by-13-inch baking dish; top with ¼ cup Parmesan. Bake until top is golden, 30 minutes.
To freeze: Cook pasta al dente according to package instructions. Drain and rinse with cold water; return to the pot. In a large skillet, heat olive oil over medium-high. Add onion and garlic; cook until onion is beginning to soften, 4 minutes. Add kale and broccoli, cover, and cook until almost tender, about 5 minutes. Transfer to pot with pasta. Stir in chicken, ricotta, lemon zest, and ½ cup Parmesan; season with salt and pepper. Transfer mixture to a 9-by-13-inch disposable baking dish (or two 8-by-8-inch baking dishes); top with ¼ cup Parmesan. Let cool to room temperature, cover with aluminum foil and freeze.
To reheat from frozen: Bake casserole (straight from the freezer) at 350 degrees for 60-90 minutes or until completely warmed through, removing the foil for the last 20 minutes of baking. You can also thaw in the fridge the day before and bake at 350 for 30-45 minutes.
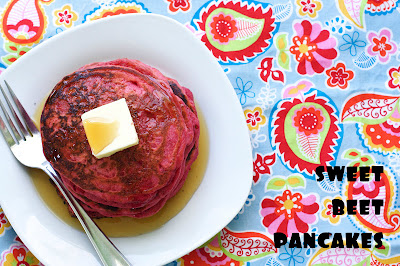
If you told me five years ago that I’d be recommending that you eat beets in any form, I would have laughed in your face. But here I am, about to tell you why you need to make beet pancakes- and soon.
This weekend, I had my first experience cooking with beets. Hubs brought home four beets for me from our farmer (Hilton) and I knew it was time to experiment. Is it weird that I am not ready to eat a plain roasted beet, and that I’d rather put it in a pancake first? Weird or not, that’s what I did. I roasted those babies up, trimmed and pureed them (all with GLOVED hands, which I highly recommend unless you want stained beet fingers), and mixed them up into my batter.
The verdict? Sweet and delicious. Hubs thought they could use a little extra syrup, but I didn’t think the earthiness of the beets came on too strong. The little guy enjoyed them, too (that means he actually took a few bites and didn’t run the other way asking for M-I-L-K).
If you’re new to beets, too, I would encourage you to start with this recipe. It’s a fairly safe introduction into the world of beets. Some day soon, I hope to face my fears and actually eat a beet on its own.. but until then, I’ll be sitting down to a plate of these sweet, pink cakes.
P.S. Like most pancake recipes, these are freezable!
Lesson learned so far in life with two babies: sometimes you will just need to make cookies.
In some ways, parenting two has been easier than I thought. I bounced back from the birth easier, I am actually able to get us all out of the house in a decent amount of time, I can manage them both by myself. Some days I think I’m doing pretty great at this mom thing. Other days, when one is screaming, then the other is screaming, then they’re both screaming.. well, cookies happen.
These cookies have been on my list to try for a long time. They didn’t turn out quite like Joy’s, but I like the changes I made and they sure are addicting. I love the addition of coconut to a basic chocolate chip cookie, but the browned butter and coconut oil mixture takes this one over the top. My cookies didn’t spread much, so I like to think of them as little nuggets of deliciousness (see recipe below for my thoughts on that).
So the next time you’re having one of those days with all the screaming, make these cookies after things quiet down. They’ll help you forget all about it.
adapted for Joy The Baker- http://joythebaker.com/2011/04/brown-butter-toasted-coconut-chocolate-chip-cookies/
Author: Oven Love
Recipe type: Dessert
Serves: 24
Ingredients
¼ cup shredded coconut (sweetened or unsweetened)
1 stick unsalted butter
4 oz coconut oil
1 cup granulated sugar
¾ cup brown sugar
1 tablespoon pure vanilla extract
1 cup whole wheat or white whole wheat flour
1½ cups all-purpose flour
¾ teaspoon baking soda
½ teaspoon fine grain salt
1 large egg
1 large egg yolk
1 cup chocolate chips
Instructions
Place a rack in the center and upper third of the oven and preheat to 350 degrees F. Line two baking sheets with parchment paper. On one baking sheet, spread out shredded coconut. Toast coconut for 4-6 minutes, until browned and fragrant. Sweetened coconut will brown faster, so watch it carefully. Remove from the oven, place in a small bowl and let cool.
Melt butter and coconut oil in a medium saucepan over medium heat. The butter will begin to foam and crackle. That’s a great sign. That means that the water is evaporating from the butter. Once the crackling subsides, keep an eye on the butter. The butter solids will begin to brown. You’ll smell the butter as it browns. Once well browned, immediately remove the butter from the flame and place in a small bowl. Removing the butter from the pan will ensure that it doesn’t continue to cook and burn in the hot pan. Allow the butter to cool for a few moments.
**Joy suggests using ¾ cup of the melted butter mixture- I got closer to 1 cup but used the ¾ cup and my dough was a little drier than I’d like, so I would suggest trying the full amount. I think this is why the cookies didn’t spread much.**
In a medium bowl, whisk together flours, baking soda and salt. Set aside.
In the bowl of an electric stand mixer, fitted with a paddle attachment, measure granulated and brown sugar. Add the brown butter mixture and beat together, on medium speed, for about 2 minutes. The sugar may still look grainy. That’s ok.
Add the egg and egg yolk and beat on medium speed for 2 minutes. The mixture should become silky smooth. Add vanilla extract and beat.
With mixer on low speed, add the dry ingredients. Beat until just incorporated. Remove the bowl from the mixer and use a spatula to fold in the toasted coconut and chocolate chips. Dough will be thick.
Cookies can be baked immediately, or the dough can be left in the refrigerator to chill for 30 minutes.
Spoon balls by the tablespoonful onto the prepared baking sheets. Bake for 10 to 12 minutes, until golden brown but still slightly soft in the center. Remove from the oven. Allow the cookies to cool on the pan for 5 minutes, before removing to a wire rack to cool completely.
Hilton is a local farmer who has recently set up shop in our town, selling his organic vegetables to people like me who are dying to have a real farmers’ market. For $20, you bring your own bag and he fills it to the brim with produce. This week, I came home with green beans, tomatoes (red and green), a variety of sweet and hot peppers, turnips with greens, cucumbers, broccoli, oranges, spinach, butternut squash, carrots and onions.
I love this method (similar to a CSA, really) because I end up getting vegetables I wouldn’t normally think to pick up (this week, that was turnips). New veggies usually lead me to new recipes- and on cool days, that means new soups. I like to use the vegetables as the center of the dish- not just the side show. The method for this soup is typical- saute some onion and herbs, add your firmer veggies with liquid and simmer for a while, then add your greens and beans and heat through. The result is a nice balance of savory flavors with a light sweetness from the squash and turnips.
Of course, like most of my recipes, you can certainly customize this recipe to fit what’s in your refrigerator or CSA box. I’m sure I’ll be recreating this soup again in the coming weeks- and I can’t wait to find out what shows up in my bowl.
Farmer’s Soup with Turnips, Spinach and Butternut Squash
1 small butternut squash, peeled, seeded and chopped
2 medium turnips, peeled and chopped
1 can diced tomatoes
3-4 cups chicken or vegetable broth
1 can garbanzo beans or white beans, rinsed and drained
1-2 cups fresh spinach
grated Parmesan cheese and crusty bread, for serving
Instructions
In a large sauce pot, heat olive oil over medium heat. Add onion and cook until soft, 3-5 minutes. Add garlic and thyme; season with salt and pepper to taste. Next, add the squash, turnips, tomatoes and broth (use as much liquid as you see fit) and bring to a boil. Return the soup to a simmer and cook for about 20 minutes or until the squash and turnips are fork tender. Add the beans and spinach and let simmer another 5-10 minutes. Serve hot with grated Parmesan cheese and crusty bread.
I am very excited to share this idea with you today! If you are looking to streamline your morning routine or looking for a quick and healthy mini-meal or snack for the kids, pay attention! This is a good one.
I was inspired to make these frozen smoothie bags by The Tidy Nest‘s make-ahead freezer smoothies and Muffin Tin Mania‘s green smoothie cups. I love having ready-made smoothies waiting in the freezer instead of pulling out tons of ingredients and making a big mess. All you need to do is empty the contents of your bag into a blender and add juice or milk until you reach your desired consistency. Easy and healthy- a win/win.
The green smoothie cubes are my favorites (you’ll find the procedure for freezing yogurt and the green cube recipe at the end of the post). If you haven’t been brave enough to try a green smoothie yet, I assure you that the greens give each smoothie a healthy punch without changing the flavor. It’s a great way to add greens to your diet if you or your kids* don’t typically enjoy their taste.
*Kid Tip- if your kids won’t touch anything green in color, put one of these smoothies in a cup with a lid where the color is undetectable and they’ll never know the difference! I also recommend these Sili Squeeze containers if your kids like the disposable squeeze pouches- I fill them up with smoothies and my little guy loves it.
Here are a few of the smoothie bag combinations that I like to have on hand.
Tropical Smoothie Bag:
pineapple, mango, banana and yogurt cubes. add orange juice or coconut milk.
(if you omit the mango and use coconut milk, you’ve got a Pina Colada bag!)
Green Smoothie Bag:
kiwi, pineapple, banana, green cubes and yogurt cubes. add white grape juice or milk.
(you can also add other green items- celery, green apple, etc.)
Mango Berry Smoothie Bag:
strawberries, raspberries, mango, green cube and yogurt cubes. add orange juice or milk.
Here are a few other ideas for smoothie combinations:
Blue Banana Smoothie Bag: blueberries, bananas and yogurt cubes. add pomegranate juice.
If you’re wondering how much of each item to add to your bag, don’t worry too much about it. Each of my bags has about 1-2 cups of fruit, a few yogurt cubes (depending on the size) and 1-2 green cubes. The amount of smoothie that you get with each bag will vary anyways, depending on how much liquid you add, so don’t worry about exact measurements. Just have fun with it!
*Note: If you’re wondering what mold I used to get the bigger yogurt cubes, I use these Beaba freezer trays. These are excellent for freezing purees of any kind, especially if you want a larger portion than what you can get with an ice cube tray. The little heart cubes are made using a heart mold from the $1 section at Target and the green cubes are made with a silicone mini-muffin tray like this one.
Procedure for Freezing Fresh Fruit:
Wash fruit well and pat dry. Cut off any unwanted skins or stems. Chop into small slices or pieces and place on a baking sheet. Do not allow the fruit pieces to touch each other. Freeze until firm. Remove from the baking sheet and place in a freezer-safe plastic bag and store in the freezer. Procedure for Freezing Yogurt:
Spoon or pour yogurt into a mini-muffin tin, ice cube tray or flexible silicone mold. Freeze until firm. Let sit at room temperature for a few minutes and remove from the mold (try to avoid running hot water over the mold, it can melt the yogurt). Place in a freezer-safe plastic bag and store in the freezer.
Green Smoothie Cubes
by Oven Love
Ingredients:
leafy greens of your choice- spinach, kale, swiss chard, etc
liquid of your choice- yogurt, milk, juice or water
In the bowl of a food processor or blender, combine the greens and liquid. Process until smooth, adding extra yogurt or liquid as needed. Spoon or pour the green mixture into a mini-muffin tin, ice cube tray or flexible silicone mold. Freeze until firm. Let sit at room temperature for a few minutes and remove from the mold (try to avoid running hot water over the mold, it can melt the mixture). Place in a freezer-safe plastic bag and store in the freezer.
If you are looking to make something sweet today, here are some of my favorite Valentine’s appropriate treats from the archives. There’s something for everyone- strawberry lovers, chocolate lovers, ice cream lovers, and breakfast-in-bed lovers alike. Enjoy!
If you spend any time on these vast internets searching for recipes (which you probably do since you’re reading this blog), you may have noticed the trend in bite-sized snacks. There are the sweeter types like cake balls/cake pops and cookie dough balls as well as healthier versions like raw energy balls. I’ve been wanting to create my own version for quite a while, and I finally got around to experimenting.
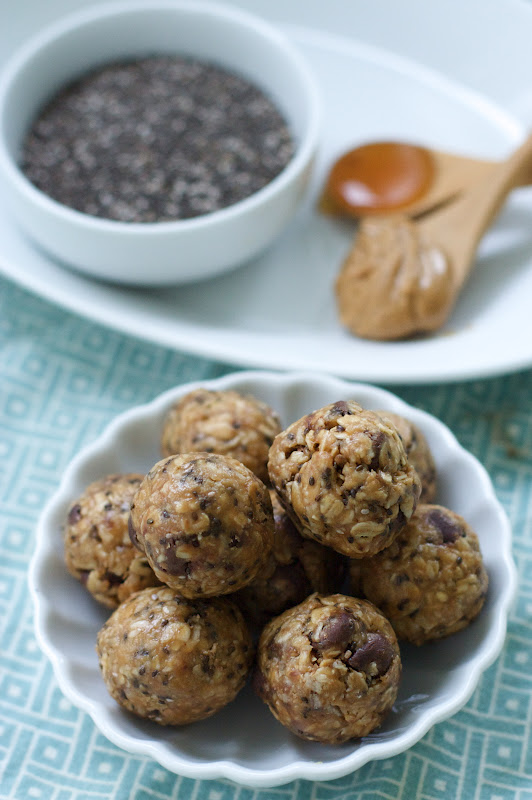
My version has the typical granola bar-type ingredients- oats, peanut butter, honey and chocolate chips- but also includes something a little different.
Have you heard of chia seeds?
I know you’ve at least heard of Chia Pets, so let’s start there. Yes, chia seeds are the same seeds that sprout like magic on those crazy old planters. But what you might not know is that they are the latest trendy ingredient in the health food world. The seeds are rich in Omega-3 fatty acids, full of fiber and contain a variety of essential minerals. They are comparable to flax or sesame seeds and are especially popular in the world of gluten-free baking (you can make a slurry of chia seeds and water that acts as an egg replacer).
The folks at Bob’s Red Mill just started carrying chia seeds and were kind enough to send me some to experiment with. I tried two variations of these energy bites- the recipe you see here and a second version using dates and coconut as the base (similar to a Larabar). The coconut version did not set up as well as I’d hoped and didn’t taste nearly as delicious as these bites do. I really love the way this recipe turned out.
I hope you’ll give these little bites a try. They have just the right amount of sweetness to be considered a treat and enough healthy ingredients to make you feel good about eating them. I would especially recommend them for pregnant, nursing or just plain busy mamas- they give you a great boost of energy and will satisfy your hunger on the craziest of days. Enjoy!
Mix all ingredients together in a large bowl. Let chill in the refrigerator for 30 minutes or more. Remove them from the fridge, use a small cookie scoop to create uniform portions and roll into balls. Store in an airtight container in the fridge. Makes about 4 dozen bites.
Hello, Oven Lovers! I’m Jessica (from Jessica Lynn Writes and The Tale of Two Kitchens) and I’m so happy to be here today! I know Natalie from my days of living in Georgia, and as much as I love living my new digs in Italy, I miss seeing her face almost every day and getting to taste all the delicious creations she makes in the kitchen.
I’m thrilled she asked me to pinch-hit for her while she soaks up some quality time with her new bundle of joy, Lucy, but I have to be honest: she left me with some very large oven mitts to fill; Natalie simply rocks in the kitchen. I wracked my brain figuring out what to share with you, but then, as I made this dish for the umpteenth time, I realized it would be perfect.
This is what I’d take over to her family one night if I still lived near her so she wouldn’t have to worry about dinner. It’s actually what I’ve been taking to all the new parents out here—it turns out Italy is the place to have babies.
This Chicken Parm Bake is unbelievably easy and so delicious that I almost don’t want to let the secret out. I love that there’s virtually nothing to clean up, it can be put together in no time, and even though it’s baked it has more flavor than some chicken parms I’ve tasted in restaurants. True story.
Truth be told, you can guestimate and just wing-it with the measurements (enough oil to cover the bottom, half a jar of sauce, plenty of cheese to please, etc.), and if I’m making it for someone else I use a foil container so it can go straight from the oven over to their house.
1 pound chicken breast, chopped in bite-sized pieces (can use whole tenderloins if you want to make it even easier)
½—1 Tbs olive oil
2 or 3 garlic cloves minced
¼ tsp red pepper flakes (optional)
salt and pepper to taste
2 cups favorite pasta sauce (about half a jar)
5-10 basil leaves, julienned (or ½ teaspoon dried basil)
8 ounces shredded mozzarella (divided)
4 ounces Parmesan (divided)
5-ounces package, croutons
Instructions
Preheat oven to 350F (180C). In a casserole dish (square, small size, or even individual dishes), mix olive oil, crushed garlic and red pepper flakes; spread mixture around to bottom of the dish. Place chicken on top of oil; sprinkle with salt and pepper.
Pour marinara sauce over chicken; spread evenly to cover. Sprinkle chopped basil over sauce. Cover sauce with ¾ of the cheese (mozzarella and Parmesan).
Next, cover every nook and cranny with croutons. Steal one crouton, eat it, and enjoy. Sprinkle the rest of the cheese over the croutons.
Bake, uncovered, for about 30 minutes or until cheese is golden brown and starts to bubble and meat reaches an internal temperature of 155 degrees. (If meat isn’t fully cooked yet—usually if you’re cooking them frozen or whole, cover with foil and continue cooking until meat is cooked.)
Milk Street on Instagram: "This bright red chicken and orzo soup gets rich, Turkish-inspired flavor from a few simple ingredients: tomato paste, garlic, sweet paprika, and a touch of dried mint. A simple, warming balance of spice, savoriness, and herbs. Best enjoyed with crusty bread. Get the recipe for Chicken and Orzo Soup With Garlic and Paprika via our link in bio. Photography: @cbcreativesphoto Food Styling: @tobinfood #milkstreet #milkstreetrecipes #chicken #chickenrecipes #or