Sprinkled Chocolate Thumbrint Cookies

Good morning, all! How are your holiday sugar hangovers?
Today I’ve got some more sugary treats for you in honor of the Great Food Blogger Cookie Swap, hosted by the fabulously talented Lindsay of Love and Olive Oil and Julie of The Little Kitchen. I have had the pleasure of meeting these two darlings in real life and I couldn’t say no when I heard they were putting this fun swap together.

After some deliberation, I started my search for a great thumbprint cookie recipe, hoping to replicate my favorite sprinkled Christmas cookies from the Oakmont Bakery in Oakmont, PA. My 8-month-pregnant self will unfortunately not be traveling back to PA this Christmas, so I needed a good substitute anyways (wouldn’t want to send myself into a nostalgic/hormonal tailspin).

Once I found my base recipe, I then decided that I would use said recipe for another cookie exchange and a weekend get-together. I ended up making at least 10-12 dozen of these little guys within a week’s time. Needless to say, I will be finding tiny sprinkles all over my kitchen for at least the next year.
And let me just say that I will never again participate in two cookie exchanges at one time. One is more than enough. I have dozens upon dozens of cookies on my counter just staring at me, begging to be eaten, talking to me in my sleep (not that I’m actually getting any), making my toddler crazy (since they are just out of his reach) and giving me tummy aches. The cookies I received from my blogger matches were very yummy, though. I got New Orleans Praline Disks from Of Cabbages and King Cakes, Candy Cane Chocolate Chip Cookies with Sea Salt from Bonnie the Baker and Peppermint Sables from Daily Nibbles. My little sprinkled cookies were sent off to The Cookie Monster, Food Victorian, and Sorelle e Cibo.
And while I’m being chatty, can I say that sprinkled cookies are a pain to photograph? Especially with the dark chocolate spot in the middle. These two pictures are all I could salvage from a ton of photos. I’d love any tips if you’ve got them!
Hope you give these cookies a try this Christmas. They’re simple enough to make in large batches (trust me), but special enough to stand out on your cookie tray. Thanks again to Julie and Lindsay for putting this event together!
Sprinkled Chocolate Thumbrint Cookies

Prep time
Cook time
Total time
basic recipe via Technicolor Kitchen- http://technicolorkitcheninenglish.blogspot.com/2009/07/chocolate-thumbprints.html
Author: Oven Love
Recipe type: Dessert
Serves: 24
Ingredients
- For the cookie dough: ½ cup (113g/1 stick) unsalted butter, room temperature
- ½ cup (70g) confectioners’ sugar, sifted
- ¼ teaspoon salt
- 1 teaspoon pure vanilla extract
- 1 ¼ cups (175g) all-purpose flour, sifted
- For the decoration and chocolate filling: Sprinkles, nonpareils or sanding sugar of your choice for decoration
- 2 tablespoons (28g) unsalted butter, room temperature
- 56g (2oz) semisweet chocolate, chopped
- 1 teaspoon light corn syrup
Instructions
- Preheat the oven to 350ºF; line two baking sheets with baking paper or silicone baking mats.
- In the bowl of an electric mixer fitted with the paddle attachment, beat together the butter, sugar, salt, and vanilla on medium-high speed until smooth, about 2 minutes. Beat in flour, beginning on low speed and increasing to medium high, until a dough forms – it won’t be sticky.
- Roll dough into balls. Dip each ball into your sprinkles or other decoration, making sure to get even coverage all around. Place onto prepared sheets. (At this point, you can make a pre-thumbprint to be sure your holes are deep enough, or you can wait to do it after the next step). Bake for 10 minutes, remove from oven, and press thumb into tops of cookies to make indentations. Return to oven, and bake until light brown on the edges, 7 to 9 minutes more. Remove to a wire rack to cool.
- While the cookies are cooling, combine chocolate, butter, and corn syrup in a small heatproof bowl. Microwave at 30 second intervals until melted or set over a pot of simmering water; stirring occasionally until melted and smooth. Allow to cool and thicken slightly. When cookies are cool, fill the thumbprints with the chocolate mixture. Let the chocolate set before serving.
Santa Hat Snack Mix
Christmas is here!
That means stuffing your face with sugar for a whole month. No matter how hard you try to avoid it, there are treats everywhere this time of year. So I’m just jumping on the bandwagon and sharing another one with you.

I am loving this little snack mix! It is a little more time consuming than your typical Chex mix, but it’s worth it. I made it for our second annual gingerbread party (post forthcoming) and it was a big hit with all of the already sugared-up guests.
The best part is the little Santa hats. They’re made from Caramel Bugles (didn’t even know they existed until I found this recipe) dipped in red chocolate melts, with a few sprinkles and a marshmallow to top it all off. The Bugles have this salty sweet thing going that is awesome- I think next time I’ll just eat a bowl of the Santa hats and call it a day.

After you’ve prepared the Santa hats and let them dry, you just pour melted white chocolate over the rest of your ingredients, mix, let dry and then throw in the Santa hats and some Christmas M&Ms. This is a great recipe to take with you to potlucks and parties since it’s easy to travel with. Just make sure you don’t eat it all in the car.

Thank you, Cookies & Cups, for this great idea!
Santa Hat Snack Mix
via Cookies and Cups
For the Santa hats:
- 1 bag Caramel Bugles (or regular, if you can’t find them. they’re typically near the ChexMix at the store)
- Red melting chocolate disks (one bag should be sufficient)
- 1 tablespoon shortening
- Mini marshmallows (just a handful is enough)
- White nonpareil sprinkles
Melt the candy melts and shortening together in 30 second intervals in your microwave until melted. As soon as everything is melted, start dipping the Bugles into the chocolate, letting the excess chocolate drip off. Let them set up until firm on parchment or wax paper.
When the Bugles are set, remelt the red chocolate if necessary and dip just the bottom of the Bugles into the white sprinkles. Then flip the Bugle over and dip the top in red chocolate and firmly press a mini marshmallow on top. Let set again on the parchment or wax paper.
For the snack mix:
- Your Bugle Santa hats (see above for procedure)
- 3 cups mini pretzels
- 1/2 cup dried cranberries
- 1 cup salted dry roasted peanuts
- 2 cups Rice Chex
- 2 cups holiday M&Ms
- 8 oz white chocolate
Spread all of your ingredients, except M&Ms, out on a large baking sheet lined with parchment or wax paper. Melt the white chocolate according to package directions and drizzle over the ingredients. Use a spatula to mix and cover the ingredients evenly with white chocolate. Allow the mix to dry on the baking sheet. When the chocolate is set, break the pieces up and sprinkle the M&Ms and Bugle Santa hats over the mix. Transfer to a serving bowl and enjoy!
My Thanksgiving 2011 Menu
Yikes! It’s already Thanksgiving week. Anyone else feeling like it just popped up out of nowhere? I got my grocery shopping out of the way today (that’s probably late for some people, but I like to have things fresh, including the bird) and somehow missed the crowds. Now all I have to do is plan out my cooking timeline.. and then find the energy to stay on my pregnant feet to make all of this food with one arm most likely useless (thank you, needy/lovey/curious teething toddler).
This will be my second year hosting at our house in GA, and we’re expecting a good 10+ guests. I’m excited to try out some new recipes and bring back some old favorites. Here’s what’s on our menu this year:

From right here on Oven Love. Complete post with all your questions answered! Can’t have Thanksgiving without the big bird.
-Mashed Potatoes
I don’t have a specific recipe for these.. my apologies. I watched my grandparents make them together so many times that it is a bit like second nature. I just boil up diced potatoes in salted water until fork-tender, drain, mash, and add enough milk, butter and salt until I’m satisfied with the taste. I was considering making potatoes gratin this year, but then I got sad thinking that I couldn’t drown those in gravy.. so mashed potatoes it is!

I am excited to try this new stuffing recipe! I usually don’t go the cornbread route, but it just sounded too good to pass up. Plus I’ve got lots of Georgia pecans on hand to use.. yum.

I chose this because it looks similar to my grandma’s recipe- we’ll see how it stacks up. I’m not really sure why I didn’t just ask for her recipe.. but I’ll work on that for next year.
This is an original Oven Love recipe, but I haven’t blogged about it in it’s own post- just in an old post about my sister-in-law’s bridal shower. It was a hit there and I’ve made it many times since, but never had a chance to share. Maybe I can get a good shot of it this year so you can see how good it looks! My mom was not a brussel sprout fan, and this year she requested this dish- it changes people.

Truth gun- my favorite reason to make cranberry sauce is so I can make the cranberry shortbread cake with the leftovers. I also think anything that comes out of a can looking like a can is unacceptable at the dinner table.

I love seeded rolls and was so happy to find these. I usually make honey whole wheat rolls, but this year I’m giving these a try instead. With a big smear of honey butter..

I’ve completely forgotten what recipe I used for pumpkin pie last year, so I’ve found a new one to take its place. This blogger raves about it, so I’m looking forward to tasting. It also looks like it sets up very well, which is my main fear when baking pies.

I made this cake a few weeks ago and it disappeared very quickly. The husband’s birthday falls on Thanksgiving Day this year, and this cake was one of his requests. We enjoyed it without the caramel glaze last time, so I will be interested to see if we like it better glazed or plain (I’m pretty sure I’m voting glazed.. no brainer for me.)

Since there will be a few pregnant gals in attendance at our meal, I wanted to provide a fun drink option for those of us who won’t be indulging in wine or homebrews. Every apple cider punch link I found led me to the same recipe, so I think it’ll be a winner.
I’m about 127% sure I won’t be posting again until after Thanksgiving, so have a delicious holiday and make sure all of your loved ones know how grateful you are for them. Happy Thanksgiving!
*Disclaimer- all photos with outside links were taken from each corresponding website and were not taken by me, unless the link is to another Oven Love post (the cranberry sauce, for example). Credit goes to all of the wonderful photographers above!
Pins, Pregnancy and a Dead Camera
I am going to skip all the excuses and just share a little life with you today. We have just hit the THIRD trimester recently and I am baffled at where the time has gone with this second little baby in my tummy. My time lately has been spent just doing life- getting through the day with a silly, rambunctious toddler; going to a record number of baby showers (SIX this month, one of which I hosted- it’s seriously a baby boom); organizing the house and finishing up our last renovation projects; getting back into my cooking groove and enjoying the fall weather (finally).
Other things happening:
-Our chickens are laying eggs like crazy! I don’t even think I told you we had chickens, but we do- 12 layers living it up in our backyard. I love the fresh eggs, but I must confess that I hate feeding them. Those girls have a lot of attitude when they’re hungry!
-My camera is dead. It just refuses to turn on. This, among laziness and poor time management, is one of the main reasons I haven’t been updating the blog or documenting anything recently. Aside from my camera, all we have to take photos with are our phones. Hubs has an iPhone, which is okay, but I just don’t like taking food photographs with anything but a real deal camera. The plan is to see if Canon can fix it.. if not, we’ll have to start hunting for something new. I really would love to show you what I’ve been cooking up lately!
-I, like so many of you, am really enjoying the inspiration found on Pinterest. If you’d like to follow me, you can find me under @missnatalieh. So in lieu of any new original recipes today, I wanted to share two treats I’ve pinned recently on my “Love Food” board:Midnight Black Chocolate Pudding. I want to try this so badly- I have been craving some chocolate pudding, but I have to get my hands on some black onyx cocoa powder first.

Cinnamon Roll Baked Oatmeal. Two of my favorite dishes combined! I love the ease of baked oatmeal, but it’s genius to add cream cheese frosting. Excuse me while I go make this immediately!

So there’s a little update on Oven Love if you’ve been wondering. Here’s hoping the camera gets fixed soon and I can get back to business.
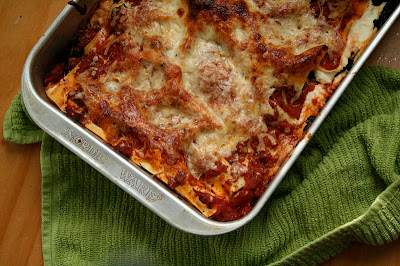
Spicy Kale Lasagna

Mmm.. I am having good memories of this lasagna.
Are you ready for cool weather comfort foods? I’m sure you northerners are. I’m getting in the mood myself, but the southern weather is getting in the way! This lasagna is a great way to transition into fall- not too heavy, since there’s no meat involved. Some vegetarian lasagnas leave something to be desired, but I really love this version- very filling and you don’t miss the meat at all.

I want to tell you more about this lasagna, but there’s a crazy, silly toddler making it difficult to hear myself think. So you’ll just have to trust me on this one!
Tell me, though- what cool weather dishes are you looking forward to?

Spicy Kale Lasagna
Prep time
Cook time
Total time
adapted from Annie’s Eats- http://annies-eats.net/2011/03/01/spicy-kale-lasagna/
Author: Oven Love
Recipe type: Main
Serves: 10
Ingredients
- 1¼ lbs. kale (or spinach), stems removed
- 3 tbsp. olive oil
- 3 cloves garlic, minced
- 1 tsp. red pepper flakes
- 1 (28 oz.) can crushed tomatoes, (preferably with herbs)
- 1 (15.5 oz) can tomato sauce
- 2 tsp. kosher salt, divided
- 1 tsp. lemon juice
- 4 cups cottage cheese (I usually use a mix of cottage cheese and ricotta)
- ¾ cup grated Parmesan cheese, divided
- 2 cups shredded mozzarella cheese, divided
- ¾ tsp. pepper
- 16 no-boil lasagna noodles (or noodles cooked according to package directions)
Instructions
- To prepare the kale, bring a large pot of salted water to boil. Add the kale to the pot and boil for 2 minutes. Drain and rinse with cold water until cool enough to handle. Wrap the kale inside a clean kitchen towel and wring out as much excess liquid as possible. Chop roughly, season with salt and pepper, and set aside.
- To make the tomato sauce, combine the oil, garlic, red pepper flakes and 1 teaspoon of kosher salt in a cold saucepan. Heat over medium-high, stirring frequently. Once bubbling, cook for about 30 seconds. Mix in the crushed tomatoes and tomato sauce, reduce heat and let simmer 5-10 minutes. Remove from the heat and stir in the lemon juice.
- To make the cheese mixture, strain all of the liquid out of the cottage cheese. (I used a fine mesh strainer and pressed down to remove the liquid.) Mix in ½ cup of the Parmesan, 1½ cups of the mozzarella, 1 teaspoon salt and the pepper.
- Preheat the oven to 375˚ F. To assemble the lasagna, add a thin layer of the sauce to the bottom of a 9 x 13-inch baking dish. Cover with a layer of noodles, then half of the cheese mixture, half of the kale, and half of the remaining sauce. Add another layer of noodles, the remaining cheese mixture, and the remaining kale. Top with the remaining noodles, then the remaining sauce. Sprinkle with the remaining ½ cup mozzarella cheese and ¼ cup Parmesan.
- Bake for 45 minutes, until bubbly and browned. Let stand at least 10 minutes before slicing and serving.
Fall Harvest Salad

Can you believe I got off my pregnant behind (well, I guess I’m still on it) to write you a post today? Things have been nuts/bananas around here lately- pregnancy drama-rama, busy schedules, all of that. I have sort of lost my cooking mojo lately, to be honest. I joined a little freezer co-op a few months ago and we get so much freezer food that I hardly ever cook anymore. I’m starting to really miss the kitchen.. I think I’m going to quit the ol’ freezer co-op soon so I can get back to my roots and start sharing with you again.

I’d like to say I made this recently, but it’s been waiting for you in the archives for quite some time. I love these flavors and I’m really getting in the mood for autumn (though that season is still weeks/months away here in GA). There’s no real skill to making this- all you have to do is compile the ingredients at your leisure. There’s lots of flexibility here- I’d encourage you to use whatever’s in season and make it your own. Maybe you prefer a different type of squash or you want to sub pears for apples.. in which case you might want to use goat cheese or Gorgonzola. See how easy it is to switch it up?

And PS- if you’re reading this, I think you’re awesome for hanging in there with me and checking in on Oven Love, even when I’m inconsistent. Thanks for respecting me and my priorities (family and real life before blog land). Now go, my loved ones- be healthy and eat salad!
Fall Harvest Salad

Prep time
Cook time
Total time
Author: Oven Love
Recipe type: Salad
Serves: 2
Ingredients
- leafy green lettuce of your choice; romaine, spinach, etc.
- roasted butternut squash, see below*
- crisp apple slices; Gala, Pink Lady, Honeycrisp, Granny Smith or other crisp type
- dried cranberries
- nuts of your choice; walnuts, sunflower seeds, pecans or a mix (toast them if you’d like)
- shaved Parmesan, Asiago or other hard cheese
- sea salt and cracked black pepper
- complimentary salad dressing- try something based in balsamic or apple cider vinegar
Instructions
- Assemble salad.
- To roast butternut squash, simply cut off the rind, scoop out the seeds, and cut into cubes. Then toss in olive oil, salt and pepper to coat. Roast at 400 degrees for 30-45 minutes or until soft and just beginning to brown.
New York-Style Crumb Cake

Good afternoon, earthquake survivors! Seems like everyone is a little shook up today. We didn’t feel it down here in GA, but if we had, I would certainly be celebrating survival with this crumb cake.

Truthfully, I made this crumb cake about 100 million years ago and forgot to post it. I found the photos in my archive today and had to share with you. This thing was really good. I don’t remember where we ate it, or with who, but I remember it tasting just like the Starbucks coffee cake (which I love!).
It would be the perfect addition to a breakfast spread, great for an afternoon coffee break or as a sweet gift for a friend or neighbor. Who wouldn’t be excited if you arrived at their door with this?

Ahhh.. so good.
I think it’s safe to say I’ll be making another one.
New York-Style Crumb Cake

Prep time
Cook time
Total time
http://traceysculinaryadventures.blogspot.com/2011/03/new-york-style-crumb-cake.html
Author: Tracey’s Culinary Adventures
Recipe type: Breakfast, Dessert
Serves: 18
Ingredients
- Crumb Topping: 1 cup packed dark brown sugar
- ½ cup granulated sugar
- ½ teaspoon salt
- 1½ tablespoons cinnamon
- 1 cup (2 sticks) unsalted butter, melted (and still warm)
- 2½ cups all-purpose flour
- Cake: 2½ cups all-purpose flour
- ¾ teaspoon baking powder
- 1 teaspoon baking soda
- ½ teaspoon salt
- 12 tablespoons (1½ sticks) unsalted butter, at room temperature
- 1½ cups sugar
- 2 large eggs, at room temperature
- 1¼ cups sour cream, at room temperature
- 1 teaspoon vanilla extract
Instructions
- Preheat oven to 350 F. Spray a 9×13 baking pan with cooking spray. A glass pan is recommended, but metal works too – your edges may be a little more crispy if you bake in metal.
- To make the crumb topping: Whisk the flour, brown sugar, granulated sugar, salt and cinnamon together in a large bowl. Add the melted butter and whisk to combine. Use a rubber spatula to fold in the flour – you’ll have to use a little elbow grease to work in the final bits.
- To make the cake: In a medium bowl, whisk together the flour, baking powder, baking soda, and salt. In the bowl of a stand mixer fitted with the paddle attachment, cream the butter and sugar together on medium speed until light and fluffy, about 2-3 minutes. Beat in the eggs, one at a time, letting the first incorporate fully before adding the second. Scrape down the sides of the bowl and beat for an additional 30 seconds. Add the sour cream and vanilla to the mixer and beat until just incorporated. Finally, add the flour mixture in thirds, beating just until combined.
- Transfer the batter to the prepared baking pan. The batter will be thick – just use a spatula to spread it evenly. Pick up the crumb topping by handfuls, and break off chunks, scattering them over the top of the batter. Use all of the topping – it will be a very thick layer!
- Bake for 45-55 minutes (rotating the pan at 15 minute intervals), or until a toothpick inserted in the center of the cake comes out clean. Let the cake cool in the pan for at least 30 minutes before serving.
Small Batch Natural Applesauce

Hi muffins! I was making another batch of applesauce this afternoon and I realized that it’s something I’ve never shared with you. I started making this applesauce when my little guy was six months old and ready to start solid food. As you can probably guess, I wasn’t into buying pre-made baby food and instead, made his food myself (more on my baby food philosophy another day if anyone’s interested). I have never been a big fan of chunky applesauce, sweetened applesauce or watery applesauce. My perfect applesauce is smooth, thick and naturally sweet.
My first instinct in figuring out how to make my perfect applesauce was just to cook down some apples, puree them up and see how it tasted. Maybe it was my new mother’s intuition, but I got it right on the first try! All you have to do for this recipe is cook your apples with a little water and puree them. It’s a perfect baby food, since it’s smooth enough for the tiny ones, but has enough body for older kids and adults, too. I will definitely admit to sneaking lots of bites while baby wasn’t looking.

I call this “small batch” because I think people usually don’t make applesauce unless they’re making a huge amount because it seems like a lot of work. In my opinion, the peeling is what takes the longest. I usually just peel the skin off with a paring knife these days instead of fooling with my dull vegetable peeler to save time. If you don’t think it’s worth it to make applesauce at home, I totally get it. But for me, it’s become a soothing, routine activity. I’m always on the lookout at Kroger for the dollar bags of “bad” apples which sometimes don’t even have bruises (love you Krog!). Then when I have enough apples in the fridge, I make up a little batch.
Maybe this isn’t for you, or maybe you can stick it in your mental file (or pin it) for when you have a baby or a giant bushel of apples this fall. The natural sweetness of the apples is delicious- I think you’ll find that food made with loving hands tastes much better than store bought.
Small Batch Natural Applesauce

Prep time
Cook time
Total time
Author: Oven Love
Recipe type: Snack
Serves: 8
Ingredients
- 8 large apples, any variety
- about ½ cup water
Instructions
- Wash, peel and core your apples, then cut them into small chunks. Fill a medium saucepan with the apples (don’t worry about your pot being too full, they shouldn’t overflow). Pour about ½ cup of water over the apples, or enough water to keep the apples from sticking to the pan as they cook.
- Cook the apples over medium heat until very soft and beginning to fall apart, about 20-30 minutes. Scoop the apples into a food processor with a slotted spoon, being careful to drain any extra liquid. Process the apples until smooth. Pour the applesauce into two pint-size mason jars. Let cool to room temperature and then refrigerate and use as needed.
Miss Brenda’s Pound Cake

One of my favorite things about living in Georgia is that Southern hospitality. Shortly after we arrived in GA, we had the honor of sharing a meal at Miss Brenda’s. This woman is the sweetest Southern gal you will ever meet! I just love her laughter and smiles, her love for the Lord and her zest for life.
Miss Brenda served us this delicious sour cream pound cake during our visit and I just had to have the recipe. Like I told you, she’s the sweetest, so she dug it up for me and sent me home with the recipe she had copied years ago from a magazine. How lucky am I?
I know there are lots of fancy desserts out there (heck, you can find plenty here on the blog), but there’s just something about a simple pound cake. I don’t think this one needs any dressing up, but I know it would be great with some fresh whipped cream and fruit, or grilled up and served with ice cream.
Thank you, Miss Brenda, for your sweetness and your recipe!
Miss Brenda’s Pound Cake

Prep time
Cook time
Total time
originally from Southern Living Magazine, contributed by Ernestine James
Author: Southern Living Magazine
Recipe type: Dessert
Serves: 10
Ingredients
- 1 cup butter or margarine, softened
- 3 cups sugar
- 6 large eggs
- 3 cups all-purpose flour
- ¼ teaspoon baking soda
- 1 8-ounce carton sour cream
- 1 teaspoon vanilla extract
- 1 teaspoon almond extract
Instructions
- Beat butter at medium speed with an electric mixer about 2 minutes or until soft and creamy. Gradually add sugar, beating at medium speed 5 to 7 minutes. Add eggs, one at a time, beating until yellow disappears.
- Combine flour and baking soda; add to creamed mixture alternately with sour cream, beginning and ending with flour mixture. Mix at lowest speed just until blended after each addition. Stir in flavorings.
- Pour batter into a greased and floured 10-inch tube pan. Bake at 325 for 1 hour and 20 minutes or until a wooden pick inserted in center comes out clean. Cool in pan on a wire rack 10 to 15 minutes; remove from pan, and let cool completely on a wire rack. Yield: one 10-inch cake.
Coming in January

Have all you smart little cookies out there figured out why I haven’t posted in a month?
The rumours are true- baby #2 is baking in my belly. The first tri kicked me in the butt this time around (just finished it but still feeling sick, ugh), so I’m sure you’ll pardon my absence. My motivation has been at an all-time low so the ol’ blog has been pretty far down on the to-do list after things like sleeping and showering and chasing a squiggly toddler.
If you’ve been reading this blog for any amount of time, you know that I already come and go as I please, but I just wanted to clue you in on that tidbit of personal biz. Don’t expect any belly photos, unless they’re done by a fabulous photographer who can figure out how to photoshop my inevitable double chin. But you can expect at least a few posts in the next few months. I’ve got a backlog of things I want to share, and I may or may not completely abandon the Great Food Adventure, but maybe I’ll surprise us all, who can say?
To tell you the truth, I have no idea what will show up on this blog. When I’m pregnant, I crave super-healthy things one minute and processed-old-timey-childhood-junk the next. It will be an adventure for all of us!
Anyone else pregs? It seems like everyone I know in real life is.. maybe there are a few out there on the interwebs, too!
Also, anyone else notice I’m wearing the same cardigan as the rainbow cake picture? bahaha! I just love that cardi, can’t get enough.