I mentioned in my last post that we love great bread at our picnics. Sometimes we just tear it up and eat it in chunks with cheese and fruit and sometimes we’ll do sandwiches. For some reason, great bread just makes a picnic more memorable (and obviously more delicious).
This recipe is a perfect picnic choice, whether you’re tearing or sandwiching. It’s from Jim Lahey’s book, My Bread. (Yes, the no-knead bread Jim Lahey!) You’ll have to plan ahead a little for the dough to sit, but there’s little effort involved. The bread is the best on the day you make it, so plan to pop it in the oven on the morning before your picnic. My favorite thing about this bread is the coarse salt on top. I could eat it all day (which sometimes I do).
Two of our favorite sandwich pairings we’ve enjoyed on Stecca bread are Caprese (tomato, basil, fresh mozzarella) and Ham with Gruyere. You can put anything on these loaves, whatever you like. I’d love to hear what some of your favorite sandwich pairings are.So, tell me. What are your favorite sandwiches? What sandwiches do you order out that you wish you could recreate at home?
from the book, ‘My Bread’ If you want to keep the baguettes plain like I did, just skip the step of embedding the garlic, olives and cherry tomatoes.
Author: Jim Lahey
Recipe type: Bread
Serves: 12
Ingredients
3 cups (400 grams) bread flour
½ teaspoon table salt
¾ teaspoon sugar
¼ teaspoon instant or other active dry yeast
1½ cups (350 grams) cool 55-65F water
additional flour for dusting
20 pieces of the any combination of following: whole garlic cloves, whole olives, halved cherry tomatoes (optional)
¼ cup extra virgin olive oil
¾ teaspoon coarse sea salt or kosher salt
Instructions
In a medium bowl, stir together the flour, table salt, sugar and yeast. Add the water and, using a wooden spoon, mix until you have a wet, sticky dough, about 30 seconds. Cover the bowl and let sit at room temperature until the surface is dotted with bubbles and the dough is more than doubled in size, 10 to 18 hours (24 hours if you have a cold cold home.)
When the first rise is complete, generously dust a work surface with flour. Use a bowl scraper or rubber spatula to scrape the dough out of the bowl in one piece. Fold the dough over itself to her three times and gently shape it into a somewhat flattened ball. Brush the surface of the dough with some of the olive oil and sprinkle with ¼ teaspoon of the coarse salt (which will gradually dissolve on the surface).
Grab a large bowl (large enough to hold the dough when it doubles in size. you could also use a large pot) and brush the insides of the bowl with olive oil. Gently place the dough, seam side down into the bowl. Cover bowl with a towel. Place in a warm draft free spot to rise for 1 to 2 hours. The dough is ready when it is almost doubled. If you gently poke it with your finger, it should hold the impression. If it springs back, let it rise for another 15 minutes.
Half an hour before the end of the second rise, pre-heat the oven to 500F, with a rack in the center. Oil a 13″ x 18″ x 1″ baking sheet.
Cut the dough into quarters. Gently stretch each piece evenly into a long, thin, baguette shape approximately the length of the pan. Place on the pan, leaving about 1 inch between the loaves. Embed the garlic cloves, olives or cherry tomatoes into the loaves, about five pieces per loaf. Drizzle, tab or brush olive oil on each loaf. Sprinkle sea salt or kosher salt over each loaf, remember to go light on the olive loaf since the olives are salty.
Bake For 15 to 25 minutes, until the crust is golden brown. Cool on a pan for five minutes, then use a spatula to transfer the baguette to a rack to cool thoroughly.
Note: The baguette may become a bit soggy in just a few hours because of the salt on the surface. If that happens, reheat the loaves in a hot oven until crisp.
It’s been a little quiet this week, but I assure you that we’re all still here and no one’s dead or seriously injured. Just a little family busyness going on.. pool-hopping, sweating through our clothes, family buzz cuts (not for me, i can’t rock that look) and other fun time heat wave activities. Ellie has been full of the sills lately (the sillies) and it has been too cute to miss. I think we’d all agree that I should be sharing the sills with my baby first and foremost.
Anyways, summer has been in full-swing in GA for months and will not be stopping until December, by the looks of it. That means it must be at least sort of warm where you live, too, right? And warm means outdoor activities, and my favorite outdoor activity is a good old-fashioned picnic. Always has been, it’s just one of my things.
Before I share some picnic perfect foods with you this month, I want to give you a little run-down of my favorite picnic goods. Maybe you’ve never been on a picnic before. Or maybe you’ve forgotten what to take. Maybe your girlfriend asked you to take her on a picnic and you googled ‘picnic essentials’? Whatever the case may be, here are a few things I like to have at the ready.
First, you’ll need some stylish essentials like a vintage-style cooler, eco-friendly utensils and a classic picnic blanket. (I am jonesing for a Pendelton blanket like nobody’s biz!) A good cooler is key for hot days, even if it’s not super stylish. A blanket is also key- you don’t want bugs crawling on you/your food or your date sitting on a bunch of rocks. When it comes to plates and utensils, I love using Bambu products if I need something disposable and reusable glass containers for everything else.
Let’s talk about location. How cute are these little car picnics? I love the idea of a picnic in the back of a pick-up truck. (Husband, take note!) Really, though, you can have a picnic just about anywhere. We’ve done park picnics, backyard picnics, car picnics (this time i mean inside the car).. really. You can make any location work, but if you want to make it special, pick a beautiful location or an offbeat spot that you love.
Once you’ve got your basic supplies and location, the key to making a picnic memorable is the ambiance. If you’re doing an evening picnic, think candles, lanterns and the like. If you’re going for daytime and you’ve got some flexibility at your location, try hanging paper lanterns, streamers, balloons or garlands. Pillows are always a great addition, and don’t forget a playlist of your favorite tunes!
And of course, the all important food! Can’t have a picnic without good eats. I won’t be sharing any recipes with you today, but I will say the following are my favorite grab and go picnic treats:
-good bread (usually baguette or fresh baked type)
-good cheese
-fruit (depending on the cheese, we usually go with grapes, apples or berries on the fly)
-veggies for snacking
-sometimes we include some meat if we want to make sandwiches
-fun fizzy drinks or a bottle of wine
-some kind of sweet treat that won’t melt in the heat
One of our favorite things to do is to go on a little grocery trip (usually to a fancier grocery as a treat to ourselves) and pick up whatever looks delicious and take it away for a picnic. It’s one of the simplest meals (really no preparation) and the picnic setting is perfect for good conversation. We love it for date nights at home or away and we cherish picnics with friends. We always end up with new memories.
I just love picnics. Fact.
I can’t wait to share some of my favorite picnic recipes and tips with you this month.
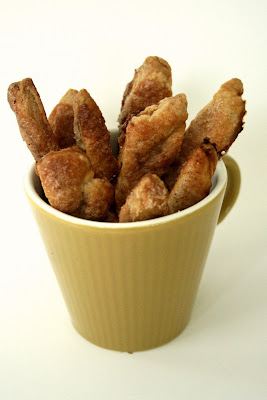
Wondering what you’re going to do with your pie dough scraps?
Do you even have pie dough scraps?Sometimes I do. Usually, I just throw them away, but if there’s a ton left over, I’ll make hand pies. After my pie dough comparison, I had a lot of extra dough and had already made hand pies, so I decided to try something new.
Pie fries are just little strips of pie dough brushed with egg or butter (you can use whatever you brushed on your pie crust) and sprinkled with cinnamon sugar. They’re sweet, flaky, crunchy little treats that can easily become an addiction. Just warning you.They would probably be extra tasty dipped in jam or chocolate sauce and would make perfect garnishes for ice cream sundaes. Simple and sweet. The instructions below are pretty loose- you can’t really mess these up.
Preheat your oven to 375 degrees (or whatever temperature your pie is baking at- feel free to bake them at the same time as your pie). Roll out your dough and cut into thin strips. Place the strips on a parchment paper-lined baking sheet. Brush the dough with melted butter or the egg. Sprinkle sugar and cinnamon on top (1 tablespoon sugar to 1 teaspoon cinnamon is a good ratio). Bake for 10-15 minutes or until golden brown. Let cool on a wire rack.
I have been on a quest to find a great pie dough recipe for quite some time. I keep thinking that maybe if I can find a great recipe, that making pie will be more enjoyable for me. I still don’t think I’m there.. but the taste testing has been pretty delicious!
Smitten Kitchen: I always have high hopes for SK recipes, so I was excited to try her all-butter recipe. She prefers the old-fashioned hand-mixed method, so this one had a little extra elbow grease mixed in. It came together nicely and was one of the easiest to roll out. I used this dough for SK’s Sour Cherry Slab Pie, which was the favorite pie of my taste-testers. That could be because it had the highest crust to filling ratio, or because the crust was thicker. Regardless, it was the flakiest and got the most compliments.
Dorie: I was disappointed with Dorie for the first time here! This was my least favorite of all the recipes. It browned (read: burnt) too quickly in the oven and shrank back a lot during baking. It looked so promising before it went into the oven. I used Dorie’s crust as the base for this Lemon Meringue Pie from Zoe Bakes. This one was quickly taken out of the running.
Cook’s Illustrated: The CI recipe was the easiest to pull together and the least fussy of the four recipes. The secret ingredient here was cold vodka in place of half of the usual water. I used the CI crust for a double crusted Apple Pie- a good choice, since it was the easiest for me to roll out and work with. More testers ate the apple pie than the cherry slab pie, but they still picked the SK crust over the CI crust. I think this crust is a good choice, but not as flaky or buttery as SK.
Alton Brown: Our good man Alton has a very specific way to execute his recipes, doesn’t he? For this pie crust, he called for a spray bottle to add water to the dry ingredients. I have to say that I’m not sure it made that big of a difference. I used the AB crust for most of the Cherry Berry Hand Pies (I had some extra crust from the other recipes to use up as well). It was a tasty crust, but I couldn’t tell much of a difference between the CI recipe.
Brown Sugar Apple Pie (with one of my little pie birds!)
Cook’s Illustrated Crust and filling from Pie
Cherry Berry Hand Pies: AB’s crust with my own filling
Conclusions:
For me, I think the winner is definitely Smitten Kitchen. It was the biggest crowd pleaser. There were good points about Alton’s recipe and the CI recipe, but my all-purpose pick is SK. That being said, I think there are things you can do with any pie crust recipe to get the best results.
Make sure your ingredients are COLD. That means your butter, your water, your flour, everything. This is huge.
Chill the dough in between steps. This is time consuming, but helps the texture in the end.
Only roll your dough once, if possible. All of the pie doughs were difficult to roll out after the initial roll. They became elastic and started to shrink back- that means tough crust.
Use flour liberally while you’re rolling to keep dough from sticking.
Make sure steam can escape your pie, whether it’s using a pie bird or just poking holes with a fork.
Have fun and take it easy! I always make pie such a big deal, but it’s really not. It’s fun and delicious and you should be smiling while you’re making it.
I’m glad I finally dug in and did some pie research. I’m no longer afraid of the pie, but I’ll still probably employ the lazy pie techniques like the galette and slab pie. It’s just my way. I hope this comparison was helpful to you if you’ve been searching for a recipe, too.
(Special thanks to my little helper! And by helper, I mean a giant mess maker. As if I don’t make enough of a mess when I bake alone.. maybe he got it from me?)
FYI, I loved answering these. Isn’t it fun to learn about each other?
How do you take pictures in restaurants without annoying other diners?
The tips we got this weekend about taking restaurant photos were simple: if you want better photos and less trouble, go during lunch time or between lunch and dinner. The light will be better and it’s a more casual setting. If it’s a high-class establishment, make sure you ask permission to take photos. Another great tip- in lieu of a tripod, prop up your camera on a glass or your purse. The steadier the camera, the better the photo in low light situations. The flash is the most annoying part of photo taking for other diners, so avoid using it if you can.
#1 thing I learned about food photography at BlogHer Food?
Use my tripod! Tripods make a huge difference in food photography because you want it as detailed as possible. I’m super lazy and the little one always wants to play with the tripod, so I don’t get it out much. Guess I will have to try harder to find baby-less photo time!
What are my favorite healthy food blogs?
Healthy blogs, hmm.. I love the blog Salad Pride– it’s a new salad every day, and they are always simple and scrumptious-looking. Whole Family Fare is a great one if you have babies/kids (or even if you don’t). And of course, 101 Cookbooks.
Was BlogHer Food worth the money?
I think so. I loved meeting other bloggers and learning so many tips and tricks. I didn’t have to pay for air fare, though, which would have made a big difference for me. I am just lucky it was in Atlanta this year- I probably wouldn’t have made it there otherwise.
When will I be doing more video posts?
Good question! Whenever I can get someone to help me do them! I would love to do more..
What made me start the blog, and how much time do I spend maintaining it?
I started Oven Love in 2008. I was a jobless newlywed (ie SATWife) and didn’t know what to do with my time. I was cooking and baking a lot, and I loved reading food blogs, so I threw caution to the wind and posted a leftover pasta dish. The rest is history. As far as time spent on the blog, it has varied with different seasons of life. I was able to post a lot before I had my son, then less during the moving/new baby phase of 2010, and now I seem to be picking up again. It all depends. I don’t let it dictate my life. It is just a blog, after all!
What’s my favorite bread recipe?
Hmm.. for sandwich bread, I always seem to come back to this King Arthur Oatmeal Bread recipe. I have changed up the ingredients multiple times and it always comes out lovely (and then promptly disappears).What is the next recipe you should try?
You should try kale chips right now, if you haven’t already! If you’ve tried kale chips, you should try magic oatmeal! Love them both.
Have I ever been to the Dominican Republic?
Actually, yes I have! Went on my honeymoon to Punta Cana with the hubs. Gorgeous there, but also sad to see the disparity between the resorts and the slums.
Did I come away from the conference with a new recipe to try?
Yes, actually! At the Scharffen Berger Chocolate booth, they served us a delicious little chocolate chili tart that I loved. I have the recipe- maybe I’ll get to share it with you sometime soon.
When I’m browsing blogs, what’s my go-to place to find every day inspiration and ideas?
My Google Reader is filled with lovely food blog inspiration every morning, but I certainly can’t list those all here. After other blogs, I often search Tastespotting or Martha Stewart. I’m also finding lots of inspiration on Pinterest these days.
Where did I find my love of food and cooking? (Megan’s question!)
I think it came from my family, but in little bits and pieces. Like watching my dad bake bread, helping my grandmother make her famous waffle cookies, finding my way around the kitchen and making giant messes on my own. It developed over time, and I came to really love it in college and after getting married.
What are my summer plans and what is the one food I hate to cook?
My summer is looking like tons of fun! We’ve got some traveling planned, including a fun surprise trip to celebrate my parents’ 30th anniversary (don’t worry, they already know we’re going, they just don’t know where). As for a food that I hate to cook? I can’t really think of one..
Do I have a good deep chocolate frosting recipe?
I do, but it’s not posted here on the blog. I started using it with Tickled Pink and now it’s my go-to chocolate frosting. Email me at ovenloveblog@gmail.com for the recipe!
First of all, food bloggers are great people. Every person I met was a g-e-m. I loved meeting other people who care about things like photo garnishes, the chickens living in my garage (sorry I haven’t told you about that yet!) and how to take pictures in restaurants without annoying people. Amazing, right? I think we should all live together in a big blogging commune and eat tasty food all day.
I learned roughly a million things at this conference. I have ideas out-the-waz and I can’t wait to roll out some new changes here at Oven Love. I want to make it even better for you guys- easier to search, more fun to look at and even more inspiring. I’m on the job.. so much to do!
And in case you were wondering, I was thinking about you the whole weekend. I even brought you back some extra swag! Here’s what’s in the bag:
-Reusable bag from Saveantibiotics.org -Metromint water -Butterball seasoning kit -All new Lite Pom (this isn’t in stores yet, but it’s so good!) -Quaker Oatmeal Squares -Bob’s Red Mill Granola, Gluten-Free Hot Cereal and Pearl Whole Wheat Couscous -Dole Peaches -Assorted coupons (Stonyfield, Wasa, Barilla, etc)
To enter, all you have to do is comment below, and ask me a question! You can ask me a question about anything: my recipes, someone else’s recipes, something that has nothing to do with food, the meaning of life, whatever you want. Just ask me a question and you’ll be entered to win the swag bag. Contest ends Wednesday night at midnight EST.
Winner will be announced on Thursday, and I’ll be answering all of your questions. Look forward to some GFA pie posts later this week!
Just wanted to post a little good morning shout out to my new friends from BlogHer Food!
Yesterday was a whirlwind of information, food and new faces. I really loved the sessions I chose (except for the SEO session, which almost made my head explode), and have had so much fun getting to know new bloggers and meeting some people who are already Oven Lovers (hi! love you!). We’ve also gotten a ridiculous amount of swag and got to attend a party last night hosted by Tasty Kitchen (although we missed Bakerella.. maybe she’ll be around today).
I’m pumped for today’s schedule- I’ll be going to two photography sessions, there’s an excursion to Sweet Auburn Curb Market and an awesome party planned at the Tabernacle. Can’t wait to share!
Ya’ll, things have gotten even crazier around her this week! I’m a busy little beaver.
I don’t know if I ever told you, but besides being a momma and a food blogger, I have another awesome gig as a Bradley birth instructor. It’s one of my favorite things in the world to do, and yesterday, I got to help a sweet baby boy come into this world med-free. I think you’d agree that baby birth days take precedence over a little bloggin’.
To continue my crazy week, I’m heading up to Atlanta for BlogHer Food tomorrow morning! I can’t tell you how excited I am for it. Reasons?
1) amazing food.
2) conversations with grown-ups.
3) not having to hold a 20 pound child all day.
4) the opportunity to become a better food blogger.
I can’t wait to come back and share all the juicy goodness that BlogHer Food will bring. Hopefully, I can do a little posting while I’m there so you can get an inside peek.
Anyone else going to BlogHer Food this weekend? I’d love to meet up if you are!
Friends, we’re all lucky today that I found my way out of bed and stumbled over to the computer to write this post. My house got hit with the stomach bug this weekend and it has been aw–ful. Friday, I got it. Saturday, I attempted to recover. Sunday, baby got it, then husband got it. Today, we are just trying to stay alive. I don’t know about you, but I turn into a real mess when I have tummy troubles. I won’t get into the details, because A) gross! B) seriously, gross. and C) I’m about to tell you about some yummy food, so I don’t want you thinking about anything gross.
I have been meaning to share these yummies for a long time.. they just always get eaten up before I get a chance to take a photo. These smoky pork tacos are one of my go-to entertaining meals- everyone seems to love them, especially the guys! They are simple to prepare, you just have to sit in agony while they smell up your house with all their deliciousness. If you can handle that, you’re in for a treat.
I like to serve them with different toppings every time. In the photos here, I have jicama, tomato, scallions and queso fresco. I’ll often have switch these out with salsa, avocado or guacamole, red onion, cilantro, fresh limes for squeezing, sour cream… you name it, we’ve had it on these tacos. Whatever we have on hand works- they are versatile and tasty every time. You can’t mess these up! Unless you don’t cook them long enough.. that would be your only faux pas. Also- don’t let them get too dry. Don’t be afraid to add some water if things are looking dry.
Oh, how I wish I could have these in my tummy today! They will have to wait for happier tummies here, but please eat some for me, will you? I am drooling on my keyboard.
PS- They work with beef as well, and are just as yummy.
PPS- You can do them in the oven or the slow cooker, I’ve written directions for both methods below.
adapted from Martha Stewart- http://www.marthastewart.com/281902/smoky-beef-tacos
Author: Oven Love
Recipe type: Main
Serves: 10
Ingredients
2-3 tablespoons chopped canned chiles in adobo
½ cup ketchup
8 garlic cloves, chopped
2 teaspoons dried oregano
1 cup water, or more
coarse salt and ground black pepper
3 lb pork roast, trimmed of excess fat (works with beef as well)
corn tortillas, for serving
Instructions
To prepare in a slow cooker: In the slow cooker, mix chiles, ketchup, garlic, oregano and water with about 2 teaspoons salt and black pepper to taste (a whisk works well for this). Cut the pork roast into 3-4 large pieces and toss with the sauce in the slow cooker. Put the slow cooker on high for 4-6 hours or low for 6-8 hours. Add more water as needed if things start to look dry. Check every once in a while- when the meat flakes easily with a fork, you’re ready to move on to the next step. Remove the meat from the sauce, let cool, and pull apart with two forks, removing any extra fat along the way. Return the meat to the sauce and let the flavors meld over low heat (or on the “Keep Warm” setting), adding water if necessary. Serve hot in corn tortillas.
To prepare in the oven: Preheat the oven to 350 degrees. In a Dutch oven, mix chiles, ketchup, garlic, oregano and water with about 2 teaspoons salt and black pepper to taste (a whisk works well for this). Cut the pork roast into 3-4 large pieces and toss with the sauce. Cover, bring to a boil on the stove, and then transfer to the oven. Bake, covered, until meat is fork-tender, about 2½-3 hours. Remove the meat from the sauce, let cool, and pull apart with two forks, removing any extra fat along the way. Return the meat to the sauce and let the flavors meld over low heat, adding water if necessary. Serve hot in corn tortillas.
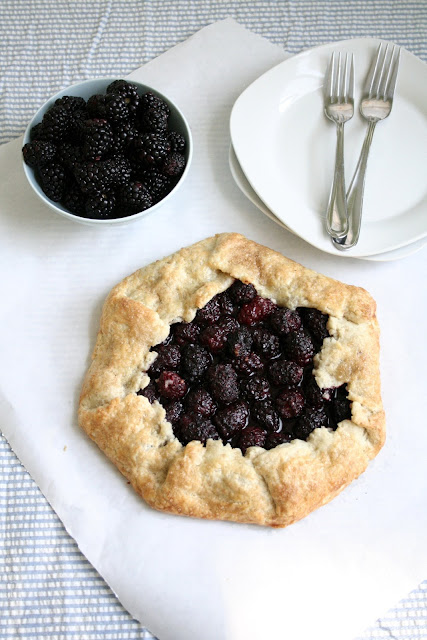
Did I tell you my thing about pies? Here’s my thing.
I didn’t used to like pies as a kid, but I do now. I love to eat them, but I don’t really like to make them. (I’m more of a cake baker, remember?) I know pie dough is easy to pull together, but the part I don’t like is rolling it, shaping it, pre-baking, par-baking, all that nonsense. You have to think ahead. I’m not into it, and that’s why I chose pies as part of my GFA challenge.. it’s not really my comfort zone.
The galette is like the lazy gal’s pie. All you have to do is make the crust, roll it out haphazardly and fill it with fruit. It can be an even lazier gal’s pie if you use a pre-made crust. All the tastiness of pie without the work! (Am I selling it?)
I plan on getting into some real pies here soon, but if you’re scared of pie-making like me, give the galette a go. It’s a great end to a summer meal, perfect with ice cream, and I’m pretty sure I’ll be eating it for breakfast while most of you are reading this. Hopefully blackberries are in season for you right now- if not, bookmark or favorite or star or pin it- or whatever the kids are doing these days.
adapted from For the Love of Cooking- http://fortheloveofcooking-recipes.blogspot.com/2010/06/blackberry-galette-with-homemade.html
Author: Oven Love
Recipe type: Dessert
Serves: 6
Ingredients
2 cups fresh blackberries rinsed and patted dry
2 tablespoons sugar
2 teaspoons cornstarch
1 batch pie dough, chilled (enough for a single 9-inch crust, I used Dorie Greenspan’s all-purpose recipe this time- http://shadowcook.com/2007/11/29/dorrie-greenspans-good-for-almost-everything-pie-dough/)
1 egg, beaten
coarse sugar, for sprinkling (I used turbinado)
Instructions
Preheat the oven to 350 degrees. Line a baking sheet with parchment paper or a Silpat.
In a small bowl, toss blackberries with sugar and cornstarch until absorbed. Set aside while you prepare the crust.
Roll out your pie dough into a circle. It doesn’t have to be perfect, but the dough should be about ½ inch thick. A helpful hint is to roll it out between two pieces of plastic wrap. Move the dough onto your baking sheet.
Spoon the blackberry mixture onto the pie crust. Be sure to keep the pile in the center, leaving ample room on the sides to fold the crust up- maybe 3 inches or so. Fold the crust up around the filling, pressing the crust down gently to seal it. Brush the crust with egg and sprinkle with coarse sugar.
Bake for 40-45 minutes until the crust is golden brown. Let cool on a wire rack for at least 10-15 minutes before serving.
Milk Street on Instagram: "This bright red chicken and orzo soup gets rich, Turkish-inspired flavor from a few simple ingredients: tomato paste, garlic, sweet paprika, and a touch of dried mint. A simple, warming balance of spice, savoriness, and herbs. Best enjoyed with crusty bread. Get the recipe for Chicken and Orzo Soup With Garlic and Paprika via our link in bio. Photography: @cbcreativesphoto Food Styling: @tobinfood #milkstreet #milkstreetrecipes #chicken #chickenrecipes #or