Banana Muffins and Bake It Pretty


Macarons, Take One


Valentine’s Sweetness from Sucre´


What’s a Macaron, Anyway?


How to Lighten Up Your Recipes


when applicable, use lower-fat, lower-sugar or lower-calorie items. some great substitutes? evaporated skim milk/buttermilk for cream
pureed veggies or cornstarch/water slurry for a roux (butter/flour)
leaner cuts of meat
whole grains for refined
brown rice for white
lighter version of dairy products and salad dressings
fruit purees/oil for butter/sugar in baking
use these cooking methods: grill, steam, saute, roast, bake. to reduce the amount of butter or oil you’re using, use just a touch, then keep the food from sticking with water, juice or broth.
try new flavors! think about herbs, spices, vinegars, extracts, citrus juices/zests..
increase the veggies. do this in omelets and scrambles, meatloaf/meatballs/burgers, quick breads, pasta dishes and more.
Lightened Up Favorites: Fish & Chips

Baked Fish & Chips
by Oven Love (adapted from Spark Recipes)
serves 2 (about 8-9 WW Points Plus values each)
For the chips:
2 baking potatoes, rinsed and scrubbed
olive oil
salt and pepper
For the fish:
8-10 oz white fish fillets, like cod or haddock
1/2 cup flour (I used whole wheat, but I would suggest using white flour or half and half)
1/2 teaspoon baking powder
4 oz beer
1/2 lemon, juiced
salt and pepper
Preheat the oven to 400 degrees. Line two baking sheets with parchment paper or cooking spray.
Slice the potatoes into chip shapes (slice lengthwise each way) with skins on. Toss with olive oil to coat. Add salt and pepper to taste, toss again. Spread in one layer on a baking sheet and put in the oven. Put in the oven.
While chips begin to bake, cut fish fillets into manageable pieces and dredge in flour. In a shallow bowl, mix flour and baking powder. Slowly add beer and whisk until you have a thick batter (you don’t have to use it all). Add lemon juice and salt and pepper to taste. Dip each piece of fish into the batter- be sure to coat well. Place on your second baking sheet and bake for about 20 minutes. Fish is done when batter is set; chips are done when soft on the inside and crispy on the outside.
Operation Kitchen [My First Video Tutorial!]
Roasted Garlic Hummus with Whole Wheat Flatbreads

I like sugar.
It’s so annoying!
I’m trying to quit.
(It is hard.)
This means making things that have no sugar.
What? Sounds totally lame and boring.
I did not want to do it.
Then I remembered how much I love hummus and started to get my groove back.


Roasted Garlic Hummus
adapted from the Curvy Carrot
makes approximately 2 cups
| 2 | heads garlic |
| 2 | tablespoons extra-virgin olive oil , plus extra for drizzling |
| 2 | thinly sliced garlic cloves |
| 3 | tablespoons juice from 1 to 2 lemons (I would use one, taste, and then add extra if you need it) |
| 1/4 | cup water |
| 6 | tablespoons tahini , stirred well |
| 1 | (14-ounce) can chickpeas , drained and rinsed |
| 1/2 | teaspoon salt, plus more for garnish |
Instructions
Preheat your oven to 350 degrees, cut top quarters off heads of garlic and discard. Wrap the garlic head in aluminum foil, drizzle with olive oil, sprinkle with salt and pepper, and roast in the oven until browned and very tender, about 1 hour.
Meanwhile, heat olive oil and the sliced garlic cloves in small skillet over medium-low heat. Cook, stirring occasionally, until golden brown, about 5 minutes or so. Watch them closely so they don’t burn. Using a slotted spoon, transfer the garlic slices to paper towel-lined plate and set aside; reserve oil.
Once the roasted garlic is cool, squeeze cloves from their skins (you should have about 1/4 cup). Combine lemon juice and water in small bowl or measuring cup. Whisk together tahini and garlic cooking oil in second small bowl or measuring cup.
Process chickpeas, roasted garlic puree, salt, and cayenne in food processor until almost fully ground, about 15 seconds. Scrape down bowl with rubber spatula. With machine running, add lemon juice-water mixture in steady stream through feed tube. Scrape down bowl and continue to process for 1 minute. With machine running, add oil-tahini mixture in steady stream through feed tube; continue to process until hummus is smooth and creamy, about 15 seconds, scraping down bowl as needed.
Transfer hummus to serving bowl, sprinkle toasted garlic slices and parsley over surface, cover with plastic wrap, and let stand until flavors meld, up to 30 minutes. Drizzle with olive oil, sea salt, sesame seeds and serve.
Whole Wheat Flatbreads
by Oven Love, adapted from Cookistry
makes 12 flatbreads (3 WW Points Plus values each)
1 1/4 cups lukewarm water
2 teaspoons instant yeast
1 tablespoon agave nectar (you can use honey or white sugar here, too)
3 cups whole wheat flour
1 teaspoon salt
2 tablespoons olive oil
In the bowl of your stand mixer, combine the water, yeast, and agave nectar (or chosen sweetner), and set aside for 5 minutes, until it begins to get foamy.
Add the whole wheat flour and salt and knead with the dough hook until the dough is smooth and beginning to become elastic. Add the olive oil and continue kneading until the oil is incorporated and the dough is smooth, shiny, and elastic.
Cover the bowl with plastic wrap and set aside for 30 minutes.
After 30 minutes, the dough will have risen, but it won’t be doubled. Take it out of the bowl, knead it briefly, and divide it into 12 roughly equal portions (I use kitchen shears or a large knife for smooth separation). They don’t have to be exactly the same unless you’re a perfectionist. I actually like the option of having some larger and some smaller.
Roll each portion into a ball as you would for buns, then flatten each one slightly. Cover them with a clean kitchen cloth so they don’t dry out as you’re working with them one at a time.
Assuming you’re using a cast iron pan, heat the pan over medium-high heat while you start rolling the flatbreads. You don’t need any oil – these are cooked in a dry pan.
On a lightly floured work surface roll the first flatbread to a 6-inch circle. It doesn’t have to be exact, and it doesn’t have to be a perfect circle. Brush off any excess flour and put the first flatbread in your frying pan. A little flour clinging to the flatbread is fine, but flour that falls off in the pan may burn so you want to remove as much as possible.
Start rolling the next flatbread while you’re keeping an eye on the first. It will start forming bubbles and might puff up completely. It will take a minute or so to cook on the first side, depending on how hot your pan is. When the the bottom is lightly browned in spots but the bread is still completely soft and pliable, it’s done on the first side.
Turn the bread over and cook on the second side for about 30 seconds or so. Again, you’re looking for a few brown spots. If the bread is puffy, press it down with a spatula so the whole surface is contacting the pan. Press gently to deflate it, and watch out for escaping steam.
If you get a good rhythm going, you can have the next flatbread rolled when the first one is finished. If you have a large griddle, or if you’re cooking them outdoors on your grill, you can cook two or three at a time. And here’s another time saver. If you’re cooking these on your grill, close the lid and they’ll cook on both sides. No need for turning, unless you want more browning (or grill marks) on that second side.
Have a clean kitchen towel ready for your flatbreads. Put them on the towel and fold the sides over to cover them as they’re done, and stack them up as you have more. They’re best served right away, while they’re still warm from cooking. If you want to reheat them later, just heat them briefly in your dry cast iron pan. A few seconds is all they’ll need.
Winter Quiche
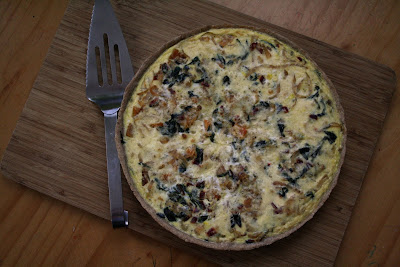
Finally, a post!
I have been trying hard to get something new up for you this weekend, but I’ve been busy living life. You know how it goes. I was busy eating every last crumb of this quiche.
I really wanted quiche this weekend, but I wasn’t sure what I wanted to put in it. I set out looking for a healthier crust option and found one at Chocolate & Zucchini. The crust is uses whole wheat flour and olive oil instead of white flour and butter, so I’d say it’s a healthy upgrade. It tastes good, too, swearsies.


Final thoughts:
Winter Quiche with Healthy Wheat Crust
by Oven Love, crust adapted from Chocolate & Zucchini
makes one 11-12 inch quiche
For the crust:
125g whole wheat flour (about one cup)
125g all-purpose flour (about one cup)
1 teaspoon kosher salt
1/2 teaspoon dried thyme
1/2 teaspoon dried rosemary
1/4 cup olive oil
1/2 cup cold water
For the filling:
1-2 teaspoons olive oil
1 bunch Swiss chard, chopped
1 onion, sliced
1 cup cubed cooked/roasted butternut squash (I roasted mine; I cubed the raw squash, tossed it in olive oil/salt/pepper and roasted at 375 until tender)
4 eggs
3/4 cups milk or cream (obviously milk is the healthier option!)
1/2 cup grated Asiago cheese
fresh grated nutmeg to taste
salt and pepper to taste
Grease an 11-12 inch tart pan lightly with cooking spray.
Combine the flours, salt, and herbs in a medium mixing bowl. Add the oil and mix it in with a fork. Add the water, mix with the fork until it is absorbed, then knead lightly (I do this with just one hand, in the bowl) until the dough comes together into a ball.
Turn the dough out on a lightly floured work surface. Sprinkle a little flour on the ball of dough and on the rolling pin, and roll the dough out into a circle large enough to fit your tart pan. Turn the dough by 45 degrees (a quarter of a circle) every time you roll the pin and back, adding a little more flour underneath and on the dough when it seems on the verge of becoming sticky. The trick is to do this in quick, assertive gestures to avoid overworking the dough.
Transfer the dough carefully into the prepared pan and line it neatly. Trim the excess dough and place the pan in the fridge for 30 minutes to rest. Preheat your over to 400.
While the crust chills, heat the olive oil in a saute pan over medium heat. Saute the Swiss chard and onion until soft, about 15 minutes. In a medium bowl, whisk eggs, milk, cheese, nutmeg, salt and pepper.
If you prefer a crispier crust, you can prick the crust with a fork and par-bake it for 15 minutes before letting it cool and adding the filling. If not, go ahead and layer the butternut squash with the chard and onion mixture in the unbaked crust. Pour the egg mixture over the top. (Be sure not to overflow the pan with your egg mixture- it’s okay if you have a little left over!)
In a par-baked crust, the quiche should bake up in about 15 minutes at 400 degrees. In an unbaked crust, bake for 20 to 25 minutes. The quiche is done when the egg mixture is set.
Lightened Up Favorites: Mac & Cheese

I stuck pretty closely to the recipe, but the main and most visible difference was that I used whole wheat bread for the bread crumbs instead of white bread. It gives the dish a darker look, but it’s healthier. If you’re making this for looks only, I would skip the wheat and use the white for better presentation.
Lighter Macaroni & Cheese
Martha Stewart
serves 8 (my ramekins were smaller, so I got 12 servings of 8 WW Points Plus each)
- 6 small vine-ripened tomatoes, (3-inch) , cut into twenty-four 1/4-inch-thick slices
- 3 tablespoons extra-virgin olive oil (I just eyeballed it, but I probably used closer to 1-2 TBS)
- 1 1/2 teaspoons fresh thyme leaves, plus sprigs for sprinkling
- Coarse salt and freshly ground pepper
- 5 slices white sandwich bread, with crust (I used about 3-4 slice whole wheat here)
- 2 tablespoons unsalted butter
- 1 pound elbow macaroni
- 2 cups homemade or low-sodium store-bought chicken stock
- 5 tablespoons all-purpose flour
- Pinch of freshly grated nutmeg
- Pinch of cayenne pepper (I added a teaspoon of ground mustard, as well)
- 2 cups low-fat (1 percent) milk (skim worked fine for me)
- 8 ounces (about 2 1/4 cups) extra-sharp cheddar cheese, grated
- 1 ounce (about 1/2 cup) Parmesan cheese, freshly grated
- Preheat oven to 400 degrees. Spread tomatoes in a single layer on 2 rimmed baking sheets. Drizzle each sheet with 1 tablespoon oil; sprinkle each with 1/2 teaspoon thyme, and season with salt and pepper. Bake until tomatoes have softened, about 20 minutes. (Leave oven on.)
- Process bread in a food processor until coarse crumbs form. Melt 1 tablespoon butter with remaining tablespoon oil in amedium skillet over medium heat. Add breadcrumbs, and toss to coat. Season with salt and pepper; set aside.
- Bring a large pot of water to a boil over high heat. Add 1 tablespoon salt and the pasta. Cook pasta until almost al dente, about 5 minutes. Drain, and run under cold water to stop cooking. Transfer to a large bowl; set aside.
- Whisk 1/2 cup stock into the flour in a medium bowl; set aside. Melt remaining tablespoon butter in a medium saucepan over medium heat. Stir in nutmeg, cayenne, remaining 1/2 teaspoon thyme, and 1 teaspoon salt. Add milk and remaining 1 1/2 cups stock. Whisk in flour mixture. Bring to a boil, whisking frequently. Reduce to a simmer. Cook 8 minutes, whisking frequently. Add cheeses; cook, stirring, until melted. Pour over macaroni, stirring to combine.
- Put eight 4 1/2-by-1 1/4-inch ramekins on a baking sheet. Put 2 tomato slices in bottom of each ramekin. Divide macaroni mixture evenly among ramekins. Top each with a tomato slice. Sprinkle with breadcrumbs and thyme sprigs. Bake until bubbling and golden brown, about 30 minutes. Serve immediately.
This post is part of
 We’re going on a little food adventure in 2011. Go see what it’s all about!


