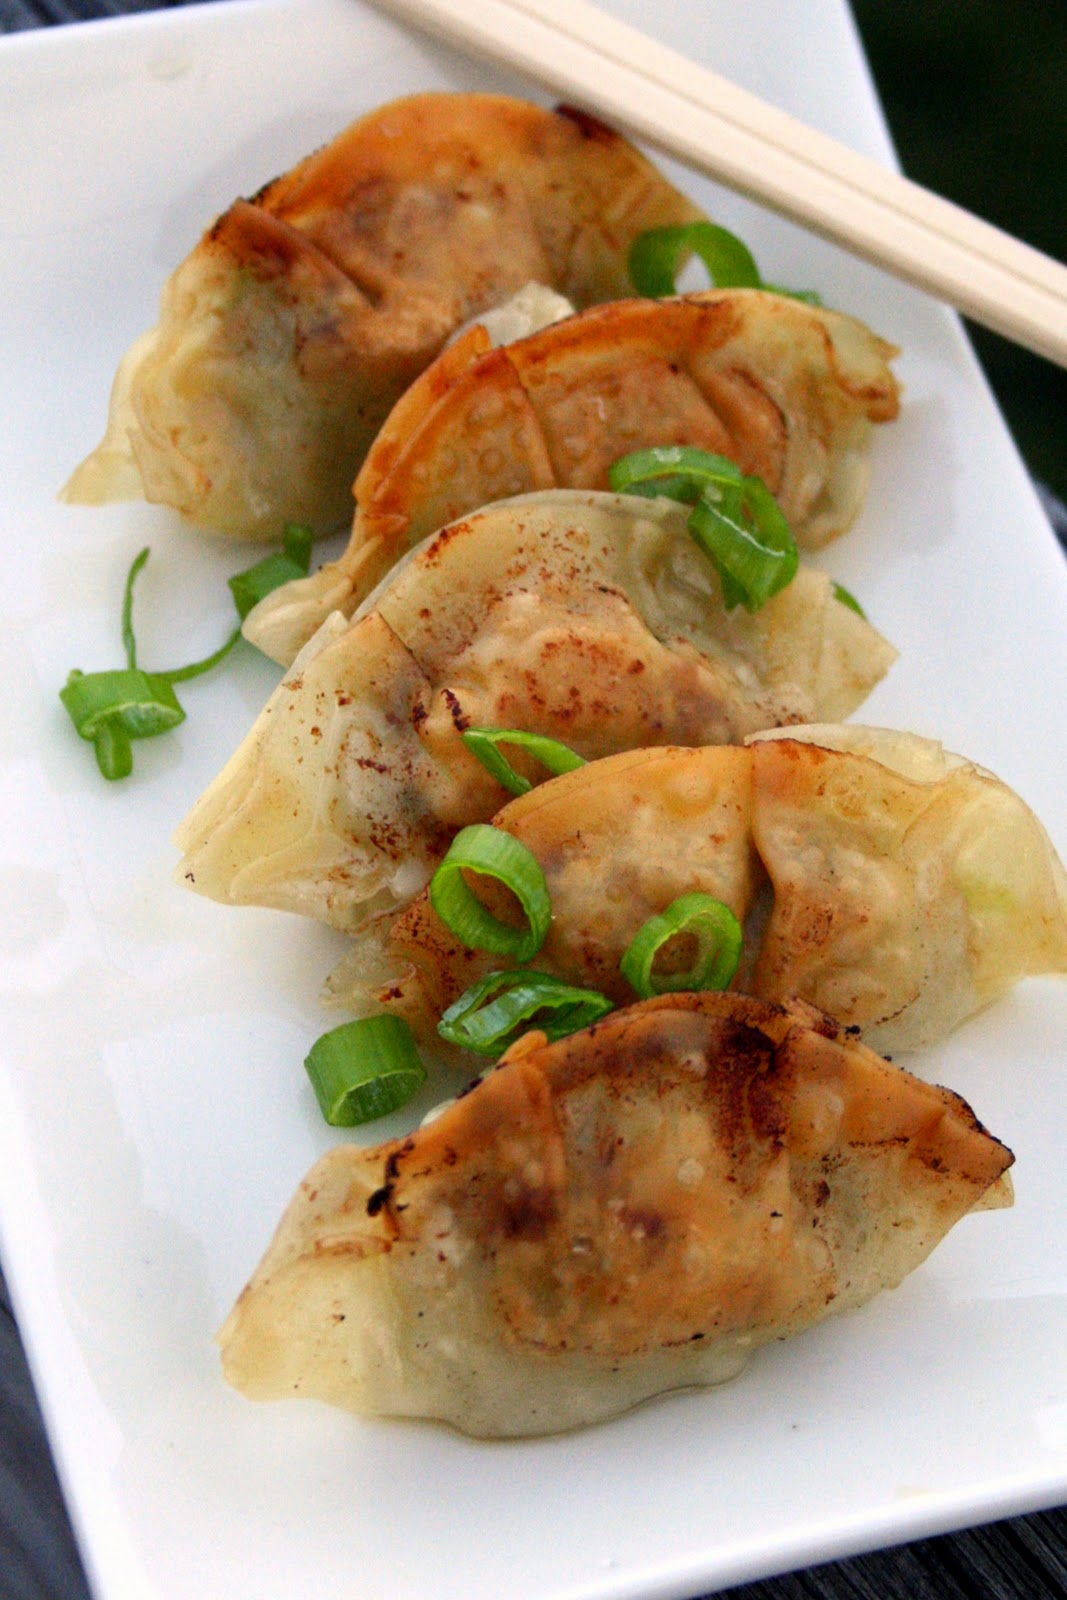
Gyoza Pan-Fried Dumplings


- ½ pound napa or green head cabbage, shredded and then finely chopped and squeezed between paper towels to remove excess moisture
- ¾ pound ground pork
- 2 green onions, including green tops, minced
- 3 fresh shiitake mushrooms, stems discarded and caps minced
- ½ bunch fresh chives, minced
- 1 teaspoon peeled and grated fresh ginger
- 1 teaspoon minced garlic
- 1 tablespoon sesame oil
- 1 tablespoon sake
- 1 teaspoon soy sauce
- About 50 round gyoza or other Asian dumpling wrappers, each about 3 inches in diameter (the thinnest ones you can find)
- 1 tablespoon canola oil or other neutral oil and 1 tablespoon sesame oil for cooking each batch
- 2 tablespoons water for cooking each batch
- soy sauce, rice vinegar and/or hot chili oil for dipping
- To make the filling- in a large bowl, combine the cabbage, pork, green onions, mushrooms, chives, ginger, garlic, sesame oil, sake, and soy sauce. Using your hands, mix together just until thoroughly combined. Avoid handling the filling to much.
- Place the stack of wrappers on a work surface and keep covered with a clean, damp kitchen towel or paper towel to prevent them from drying out. Holding a wrapper on the palm of one hand, place about 1 teaspoon of the filling in the center of the wrapper. With a fingertip, swipe one-half of the edge of the wrapper with a little water, and then fold over the other edge to meet the dampened edge, enclosing the filling and pinching to seal securely. With your fingers, make 3 or 4 evenly spaced pleats along the sealed edge and place the dumpling, flat side down (the opposite of the pleats) on a sheet of waxed paper. Repeat until all the filling has been used up. (At this point, you can freeze them on a rimmed baking sheet, place in the freezer, and then transfer the frozen dumplings to a zippered plastic bag and return to the freezer for up to 1 month. Cook them directly from the freezer, allowing a few minutes longer cooking time when the pan is covered.)
- To cook the dumplings, heat a frying pan over high heat. When the pan is hot, add the canola and sesame oils, swirl to coat the bottom of the pan with the oils, and allow them to heat. When a drop of water flicked into the pan sizzles instantly, arrange about 12 dumplings in the pan, lining them up neatly and placing them flat side down and pleated edge up. Cook undisturbed until the bottoms are lightly browned, about 3 minutes. Add the water, then immediately cover the pan, reduce the heat to medium-high, and cook for 5 minutes. Uncover and cook for a few minutes longer until all the water has evaporated and the dumplings are dark brown and a little crusty on the bottom.
- To serve, slide a spatula under the dumplings, being careful not to tear the wrappers, and flip them browned-side up onto a large plate or platter, still lined up. For the dipping sauce, set out containers of soy sauce, vinegar and hot chili oil. Provide each diner with a small dipping bowl to assemble a dip to taste.
Fresh Strawberry Cake with Cream Cheese Swiss Meringue Buttercream


- 24 oz frozen or very ripe fresh strawberries, hulled (if frozen, thawed)
- 1-2 tsp sugar (for fresh berries only)
- ¼ cup milk, at room temperature
- 6 large egg whites, room temperature
- 1 Tbsp vanilla extract
- 2¼ cup cake flour, sifted
- 1¾ cup sugar
- 4 tsp baking powder
- 1 tsp salt
- 12 Tbsp unsalted butter (1½ sticks), softened (not melted)
- pink or red food coloring, preferably the gel type (optional)
- Thaw frozen strawberries in whatever form (sliced, whole, etc) and in whatever container/bag you have them in. Pour into a fine strainer placed over a bowl and let sit. Lightly toss the strawberries occasionally to remove any pockets of excess liquid. Reserve the liquid for another use or discard.
- Place strawberries in a food processor or blender and puree. (You can use fresh strawberries if you don’t have a stash of frozen strawberries in your freezer. Just hull, slice and toss with a teaspoon or two of sugar and cover. Let them sit at room temperature for a couple of hours, until nice and juicy. Place strawberries in a food processor or blender and puree.)
- Reserve ¾ cup puree for the cake. Use leftover puree to fill the cake or fold into the frosting, if desired.
- Preheat oven to 350 degrees and prepare two 8 or 9 inch pans: spray inside with baking spray with flour (or use some sort of grease/flour combination).
- In small bowl, combine puree, milk, egg, vanilla and mix with fork until well blended. In bowl of stand mixer, add sifted flour, sugar, baking powder and salt and mix to combine. Continue beating at slow speed and add butter. Mix until combined and resembling moist crumbs.
- Add liquids and beat at medium speed for about 1 minute or until full and evenly combined. Stop mixer to add food coloring if using and to scrape down the sides of the bowl and beat to combine. Divide the batter evenly among the pans and smooth tops.
- Bake for about 25 minutes or until a toothpick inserted in the center comes out clean (time will vary). Let cakes rest in pan for about 10 minutes and turn out onto wire racks. Let cakes cool completely (about 2 hours).
- 3 (100g) egg whites
- ⅔ c (130g) sugar
- 10 Tbsp (142g) butter, cubed and at room temp
- 1 tsp vanilla
- 4 oz (113g) cream cheese, cubed and at room temp
- In the base of a double boiler, bring water to a simmer. In the top bowl (or just a bowl to place over a pan of simmering water) combine the egg whites and sugar and whisk constantly until the mixture is hot to the touch (160F on a candy thermometer if you want to be completely accurate), about five minutes depending on the original temperature of the eggs. When the mixture has warmed sufficiently, pour it into the bowl of your stand mixer and whip on high speed until the bottom of the bowl is room temperature, ten to fifteen minutes. When the bowl is no longer warm, turn the mixer to medium-low and begin adding the butter piece by piece. Let each chunk incorporate completely before adding the next and don’t rush the process!
- After all of the butter has been added, add the vanilla and turn the speed back to high. Whip for about 3 minutes or until the buttercream comes together. Turn the speed down to low and add the cream cheese, then mix on medium to fully incorporate.
Guest Post: Tomato Pesto & Mozzarella Melts
Hey there, “Oven Love” readers! My name is Tina, from My Life as a Mrs! Natalie and I met in Atlanta last year at the BlogHer Food conference (Photo Here)… & we hit it off immediately! It’s hard to NOT hit it off with Natalie – she is super sweet, bubbly, and an absolutely gorgeous person inside and out! 🙂
Anyhow, since Natalie is adjusting to having sweet little Lucy around, I am here to give you all a little something tasty!!
Tomato, Pesto, and Mozzarella Melts:

Yes, they are as amazing as they sound (& look).
It’s basically a grown up grilled cheese – Caprese with Pesto Style! And man is it GOOD (and EASY!)
We are talking 6 ingredients (most of which you can buy at any major grocery store):
- Sour Dough Bread
- Butter
- Tomatoes
- Fresh Mozzarella
- Pesto (I like to make big batches and then freeze individual portions – but you can find pesto at the grocery store too!)
- Balsamic Reduction (You can buy this at the store – or you can boil down regular balsamic vinegar in a saucepan until it reduces and gets thick and syrupy)
8 minutes on a griddle and BAM – Dinner. is. served.
Gotta love a fast and easy dinner: Great for weeknight meals -OR- for the new mom 😉

Natalie: I wish I was there to make these for you! Congrats on your beautiful little girl! Soak it up, girl! xoxo
Oven Love Readers: Thanks for letting me share some grub with ya’ll! God Bless! Don’t forget to stop on by my blog & say hi! 🙂
Same Ingredient Recipes ya’ll may be interested in:
- Pesto Ricotta and Cherry Tomato Pizza (MY FAVORITE PIZZA EVER!!)
- Caprese Baguette with Pesto Mayo & Balsamic Reduction
- Complete Recipe Index

- 8 slices sour dough bread
- 4 tablespoons pesto
- 2 whole tomatoes, thinly sliced
- 8 ounces fresh mozzarella, thinly sliced
- 4 tablespoons butter
- Balsamic Reduction, for topping
- Build 4 sandwiches (Bread, 1 tablespoon pesto, a few slices of mozzarella cheese, a few slices of tomato, and lastly another slice of bread).
- Add 1 tablespoon butter to a hot skillet and melt over medium high heat. Once the butter is nice and hot, carefully add 2 of the prepared “sandwiches” leaving a few inches between them. Place a piece of foil over them and then top with a heavy bottomed skillet (I used a cast iron), allowing the weight to press it down.
- Heat for 4-5 minutes (until bottom is crisp and golden), then remove the heavy skillet, lift sandwich with spatula and add 1 more tablespoon butter. Carefully flip the sandwiches (uncooked side down) and then top again with the foil/heavy skillet. Heat for another 3-4 minutes until remaining side is golden and cheese is melted. Remove from skillet and allow to cool for 2 minutes. Repeat with remaining sanwiches!
- Slice on a diagonal and drizzle with balsamic reduction. Serve hot!
- Note: You could use a panini press if you have one!
Whole Wheat Chocolate Chip Skillet Cookie


- 3 cups whole wheat flour
- 1½ tsp. baking powder
- 1 tsp. baking soda
- 1¼ tsp fine sea salt
- 8 oz. cold unsalted butter, cut into ½ inch pieces, plus more for buttering the pan
- 1 cup dark brown sugar
- 1 cup sugar
- 2 large eggs
- 2 tsp. pure vanilla extract
- 8 oz. chopped semi-sweet or bittersweet chocolate or chocolate chips/chunks
- Preheat the oven to 350°F, with a rack in the middle. Butter a 10 or 11-inch ovenproof skillet, one that is at least 2-inches deep. If you’re unsure, measure, because if you use a too small skillet, you’ll have a messy overflow.
- Sift the dry ingredients into a large bowl.
- In another large bowl, or in the bowl of a stand mixer fitted with the paddle attachment, add the butter and the sugars. Mix just until the butter and sugars are blended, about 2 minutes using the mixer on low speed. Use a spatula to scrape down the sides of the bowl along the way. Add the eggs one at a time, mixing until each is combined. Mix in the vanilla. Add the flour mixture to the bowl and blend on low speed until the flour is barely combined, about 30 seconds. Scrape down the sides and bottom of the bowl.
- Add most of the chocolate to the batter. Mix just until the chocolate is evenly incorporated. Use a spatula to scrape down the sides and bottom of the bowl, then scrape the batter out into the skillet, pressing it out into an even layer. Sprinkle any remaining chocolate across the top, and casually press it into the dough a bit, just enough that it isn’t riding directly on top of the dough.
- Bake the cookies for 35-45 minutes, or until until the dough is a deep golden brown along the edge, and the center has set. Remove from oven and let cool a bit before slicing into. Cute into wedges or small squares.
- Makes one large skillet cookie, which you can cut into as many cookies as you like.
Freezer-Friendly Chicken Enchiladas


- 1 medium onion, chopped fine
- 2 jalapenos, seeded and chopped fine
- 1 teaspoon canola oil
- 3 medium cloves garlic, minced
- 3 Tablespoons chili powder
- 2 teaspoons ground cumin
- 3 teaspoons sugar
- 1 15-oz can tomato sauce
- 1 cup water
- 1 large tomato, seeded and chopped
- 1 pound boneless, skinless chicken breasts (about 2 large breasts)
- 1 cup extra sharp white cheddar, shredded
- 1 cup Monterey jack cheese, shredded
- ½ cup minced fresh cilantro
- 12 (6-inch) soft corn tortillas
- cooking spray
- salt and ground black pepper
- Preheat oven to 425.
- Combine the onion, jalapeno, ½ teaspoon salt, and oil in a large saucepan. cover and cook over medium-low heat, stirring often, until the onions and peppers have softened, 8-10 minutes. Stir in the garlic, chili powder, cumin, and sugar, and cook until fragrant, less than 30 seconds. Stir in the tomato sauce, water, and chopped tomato. Bring to a simmer, and cook until slightly thickened, 5 minutes.
- Nestle the chicken into the sauce. Reduce heat to low, cover, and cook until chicken is cooked through (thickest part reaches 160 degrees), about 12-20 minutes. Transfer the chicken to a plate, and set aside to cool.
- Strain the sauce through a strainer into a medium bowl, pressing the onion mixture to extract as much liquid as possible. Transfer the onions to a large bowl and set aside. Season sauce with additional salt and pepper to taste.
- Shred the chicken into bite-sized pieces. Add to the onion mixture, and add ¼ cup of the enchilada sauce, 1 cup cheese, and the cilantro. Toss to combine.
- Stack the tortillas on a plate and cover with plastic wrap; Microwave on high until warm and pliable, 40-60 seconds. Spread the tortillas on a clean work surface, and spoon ⅓ cup of the chicken mixture evenly down the center of each. Tightly roll each tortilla and lay seam-side down in a greased 9×13 inch baking dish.
- *To freeze, stop here and see instructions below.*
- Lightly spray the tops of the enchiladas with cooking spray. Place in the oven, uncovered, for about 7 minutes, or until the tortillas start to brown slightly (skip this step if you don’t like the crunch).
- Reduce heat to 400. Remove enchiladas and pour sauce evenly on top. Top with the remaining cheese. Cover dish with foil, and bake an additional 20 minutes, or until heated through.
- Remove foil and bake another 5 minutes, until cheese browns. Remove from oven and let stand 10 minutes before serving. Serve with sour cream, guacamole, salsa, additional cilantro, etc.
- To Freeze: Cover the dry enchiladas with aluminum foil and freeze. Freeze the sauce separately in a Ziploc freezer bag. Freeze the remaining cheese in a separate Ziploc bag as well.
- To reheat after freezing: Let the enchiladas, sauce and cheese thaw in the refrigerator (putting it in the fridge in the morning should be fine). Preheat the oven to 400. Pour sauce on top of the thawed enchiladas and top with the cheese. Recover with foil and bake 20 minutes or until heated through. Remove the foil and bake another 5-10 minutes until the cheese browns. Remove from oven and follow serving directions above.
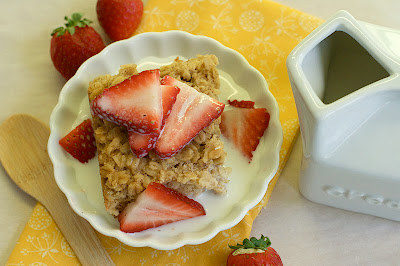
Make Ahead Baked Oatmeal


- 2 large eggs
- ¼ cup maple syrup, honey or agave nectar
- 1 teaspoon baking powder
- 1 teaspoon vanilla
- 1 teaspoon cinnamon
- ¼ cup salted butter or coconut oil, melted
- ½ cup applesauce or other fruit puree (I’m thinking about trying pumpkin, pear, and others)
- 1 small apple, finely grated
- 1¼ cups milk (non-dairy, if necessary)
- 3 cups old-fashioned oats (gluten-free, if necessary)
- ¼-1/2 cup chopped nuts (optional)
- ¼-1/2 cup dried fruit or chopped fresh fruit (optional)
- cream, half-and-half or milk, for serving
- chopped fresh fruit, for serving
- brown sugar or maple syrup, for serving
- Coat an 8×8 or 2 quart baking dish with butter or cooking spray.
- In a large bowl, whisk together all ingredients, except the oats and nuts/fruit (if using). Fold in oats and nuts/fruit (if using) and combine well. Transfer the oat mixture into the baking dish and spread evenly around.
- To bake right away: Preheat the oven to 375 degrees. Let oat mixture sit and soak for 20-30 minutes at room temperature while the oven is preheating. Bake at 375 degrees for 30 minutes or until oatmeal is set and edges are brown.
- To bake later in the day or the next morning: Cover your dish tightly with plastic wrap, pressing the plastic directly on top of the oat mixture. Refrigerate overnight. In the morning, preheat oven to 375 degrees. Unwrap oatmeal and place in oven. Bake for 30 minutes or until oatmeal is set and edges are brown.
- Serve hot with: cream, half-and-half or milk; fresh chopped fruit; and brown sugar or maple syrup.
Meals for New Parents

In the past year, I have delivered A LOT of meals to new parents.

- Chicken Enchiladas with Mexican Rice and Snickerdoodle Blondies
- Spicy Kale Lasagna (a nice vegetarian option) with Italian Tossed Salad and Miss Brenda’s Pound Cake (with whipped cream and berries!)
- Tuscan Tomato Soup with a great loaf of bread and cheese for sandwiches
- Zucchini Galette (pictured above) with Caprese salad and Strawberry Ice Cream
- Looking for a vegan option? Try this Asparagus Tart with White Bean Pesto with fresh cut veggies and Vegan Chocolate Chip Cookies
- Roasted Garlic Hummus with fresh, pre-cut vegetables and pita bread or pita chips (I like Stacy’s)
- Muffins of any kind
- Marathon Squares – these would be great for a boost of energy!
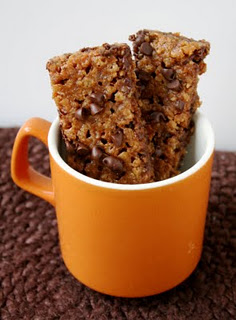
- Chocolate Chip PB Granola Bars (pictured above)
- New York Style Crumb Cake
- Pre-cut veggies with dips- Cucumber Yogurt Dip, Avocado Tomatillo Dip or Curry Chutney Dip
- Kale Chips

If you’re really short on time and can’t make anything, ask them what their favorite take-out meal is and deliver that to their door. This will typically satisfy a craving they’ve been having (for the food or for contact with the outside world). There is certainly no shame in going this route- they probably won’t be going out to their favorite spots for a little while, so you can provide them with a little date night at home.
Adventures in Freezer Cooking

Are you a fan of freezer cooking? Freezer cooking and I have evolved in our relationship over the years.


My Favorites of 2011
Lots of love and best wishes for a great 2012!


Forgot how much I love this recipe until today. Now I’ve got to make some before baby comes..


Salted Peppermint Rice Krispie Treats


- ¼ cup unsalted butter or ghee
- 4 cups peppermint marshmallows **There are a few ways to do this. You can make them homemade, you can buy store-bought (Jet-Puffed has a peppermint variety during the holidays), or you can use regular marshmallows with a dash of peppermint extract and a drop or two of red food coloring (optional).**
- 5 cups Rice Krispie cereal
- 2 ounces semi-sweet or dark chocolate
- 3-5 peppermint candies, crushed
- ¼-1/2 teaspoon fine sea salt
- To prepare, butter a 9×13 baking dish.
- In a large saucepan, melt the butter over medium heat. When the butter is melted, add the marshmallows and reduce heat to low. Stir until the marshmallows are melted completely and remove from heat. Add the Rice Krispies and stir until well-coated. Spread the mixture into the prepared pan and press down with a spatula or buttered fingers.
- Next, heat the chocolate in the microwave in 30 second intervals until melted. Transfer into a pastry or Ziplock bag and cut the corner. Drizzle the chocolate evenly over the Rice Krispie mixture (you can also use a spoon to do this, but it will be a bit messier). Sprinkle the crushed peppermint candies and sea salt evenly over the chocolate and let rest until the chocolate is set. Cut into squares and serve.