April Advertising Special!

In honor of Passionfruit opening their Marketplace today (that’s my page in the Marketplace above), I am offering $5 off ALL Oven Love ad spots!
That means large ads are $20, medium ads are $10 and small ads are just $5 – that’s a steal, seriously.
Use the promo code “iloveovenlovers” to take advantage of this discount before it expires!
This is not an April’s Fool’s joke, either- it’s 100% real. 🙂
For more information about sponsoring Oven Love, check out my Passionfruit Ads page or the Advertising page here on Oven Love.
Overnight Oatmeal: 5 Ways
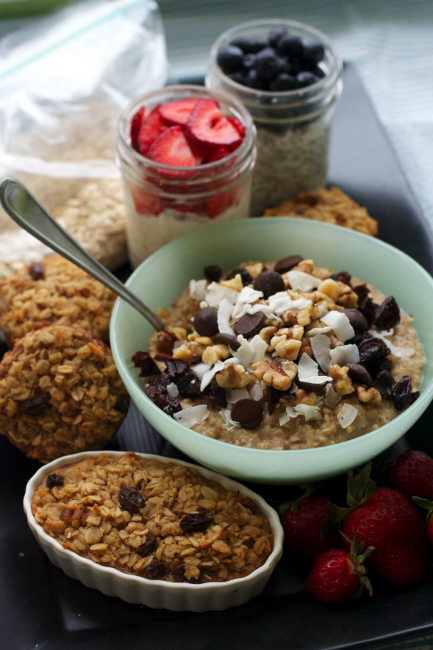
Good morning! Join me at Modern Parents Messy Kids today with five ways to make overnight oats: traditional soaking, grab-and-go baked oatmeal, DIY oatmeal packets, crockpot oats and refrigerator oats. There’s certainly something for everyone (unless you are grain-free or you don’t like oats.. then you’re out of luck.) What’s your favorite way to eat oatmeal?
Traditional Bone Broth: Tips, Tricks and More

As you probably know, I’ve been working on healing some stomach problems (are you tired of hearing about it yet? haha). The first time I read about the healing power of bone broth was through the Weston A. Price Foundation. It made a lot of sense to me- finally I understood why homemade chicken soup was said to be such a good remedy! Then I did more research and found the GAPS diet, which is big on bone broth and affirmed everything else I had read. I won’t go into detail about all of the benefits here (check out the links at the end of the post), but I did want to explain my broth routine and what I’ve learned along the way.
When I drink broth:
- With most meals, to help with digestion.
- In the morning before breakfast (if I’m not ready to eat yet).
- When I go out and I’m not sure if there will be any food that I can eat, but don’t have time to pack food.
- When I have stomach pain.
Really, I could drink it anytime. I usually sip it from a mug like I would drink tea. I drink it plain, with sea salt, or sometimes I stir in a spoonful of coconut oil or grass-fed butter (sounds weird, but it tastes really good and helps keep me feeling full. Just stir it around with a spoon as you’re drinking it so your lips don’t get oily!)
How I make broth:
- For chicken: I typically cook a whole chicken (roast or boil), pick off most of the meat and then put the bones and skin in the crockpot. I cover the bones with filtered water and cook on low for a day or two. Sometimes I add salt, sometimes I forget. Sometimes I add peppercorns or a few bay leaves or vegetable peelings, but usually I keep it simple. Sometimes I add a tablespoon of raw apple cider vinegar, as well (to help get even more nutrients out of the bones). Don’t be alarmed if the vinegar makes the broth a bit cloudy.
- For beef: I usually get beef bones that are meant specifically for broth/soup, so I’ll just throw them in the slow cooker or a pot, remove any meat and add it to a soup (since it’s not a a lot of meat) and then return the bones and continue cooking the broth.
- For fish: I can’t get sustainable whole fish around here, so I haven’t done this myself, but if I did, I would stick the bones and the head in a pot/crock pot with the same method. (I don’t think I would really drink this one on it’s own- probably just use it for soups).

My Broth Tips:
- I never throw away bones- I store them in the freezer along with vegetable clippings (onions, carrot and celery) if I’m not making broth right away or if I only have a few bones.
- Try to include some skin (for the fat) and the joints of the animal if you can- the joints help to create gelatin (especially wing tips/knuckle bones, etc).
- Don’t be afraid if your broth looks like jelly after it cools down. That’s a good thing! Gelatin is very nourishing and it will return to liquid state when you heat it.
- You can roast the bones before you use them for stock if you want deeper flavor or a darker broth.
- Store broth in the refrigerator (it will keep for a few weeks) or freezer. I like to use glass jars.
- Reheat broth on the stove so you don’t kill the nutrients (as opposed to the microwave). It’s a pain when you’re in a hurry, but I do it in a small saucepan or in a tea kettle.
- There will be a layer of fat at the top of your broth (see above)- this is a good thing! It is full of good nutrition, don’t throw it away! It will melt down into the broth when you heat it up.
- Be careful not to burn your mouth on hot broth. Broth smells so good cooking in my house and I like to scoop cups of it right out of the slow cooker, but it is REALLY HOT. Wait for fresh broth to cool down a bit.
Anyone else out there drinking broth? I can’t be the only one! Are you intimidated by the process! Please feel free to comment with your questions and I’ll gladly answer. If you’re interested in learning more about bone broth, here are some links I’ve found helpful:
Bone Broth: 12 Days of Gelatin
Perpetual Soup: The Easiest Bone Broth You’ll Make
Traditional Foods 101: Bone broth, Broth and Stocks
How to Make Health Boosting Bone Broth
Top 5 Reasons Bone Broth is The Bomb
The Wonders of Gelatin and How to Get More in Your Stock
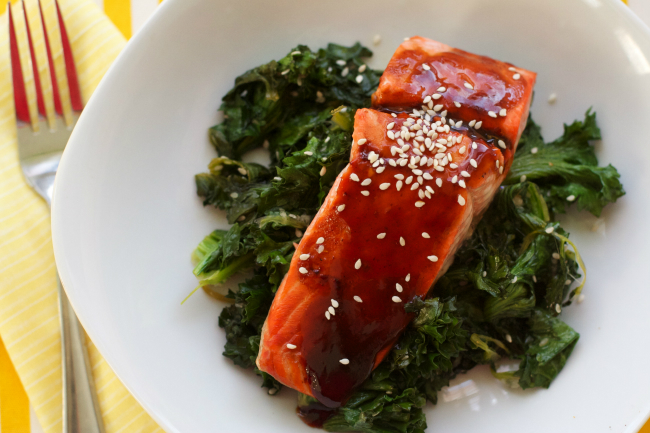
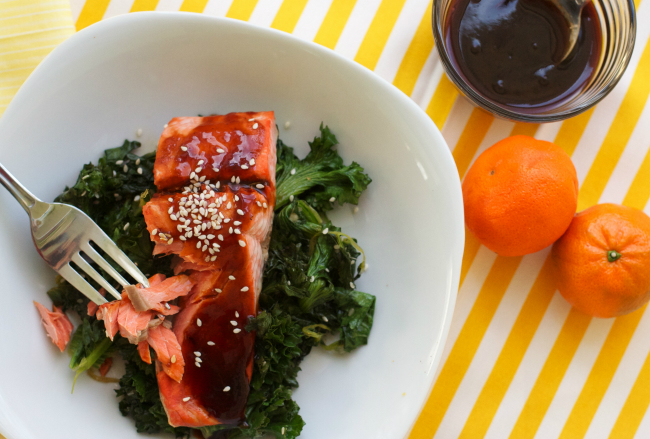
Citrus Hoisin Salmon and Sesame Sauteed Kale
I just remembered that I like fish. How did I forget this? Reasons why:
1. It’s quick cooking.
2. You can flavor it with anything.
3. My kids eat it!
4. It’s good for you.
5. It’s beautiful to look at.
6. It makes me feel fancy.
Seriously, I’m in love! I started getting these giant slabs (fillets, I think? whatever half-a-fish-without-the-head/bones is called) of wild-caught salmon at my grocery store and it is the most beautiful shade of.. well, salmon. And granted, they are frozen and not fresh (that’s a whole other conversation) and they ain’t cheap, but as far as I know, there aren’t any wild salmon swimming in these Georgia waters, so until we get stationed in Alaska (no thanks!), frozen it is.
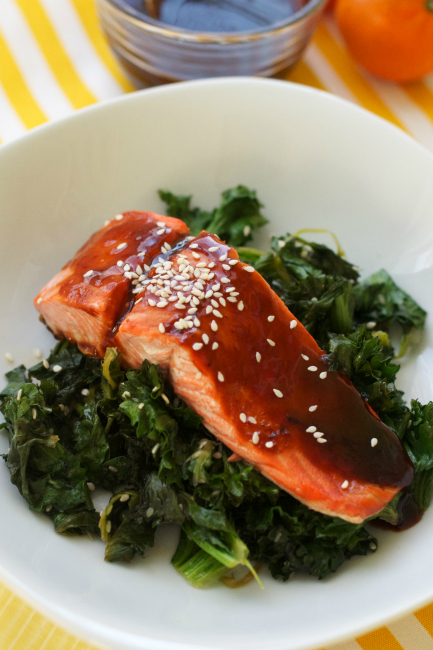
On to the story of this dish. My thoughtful husband usually stops by the farmer’s market on Thursdays on his way home from work and brings me all kinds of edible treasures. This week, he showed up with strawberries (it’s spring!!), leeks, sweet potatoes, cabbage, pecans, some teeny tiny carrots and a big bunch of kale. I knew I had a little jar of hoisin sauce to use up and a slab’o’salmon thawing, so I thought it would be nice over a bed of sesame kale. Nice, indeed.
If you aren’t familiar with hoisin sauce, it’s a thick chinese stir-fry sauce. You can find it gluten-free (Wok Mei brand), but I don’t think that brand is widely available. It’s also got sugar and soy and corn starch, and probably “natural flavors”, so I’m not sure it’s the healthiest option out there.. but man, is it tasty. Maybe I’ll create a homemade version soon. You could substitute soy sauce or teriyaki sauce, but the final sauce won’t be as thick (unless you reduce it down on the stove).
If you’re not on the kale bandwagon yet, you can substitute another leafy green- bok choy would be a great choice. Serve with rice if you’re looking for a heartier meal (or leftover mac-and-cheese like the rest of my little family.. you know, do what works.)
I heart salmon!
- 1 wild-caught salmon fillet (fresh or thawed from frozen), cut into portions, or about 6 individual portions (Basically I’m saying if you get half a fish, cut it up. If it’s already cut into pieces, that’s fine, too.)
- ⅓ cup hoisin sauce (If you need gluten-free, try Wok Mei brand)
- 2 tablespoons fresh citrus juice (orange, clementine, tangerine, etc)
- 2 tablespoons honey
- salt and pepper
- sesame seeds, for garnish
- Preheat your broiler on high.
- In a small bowl, mix hoisin sauce, citrus juice and honey until combined.
- Place salmon portions in a glass baking dish. Season each piece with salt and pepper and brush with the half of the sauce. Save the other half of the sauce for later.
- Broil for 8-10 minutes or until salmon flakes easily and is cooked through.
- Serve immediately, drizzled with the remaining sauce and sprinkled with sesame seeds.
- 1 tablespoon coconut oil
- 1 teaspoon sesame oil
- 1 bunch kale, rinsed and stems removed
- salt and pepper
- 1 tablespoon soy sauce (gluten-free, if necessary)
- 1 tablespoon sesame seeds
- 1-2 teaspoons citrus juice (orange, clementine, tangerine, lemon, etc)
- more sesame seeds, for garnish
- In a large skillet, heat coconut oil and sesame oil over medium-high heat.
- When the skillet is hot, add kale and saute until it begins to wilt.
- Add seasonings- salt and pepper, soy sauce, sesame seeds and citrus juice. Mix and continue to cook until wilted and soft.
- Garnish with sesame seeds and serve immediately.
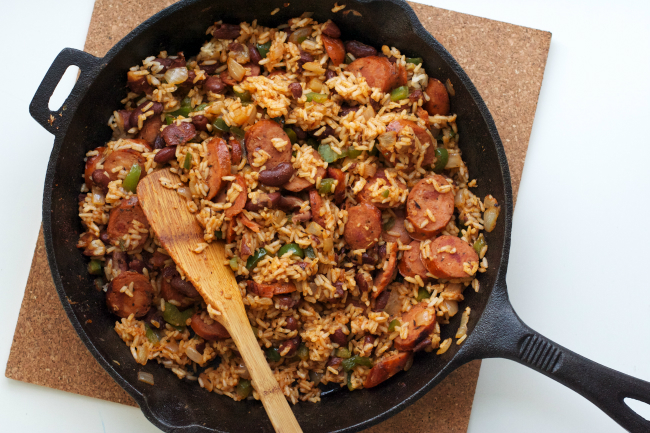
Creole Rice Skillet with Andouille Sausage

I heart quick dinners. Don’t we all?
Some nights there just isn’t time to mess around with the oven and the pots and the pans and the measuring cups and the nonsense.
Some nights I just pull out the cast iron and see what happens.
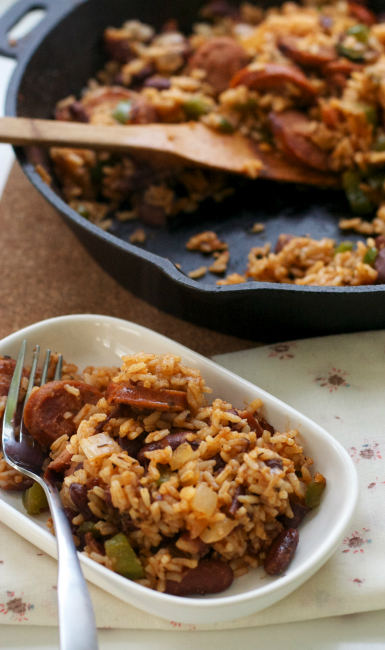
The night I made this skillet, I was lucky enough to have some cooked rice, some beans and some Aidell’s Cajun-Style Andouille Sausage* hanging around. So creole/cajun/jambalaya-style skillet it was. It came together lightening fast since the rice and sausage were already cooked, but it wouldn’t take more than 20 minutes to get that taken care of, so still a quick dish in my book.
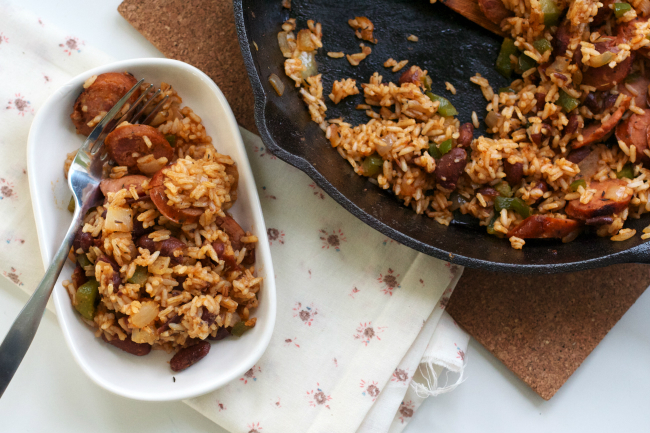
This one was a winner for the adults in our household, but it was a bit spicy for the kids. If you want to make a kid-friendly version, I would go easy on the spices and use a milder variety of sausage. Still a yummy combo, I’m sure.
If you’re not really into the cajun/creole thing, maybe try Italian sausage and cannelini beans or really anything else from the pantry or fridge that sounds good to you. That’s the best part about skillet dinners- you can just throw more stuff in until it looks like a meal. (Spoken like a true food professional, amiright?)
*P.S. This post is not sponsored by Aidell’s, I just like them! They are the best option at my local grocery store for natural link sausages.
- 1-2 tablespoons grass-fed butter or lard
- 1 onion, chopped
- 1 bell pepper, chopped
- 2 cups cooked rice, any variety
- 4 andouille sausage links, cooked and chopped
- 1½ cups or 1 drained and rinsed can of red kidney beans
- 1 teaspoon salt
- 1 teaspoon black pepper
- 1 teaspoon onion powder
- 2 teaspoons garlic powder
- 1 tablespoon paprika (I use smoked paprika but any kind will do)
- ¼ teaspoon red pepper flakes or cayenne pepper (or both)
- 1 teaspoon oregano
- 1 teaspoon thyme
- In a cast iron skillet, heat the butter or lard over medium heat. Saute the onion and bell pepper until they begin to soften.
- Add the rice, sausage and red beans. Stir and let cook until warmed through.
- Add the spices and stir until completely coated. Serve warm in the skillet.
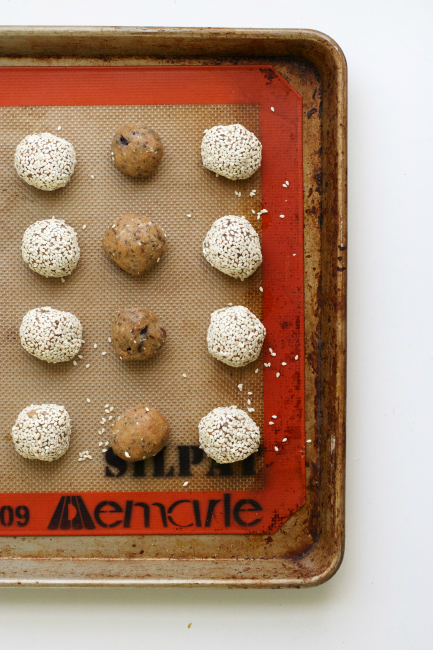
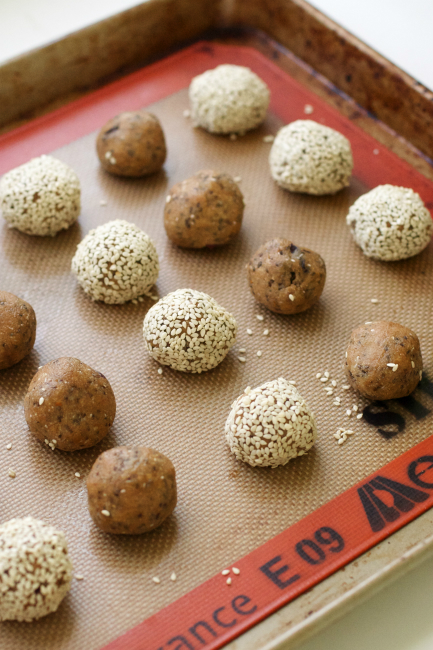
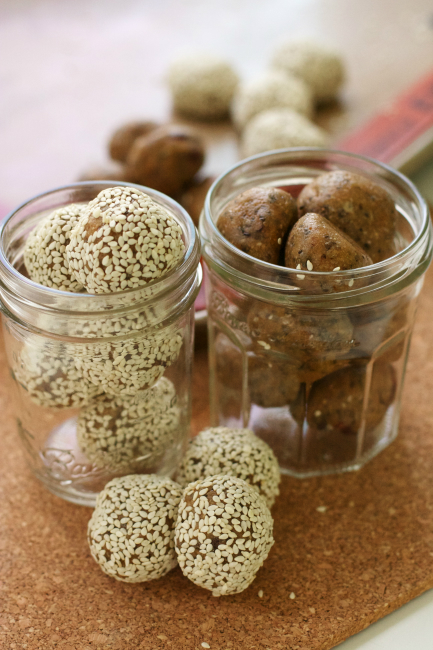
Spiced Nut Butter Balls
I am a fool for this snack ball trend.
They are so good! So easy to pull together! So much better to snack on then junk food!
The one thing they don’t have going for them is a good name- Nut Balls is just awful. So is Snack Balls. Energy Balls? Nut Butter Balls? A little bit better, but not by much. I think I’ll quit before this becomes an entire post about naming snack balls. (Ugh, I even hate typing that!)
Let’s call them snack bites instead, shall we?
I feel a lot better about snack bites. My mood is changing already!
I found this lovely recipe at The Gracious Pantry and of course I junked it up with more nut butters and extra seeds and things. I couldn’t resist! They just needed to be rolled in something.
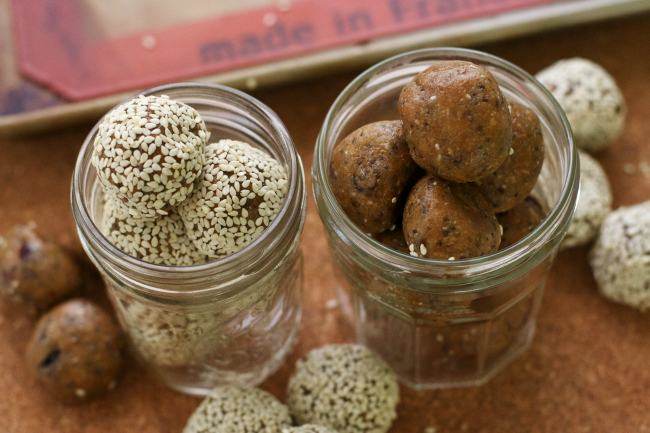
I have to admit, though, that I actually like the plain ones better. The sesame seeds get stuck in my teeth (awesome mental picture of me happening right now, you’re welcome). Don’t let that stop you now, both taste great- you could roll them in shredded coconut, too, if you’re more into that.

I think these will keep in the fridge or freezer for quite a while, but I can’t tell you from experience. They go fast in this house. Last night, I pulled some out for the family to taste test and the kids full-on grabbed them from my hands and devoured them, then looked at me like rabid dogs until I brought out a few more. My one-year-old daughter literally shoved a whole one into her mouth without a second thought. It was like watching a snake swallow an egg or something, I couldn’t look away. My advice is to make these after your kids go to bed and hide them in the back of your freezer if you ever want to taste them. Just sayin’.
(Disclaimer- She didn’t actually swallow it whole, she did chew.. I would not stand idly by and watch her choke, I promise.)
Oh, and they’re called spiced nut butter balls because there are spices in there! Cinnamon, nutmeg, ginger, allspice, cloves, the whole gang. Even orange zest joins the party. As usual, you can take them or leave them, whatever your preference. I think it’s fun to eat these so-called cold-weather spices all year long, but if it’s not your thing, that’s cool, too. Just don’t wait until fall to make these- they taste great right now. (Just ask my kids.)
- 1¼ cups almond meal
- ¾ cup nut butter (I use ¼ cup almond butter, ¼ cup sunflower seed butter and ¼ cup tahini/sesame paste)
- ¼ cup chia seeds or sesame seeds (or a mix of both)
- ¼ cup plus 2 tablespoons maple syrup
- 1 teaspoon vanilla
- Zest of ½ large orange
- ½ cup dried cranberries (sweetened with fruit juice if you can find them that way)
- 1 teaspoon cinnamon
- ½ teaspoon ground ginger
- ½ teaspoon ground nutmeg
- ¼ teaspoon ground cloves
- ¼ teaspoon allspice
- ¼ cup shredded coconut or almond meal (optional)
- sesame seeds or shredded coconut, for rolling
- Combine almond meal, nut butter, chia or sesame seeds, maple syrup, vanilla, orange zest, dried cranberries and spices in large bowl and mix well. If the mixture seems too wet, add the additional shredded coconut or almond meal until you have a firm dough to roll.
- Form into balls. Roll them in sesame seeds if you like.
- Place balls on a parchment lined cookie sheet and place in the freezer for at least 2 hours.
- Store in the refrigerator or freezer in an airtight container.
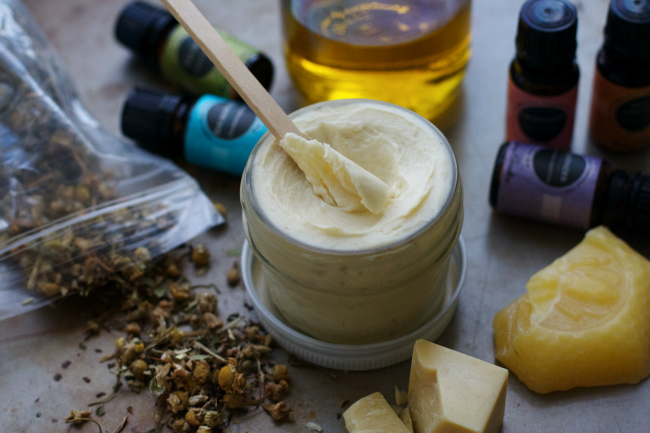
Homemade Diaper Balm (Cloth Diaper Safe)

I know we usually talk about food around here, but today I want to talk about babies. More specifically, baby bottoms. Just a little segway from our normal topics of conversation.. no big deal.
You probably know this (or maybe you’d just guess it from my other granola-mom-type interests), but my babies wear cloth diapers. I’m not really sure why we started using them in the first place- probably something to do with the environment or being too cheap to buy disposables all the time or something. Whatever it was that started it all, we have had a great experience with them on both our kids. (BumGenius 4.0 is our favorite, if you’re wondering.)
One of the things about babies, though, whether you cloth diaper or not, is that they get diaper rash. Fact of life. And for my kids, it gets worse when they sit in their cloth diapers. Granted, part of the reason is that they’re sitting in their own pee, but the other part is that they’re not always protected with diaper cream. Most diaper creams are not cloth-diaper-friendly since their job is to repel moisture (meaning when the cream is absorbed into a cloth diaper, it will repel the moisture that it’s supposed to absorb), so we skip them and stick them in disposables until the rash passes.

At one point, I found a cloth-diaper-friendly balm that I liked-Angel Baby Bottom Balm– but I was not going to keep spending that much money for two measly ounces of diaper cream, so I set out to make some at home. This was my first homemade beauty-type item, you guys! It’s pretty easy if you can get all the ingredients you need.
The coconut and olive oil were already in my cabinet, but the cocoa butter, beeswax and shea butter took a little effort to find in their natural form. I ended up finding those ingredients easily at Whole Foods, so if you have one near you, you’re golden. If you don’t, get busy with your search engine and you’re sure to find them on the interwebs. Just make sure they are all natural and have no additives.
All of the ingredients have natural healing properties- antibiotic, anti-fungal, antiviral, antioxidant, antibacterial, antimicrobial, anti-inflammatory- you name it, this balm helps to fight it. The essential oils are just my own blend- you can feel free to substitute other oils if you like and add more or less depending on your baby’s sensitivity.
This is also a great healing moisturizer for dry skin, cuts, scrapes, burns, eczema, razor burn, bug bites, cradle cap, and more- healing for the whole family in one small jar. But what’s most important are those baby bottoms. Happy bottom, happy baby.
- 1 ounce olive oil
- 2 teaspoons chamomile flowers, dried
- 1 ounce coconut oil
- 1 ounce shea butter
- 1 ounce cocoa butter (chop if necessary)
- ½ ounce beeswax (chop if necessary)
- 5 drops Tea Tree essential oil
- 2-3 drops Lavender essential oil
- 2-3 drops Eucalyptus essential oil
- 2-3 drops Sweet Orange essential oil
- 2-3 Grapefruit essential oil
- Heat olive oil on low heat in a small saucepan- do not bring to a boil- for about 10 minutes. Add chamomile flowers and stir for 10 more minutes, then take off the heat and let steep for an hour or two.
- After an hour or two has passed, strain the chamomile oil into the bowl of a double boiler. Add coconut oil, shea butter, cocoa butter and beeswax until melted. Remove from the heat and move the mixture to the bowl of your stand mixer or a container safe for mixing with a stick blender. Let the mixture cool.
- When the mixture is at room temperature (bottom of the bowl is no longer warm), add your essential oils.
- Using a standmixer or stick blender, mix on high until the mixture is completely cool and turns from clear liquid to a white solid. If this is not happening- if the mixture is too runny or doesn’t turn- place the bowl in the refrigerator for 5-10 minutes, scrape down the sides of the bowl and try again. If that still does not work, add more beeswax or cocoa butter (these are solid at room temp) until you reach the desired consistency.
- Scoop into a small jar with a tight fitting lid. Store in a cool, dry place.
- Use within one year.
Recipe Fails and Other News
In the interest of keeping it real, I just wanted to tell you what goes on behind the scenes of this jam-up blog of mine, lest you believe that I am churning out perfect recipes day in and day out.
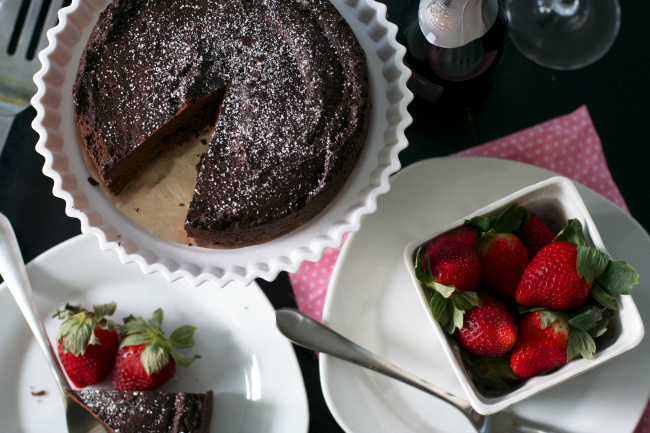
- That chocolate cake up there? Looks so yummy, right? I experimented a bit with the unsweetened chocolate I had on hand and some honey.. and it didn’t turn out so well. It was like fudge, but not in the good way. The original looks great, though- check it out at Gimme Some Oven.
- I have been baking lots of muffins lately (apple cinnamon, pumpkin streusel) with coconut flour. I enjoy the taste and texture, but I am having the hardest time getting them to pull away from the muffin liners. Is it just me? Is it the liners? Has anyone else had this problem with coconut flour muffins?
- I already told you I can’t fry eggs on my stainless steel- help, please! How do you fry your eggs? I need a tutorial. We eat a ton of eggs, so I am not above buy a new pan specifically for egg-frying.
- I wish I could photograph a Larabar and a few spoonfuls of peanut butter and call it a lunch recipe. It’s tough to pull lunches together without planning in advance. That’s a reason there aren’t too many lunch recipes on Oven Love. 😉
Just wanted to make sure it’s out there loud and clear that all my meals aren’t picture perfect and neither am I- far from it! Now I’m off to figure out what to make for dinner.. any suggestions?
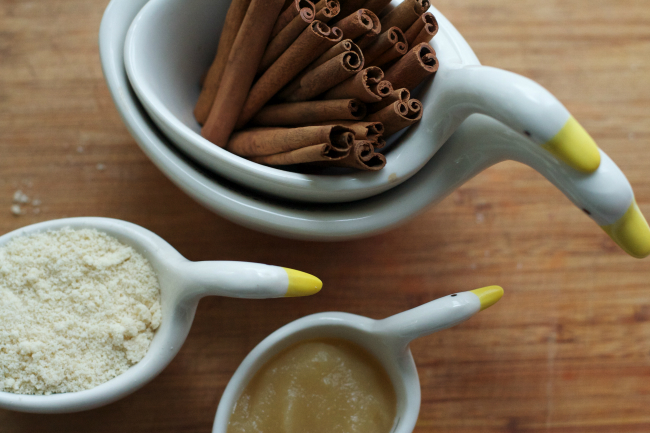
Apple Cinnamon Muffins (Gluten-Free, Grain-Free, Paleo)
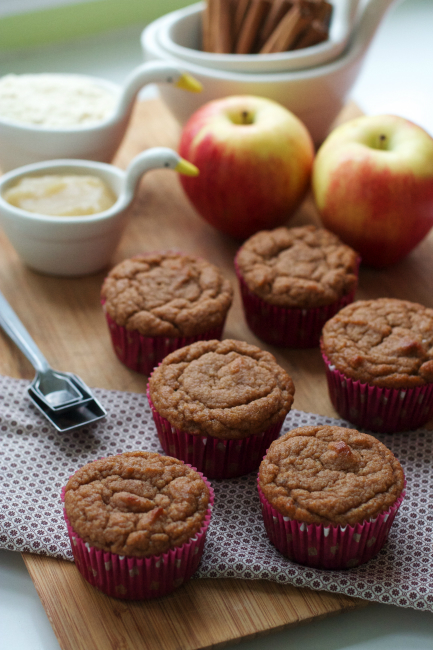
I might need a Paleo baking intervention. I’ve gotten the hang of it now and the treats are flowing freely again in this house.. but my tummy troubles have not disappeared. (They are still undiagnosed.. go here for more of my story.) Now my wheels are turning again, trying to figure out why.
I thought that changing things around, doing things the Paleo/gluten-free/lots-of-other-stuff-free way that things might work themselves out. And now, I’m thinking maybe I need to go further.. more drastic.. start from scratch and heal (aka GAPS or something similar). I’m trying to figure out what more I can do.
But I’m realizing now that I can’t do it.
I can’t heal myself. I can’t do this in my own power. I believe in a God who heals. The God who came to earth and died for me, who goes before me and stands beside me. The God who changed my heart- I certainly didn’t change it myself. So why am I believing that I can change myself now?

“Agree with God and be at peace; thereby good will come to you. Receive instruction from his mouth, and lay up his words in your heart. If you return to the Almighty you will be built up; if you remove justice far from your tents, if you lay gold in the dust … then the Almighty will be your gold and your precious silver. For then you will delight yourself in the Almighty and lift your face up to God. You will make your prayer to him and he will hear you, and you will pay your vows. You will decide on a matter and it will be established for you and light will shine on your ways.” Job 22:21-28
It is easy to get bogged down in the day-to-day issues of life and believe that if we just tried harder, if we just planned better, if we were just better people that things would go our way. But the truth is that God is the perfect planner and his perfect plan for us has been in motion since before there was time. He is good and his plan is good, even if we can’t see it (or if we have a different definition of the word ‘good’). His word says that if we agree with him, good will come to us- but it doesn’t say when. Maybe it won’t be until Heaven, but it will come; so long as we believe in him and his promises.
So maybe I will try another approach to healing, maybe I won’t. I don’t know now. But I know I will be spending time with the Lord, talking and listening. Trusting in the one who knows suffering better than any man. And rejoicing because I know the end of the story (spoiler alert: it’s a happy one. :))
- 2 cups of almond meal
- 3 eggs
- 1 cup of unsweetened applesauce
- ¼ cup of maple syrup
- 1 tbs of cinnamon
- 1 tsp of baking powder
- 1 tsp of baking soda
- 2 tsp of vanilla extract
- Preheat oven to 350 degrees.
- Blend the eggs together in a separate small bowl.
- Mix together all the above ingredients and slowly stir in the blended eggs.
- Pour the batter evenly into 12 muffin baking cups.
- Cook 20-25 minutes until the tops are golden brown.
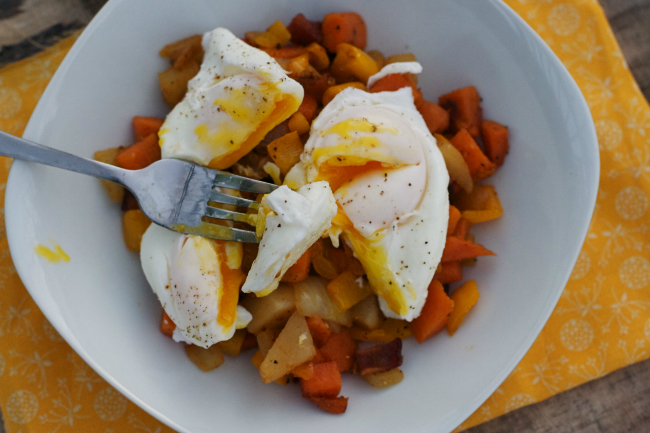
Sunrise Breakfast Hash with Poached Eggs
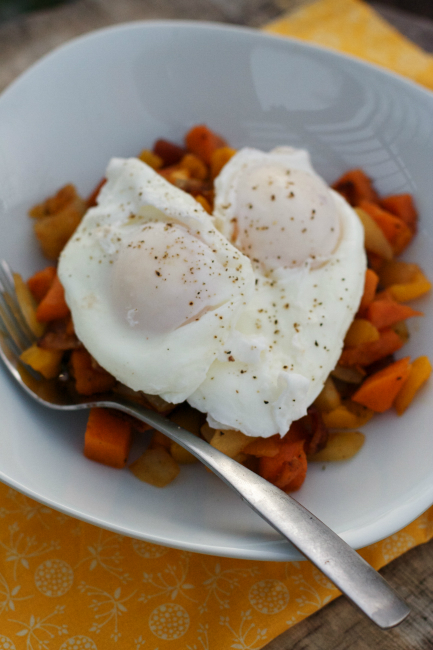
Sweet potatoes, bacon, poached eggs.
My darlings.
I have been eating this combination regularly for weeks and I just can’t get enough. I am a like a bottomless pit of eggs and bacon- the vegetables are just thrown in for variety and nutrition (and because we would go bankrupt eating pastured bacon every day). These three ingredients are always in my house, so this is one of my favorite go-to meals when I haven’t planned ahead (I told you I need to take my own meal planning advice).

Have you ever poached an egg? You don’t have to poach the eggs for this meal if you don’t want to. (I am certainly not against frying them, you know me.) But why does poaching seem so fancy? It’s really just dropping an egg in some simmering water for a few minutes and scooping it out. I was scared of doing it until I bit the bullet and tried it out.. now it’s my go-to method.
I would gladly fry my eggs up in some butter, but I still haven’t mastered the art of frying eggs in stainless steel pans without breaking the yolks (there you go.. my secret’s out). So poaching the eggs is actually the lazy way in my house. We take our eggs seriously so I don’t want to risk wasting one on an already-doomed experiment in stainless steel. Is there any magical tip out there that I need to know? I mean, I’m cool with eating poached eggs all the time, but a girl needs a fried egg now and then, too.
Three more things:
1) I called this Sunrise Breakfast Hash because Sweet Potato, Yellow Pepper, Turnip, Onion and Bacon Hash was just not happening. Also, because it’s bright and sunny looking..
2) If I have spinach or arugula or another leafy green around, I will top it with the hash and egg for a yummy salad- no dressing required! You can also add other root vegetables to the mix if you don’t like turnips- try rutabagas, parsnips or butternut squash if you like.
3) I am really not trying to make all of my food look like hearts (see the butter on these muffins?). It’s just happening spontaneously (except for my Valentine’s veggies). But feel free to take it as a secret love message. XOXO!
- 4 slices of thick cut bacon (pastured/grass-fed if you can find it)
- 1 sweet potato or yam, peeled and chopped
- 1 turnip, peeled and chopped
- 1 onion, peeled and chopped
- 1 yellow or orange sweet pepper, seeded and chopped
- water or broth/stock
- 2-4 fresh eggs (they poach better)
- 1 tablespoon apple cider or white vinegar
- salt and pepper to taste
- Cook the bacon until crisp. Let cool; chop or crumble, then set aside.
- Using the bacon grease, lard, coconut oil or grass-fed butter (like Kerrygold), heat a saute pan (that has a lid) over medium heat. Add the sweet potato, turnip, onion and sweet pepper and saute for a few minutes until the mixture begins to brown.
- Add some water or stock to the pan. It should be hot enough that it begins to steam. Put the lid on the pan and let the vegetables cook until tender (the sweet potatoes will take longest. check them with a fork to make sure they are soft). You may add more liquid if necessary. Be sure to stir it around so the vegetables don’t stick or burn.
- While the vegetables are cooking, put a small saucepan filled ⅔ full with water on the stove and bring to a simmer. Add the vinegar. Do not bring to a full boil. When the water is just simmering, drop in your eggs carefully by a large spoon or measuring cup, one at a time. They will spread a bit and some foam will rise to the top of the water- that is normal.
- Cook until your desired doneness- 6-7 minutes for a runny yolk, 8-10 for soft cooked yolk and longer for a hard cooked yolk. Remove the eggs with a slotted spoon and let them drip dry.
- To plate, mix the bacon with the vegetables and transfer the mixture to a shallow bowl. Top with the poached egg and season with salt and pepper. Serve immediately.