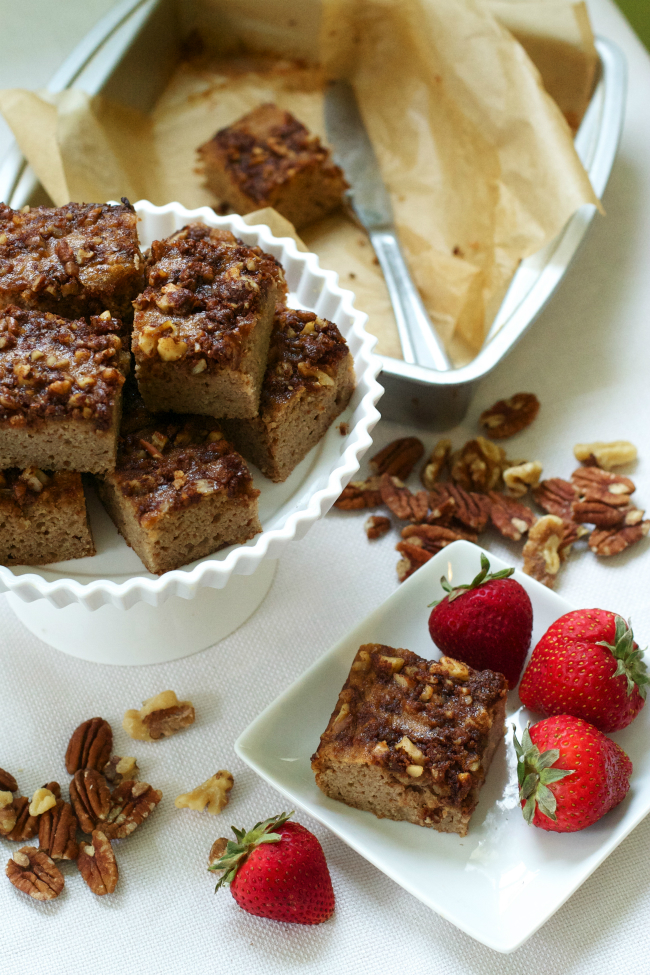
Coffee Cake (Grain-Free, Paleo, GAPS)
The scene in my kitchen at 6:30AM this morning:
Two half-dressed kids are clamoring at my feet for their milk cups to be filled. Three-year-old Elliott climbs up into the helper tower, discovers the pan of coffee cake and yells, “LUCY! CAKE FOR BREAKFAST!” She squeals and nods her head to tell us she’s on board. I cut them each a small piece, they chomp away quietly, and then stick out their little hands for more. And so the day begins.
I think one of the best mom tricks for getting your kids to eat a little healthier is to give their food cool names. This definitely isn’t “cake” in the normal, American sense of the word, but in our house right now, it’s a treat. Especially at 6:30 AM. I feel good about all the ingredients, so I’ve got no problem serving them this kind of cake for breakfast.
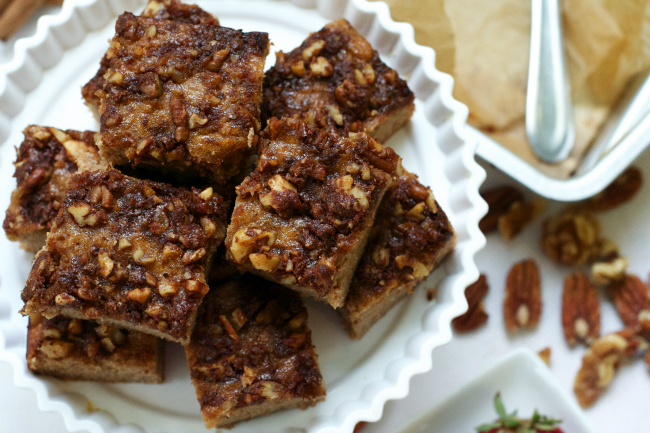
The cake’s main ingredients are coconut flour, eggs, coconut oil, squash puree, a little honey and some spices. I get my coconut flour and oil from Tropical Traditions. On top is a “crumb” topping of chopped nuts, coconut oil, cinnamon and some coconut sugar. This is a lovely cake for snacking- it’s moist, but sturdy- it’ll hold up well in lunch bags or stuffed quickly into your purse when you’re on the go. It’s great with some fruit and yogurt in the morning, or on your brunch table; the perfect match for your afternoon tea or as a late-night snack without the guilt.
I have missed cake since I’ve been on GAPS. I know there are GAPS-legal cake recipes out there.. but it’s not like I can be eating cake all the time just because it’s technically legal. So a little coffee cake like this is just what the doctor (nutritionist?) ordered for me this week. I just have to work on my self-control and try not to eat more than one (or two) pieces a day.
I guess I can always call in my little people to help out with that. Cake for breakfast!
- ½ cup coconut flour, sifted or lumps removed with a fork
- ¼ teaspoon baking soda
- ½ teaspoon sea salt
- 1 teaspoon cinnamon
- ½ teaspoon fresh grated nutmeg
- ½ teaspoon ground ginger
- ¼ teaspoon ground cloves
- ¼ teaspoon allspice
- 6 eggs at room temperature
- ¼ cup coconut oil, melted and cooled or very soft
- ½ cup honey
- ½ cup squash puree (any squash will do; summer or winter. I used acorn squash that I had frozen. You could also use pumpkin, carrot, apple, pear, etc.)
- 1 teaspoon pure vanilla extract
- ½ cup nuts, chopped (I used walnuts and pecans)
- 2 tablespoons coconut or date sugar (you can substitute honey to be 100% GAPS legal, but the topping will be a little stickier)
- 1 tablespoon coconut oil
- 1 teaspoon cinnamon
- Preheat the oven to 350 degrees. Prepare an 8×8 baking dish with parchment paper.
- In a large bowl, combine coconut flour, baking soda, sea salt and spices. Make sure there are no large lumps of coconut flour.
- In a medium bowl, whisk eggs, coconut oil, honey, squash puree and vanilla extract until well combined.
- Pour the liquid slowly into the dry ingredients, whisking well. Continue to whisk until the mixture begins to thicken up. Pour the batter into the prepared pan.
- In a small bowl, mix the nuts, coconut sugar, coconut oil and cinnamon. This is your topping. Sprinkle evenly over the batter in the pan.
- Bake for 30-35 minutes until golden brown and a toothpick comes out clean. Cool before serving and keep in an airtight container.
Baked Eggs with Spinach and Bacon

We like eggs.
You might already know that. (The backyard chickens are a dead giveaway, no?)
Since we’re moving, we said our goodbyes to the chickies a few weeks ago and they moved in with our friends across town. We no longer have eggs 24/7, which feels really weird. And it means I have to BUY eggs, just like everyone else. Not only do I have to buy them, but I have to buy them in flats (2 1/2 doz) instead of dozens because we can seriously tear. up. some. eggs.
Sometimes I get two flats at a time. And they disappear. Because we really like eggs.

My personal preference is a runny yolk, but not too runny. I like it where it just oozes slowly down your plate and you can dip stuff into it. YUM. Baked eggs are a perfect way to get my fix in this department (although I cooked them just a bit harder than I like in the ones pictured).
You can’t see it too well in the photos, but there’s spinach and bacon hiding underneath those eggs. An awesome surprise to find at the bottom of your breakfast dish. Or lunch or dinner.. or brunch, or midnight snack.
Eggs for President!

One of these dishes was filling enough for one person, but if you’re serving it alongside something else, I’d suggest splitting it up into 4 smaller ramekins. Add some toast/fruit/yogurt/salad and you can spread that meal a little further.
And let’s not forget to mention the cheese. I used raw cheddar, but I think fontina, havarti (GAPS-friendly), parmesan or gruyere would all be excellent choices. You can also skip the cheese entirely, if that’s your thing. The eggs can hold their own.
- 4 slices of bacon
- 4 cups fresh spinach
- 1 cup of shredded cheese (I chose raw cheddar)
- 4 eggs
- ¼ cup heavy cream or coconut milk (optional)
- chopped fresh parsley, for serving
- Preheat oven to 400 degrees and butter 2-4 small oven-safe dishes.
- In a hot skillet, cook bacon until crisp. Set aside. In the same skillet, wilt the fresh spinach.
- Fill the dishes with the spinach, then top with the bacon (I suggest crumbling the bacon a bit- I left mine in small strips and I would have rather had it crumbled or chopped). Add a bit of the cheese (reserving some to top the eggs), then add the eggs on top of that. Pour a bit of cream on top of the eggs, then add the remaining cheese. Season with salt and pepper.
- Bake for 15-20 minutes, depending on how set you like your egg yolks. I would check them around 10 minutes (especially if you like your eggs runny).
- Top with the parsley and serve immediately.
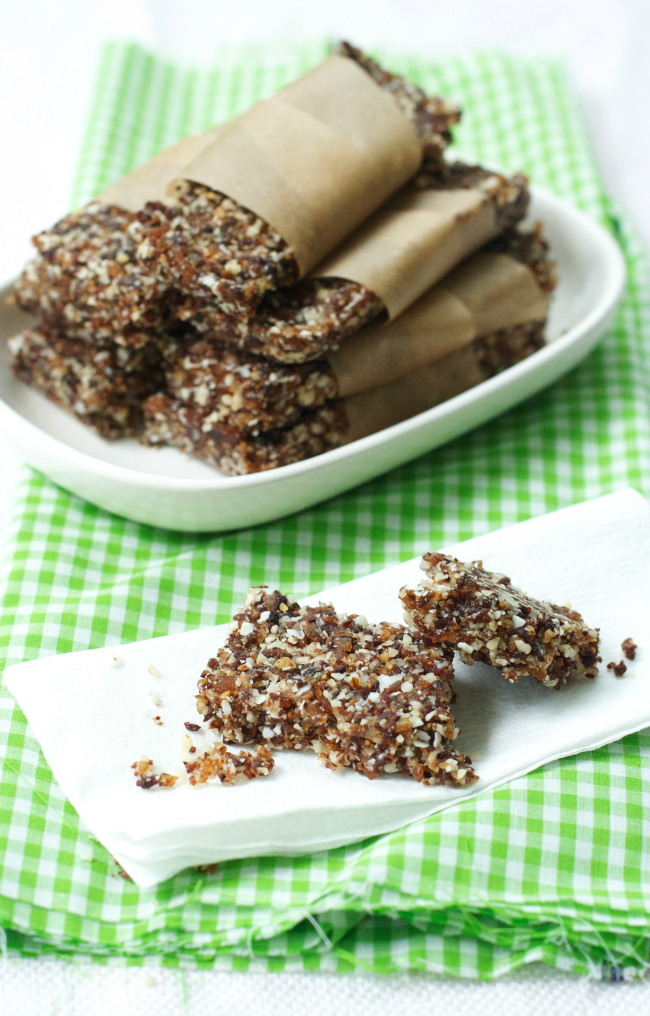
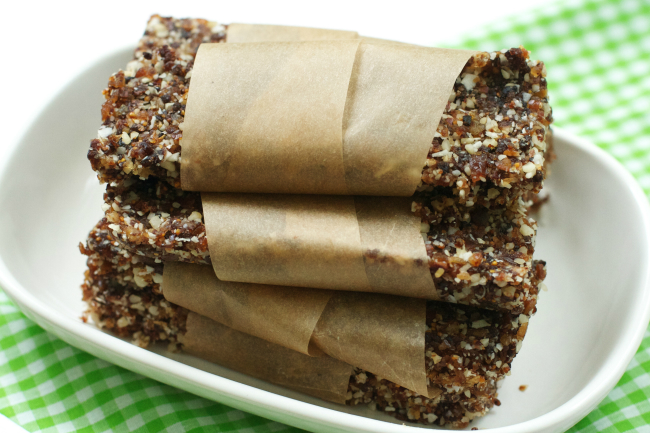
Hazelnut Fig Bars
I’m in limbo.
We are moving soon (just two months away..). It’s soon enough that I’m starting to get sad/nostalgic/motivated to start fresh/etc; but not soon enough that I can actually do anything about it. It’s too soon to start packing, too soon for goodbyes. I want to soak up the last bit of time here, but I’m having trouble with that. Nick is gone at training and I feel like I’m just doing busy work- filling up the time, not really enjoying the time. I’ve made a summer bucket list, but getting through it seems like more work than fun (even though I know I’ll regret it if we don’t do those things before we go).
I think I might be in a cooking rut, too. I was immersed in the GAPS Intro diet for two months and now that I’m on the other side of it, I need to get inspired all over again. I’ve quit meal planning and I’m just cooking on the fly for me and the kids. I need to break out of this whole thing and start fresh!
I did manage to mix up these faux Larabar-type bars a few days ago. It was hard not to eat them all in one sitting- snacks like this are tough for me to resist! It’s not good for me to be the only adult in the house with no accountability. One of these days you will find me laid out on the floor after a nut butter overdose, I’m telling you!
If you’re not into figs, you can substitute another dried fruit or more dates. But you should try them- they’re pretty good. And this is coming from a girl who was a fig hater for the first 20 years of life. Break free, people! Eat figs. Eat food you think you don’t like. It might surprise you. And you can always spit it out gracefully into your napkin, so there’s that.
Where is this post going? I need some direction. What’s going on with you guys? What inspires you? Share with me!

- 1 cup hazelnuts (I pre-soak and dehydrate mine)
- 1 cup dried figs, stems removed
- 1 cup pitted dates
- ½ cup coconut flakes or shredded coconut
- 1-2 tablespoons coconut manna/coconut cream concentrate/coconut oil
- Add hazelnuts, figs, dates and coconut to the bowl of a food processor. Process until all ingredients are finely chopped.
- Scrape down the bowl an add 1 tablespoon of coconut manna. Process until the mixture starts to stick together between your fingers. Add extra coconut manna if necessary.
- Press the mixture into an 8×8 pan (lined with parchment or plastic wrap). Let cool in the refrigerator until hardened, then cut into 12 bars. Keep stored in the refrigerator.
More Refreshing Summer Drinks
 I’m sharing more summer drink recipes over at MPMK today, each of them a fruity treat to enjoy after a long, hot day.
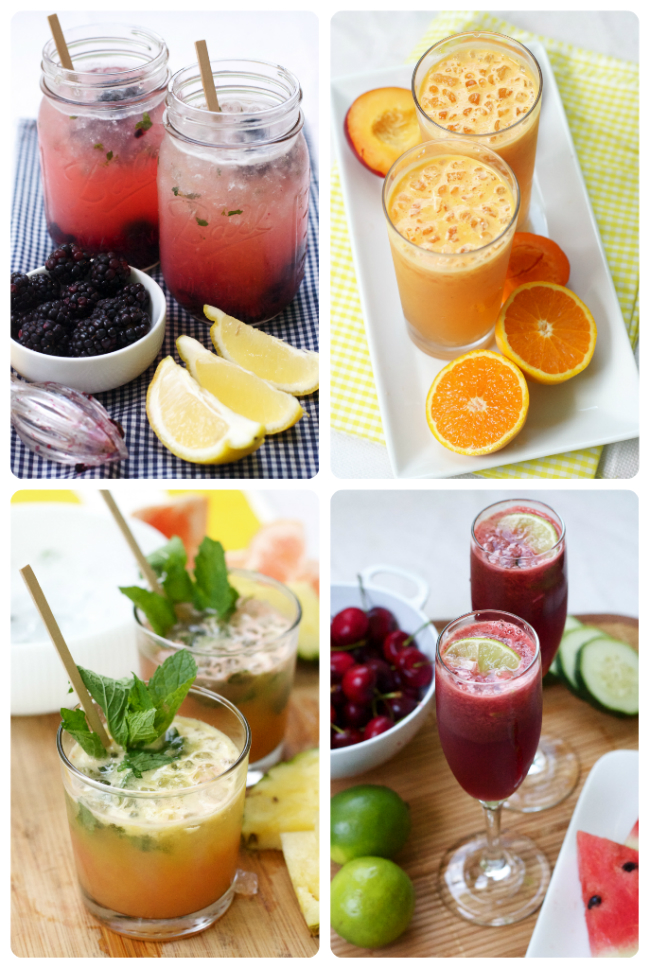
The drinks pictured above are Quick Blackberry Thyme Lemonade, Sweet Summer Cooler, Pineapple Grapefruit Spritzer and Cherry Cucumber Melon Cocktail. Get the last two recipes here and get sipping!
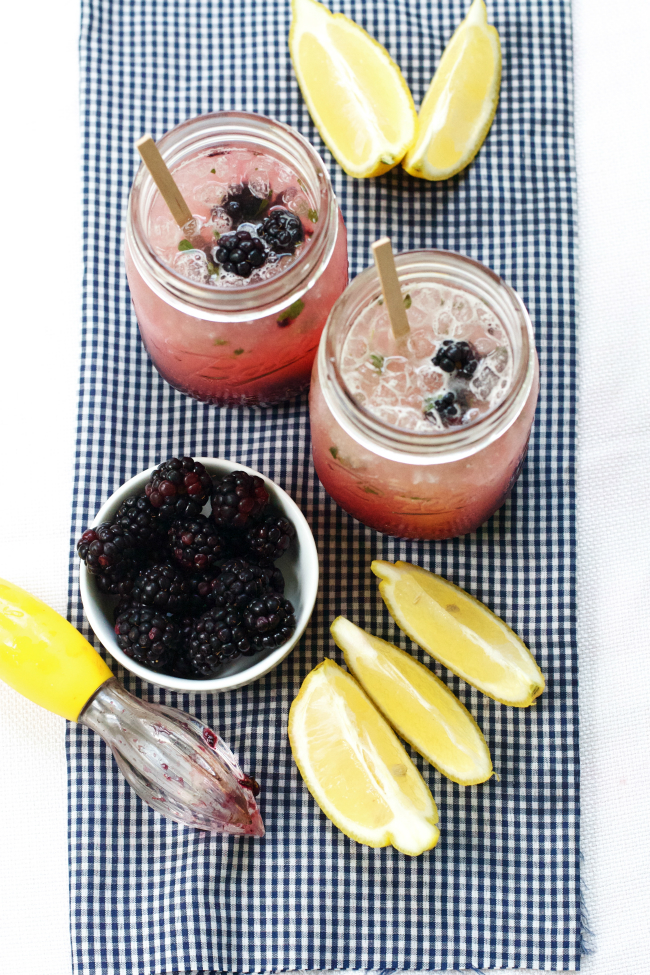
Quick Blackberry Thyme Lemonade
So, I’m planning to bombard you with a whole bunch of drink recipes this week. Is that cool? I had some time without the kids and I got carried away with my experimentation (it looked like the produce section of the grocery store blew up in my kitchen). All of the drinks turned out to be pretty tasty, so I’ve got to share. I hope you’re thirsty.
I call this “quick” lemonade because you don’t have to worry with making simple syrup on the stove and waiting for it to cool before you can take a drink. I just juiced some lemons, whisked some honey in with the juice and then added that to a glass of crushed blackberries and thyme. Cover that with cold water (and/or some vodka) and you’ve got a quick, refreshing something-to-sip.
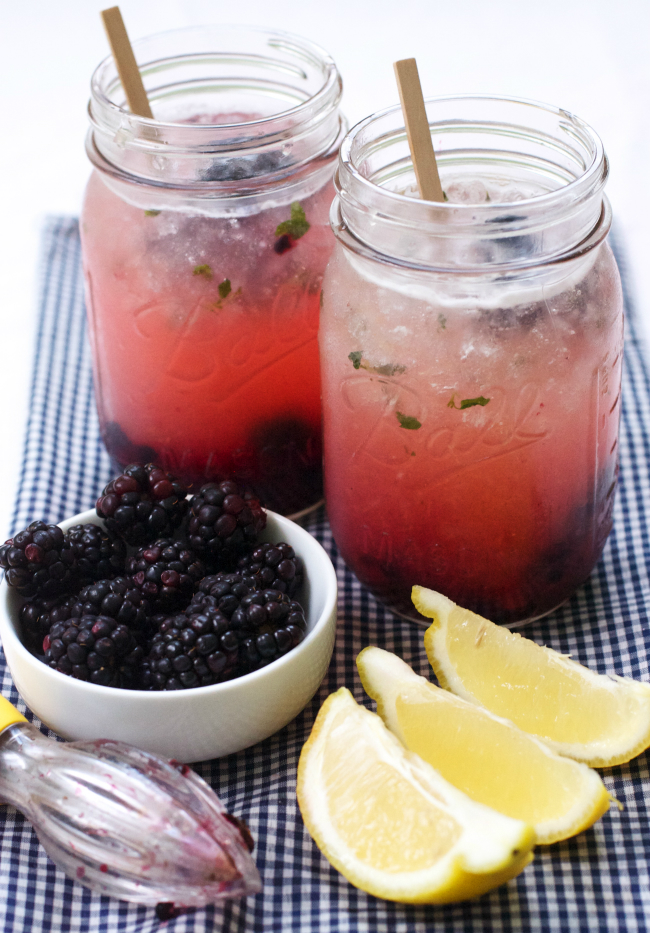
These are really low maintenance- I would put a few caps on those Mason jars and take them out on a picnic.. probably with this salad. Summer heat, I am ready for you!
PS- Try a raspberry or strawberry version to mix it up.
- ½ cup blackberries, divided
- fresh juice of two lemons
- 1 tablespoon honey
- a few sprigs of fresh thyme, removed from the stem
- 2 shots vodka (optional)
- water
- Split ¼ cup of between two glasses. Muddle (smash) them up in the bottom of the glasses.
- In a small glass or bowl, whisk lemon juice and honey. Split the juice between the two glasses and add the thyme leaves.
- If you’re adding the vodka, add one shot to each glass. Add ice and then top with water and stir. Top the glasses with the rest of the blackberries.
Sweet Sunset Cooler
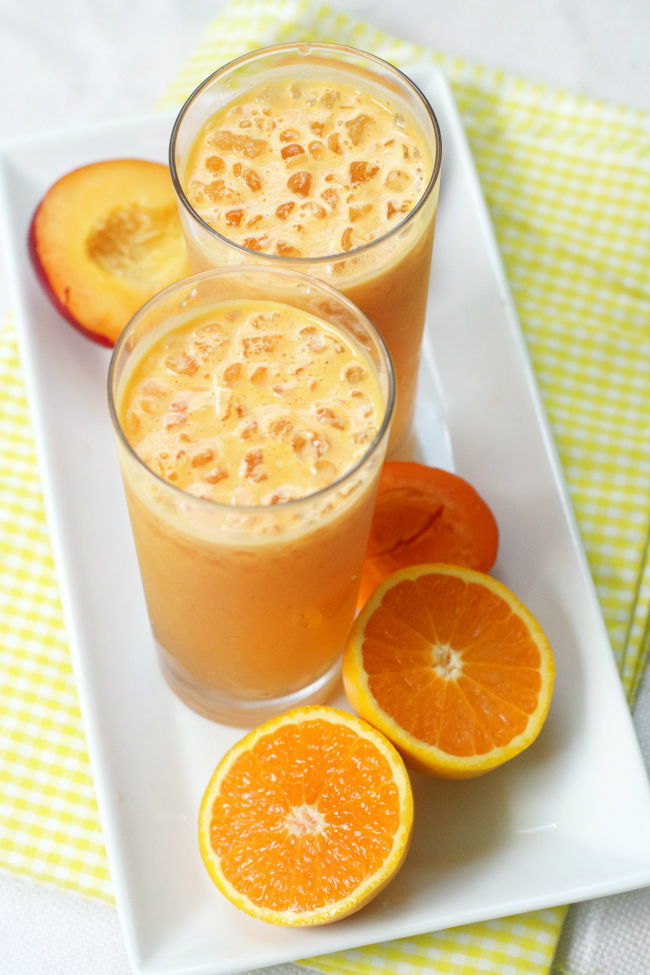
I’d like to introduce you to your new favorite drink of Summer 2013: the Sweet Sunset Cooler.
I am all about this drink! It really surprised me. I typically don’t buy apricots or nectarines (I have a love/forget-to-love relationship with stone fruit), but I picked some up on a whim and I am glad I did. I don’t know what my deal is with stone fruit.. I always forget how good it is.
Here’s what’s inside the glass: oranges, pineapple, apricots and nectarine. If you want to keep it simple, just add a little ice and water. If you want to step it up a bit, add some ginger ale or seltzer. If you’ve had a long day or you want a fun party drink, add some rum or vodka.

I used my juicer for this, but you can still make it if you don’t have a juicer. You can run the fruit through a blender and then press it through a strainer to remove all of the juices. You could also buy pre-packaged juices, though I’m not sure you can readily find apricot and nectarine juice at your local grocery store. (If you can, lucky you!)
Take advantage of the fresh summer produce and make these coolers for yourself and someone you love this season. Right now, I’m imagining packing them up in Mason jars for a sunset picnic, or just escaping to the backyard for a few sips with my mister. Whenever or wherever, this is going to be my summer go-to drink. Cheers!
- 2 oranges, peeled
- ¼ pineapple, tough skin removed
- 1 nectarine or peach, pitted
- 2 apricots, pitted
- 1 shot vodka or rum (optional)
- ginger ale, club soda, seltzer water or water
- Run oranges, pineapple, nectarine and apricots through a juicer. (If you don’t have a juicer, you can blend the fruit and then strain it to get the juice). Pour the juice into two tall glasses with ice.
- For an alcoholic drink, add a shot of vodka or rum. Then top the juice (and alcohol, if using) with ginger ale, club soda, seltzer water or water to fill the glass. Give it a quick stir and enjoy.
Surviving GAPS Intro: Stages 5 & 6
This is the last post in my five-part series chronicling my journey through the GAPS Intro Diet.
So I am officially done with GAPS Intro! I have been for about a week or so, but I haven’t gotten time to sit down and gather my thoughts about the whole thing. I have actually sat down to write this post a bunch of times and just can’t get into it. I think it’s because I had a tiny breakdown about GAPS, and then I relaxed a little about Stages 5 & 6. Let me explain.
I wrote a little about my episode here, but basically what happened was that I had my first reaction to a newly introduced food and I got discouraged. I thought I would have to be stuck at Stage 4 forever if I couldn’t eat every single food on the list. Then I realized that I am the one in charge of this plan, and that I could make the executive decision to move onto the next stage and try that food again later when I felt ready. That really took the pressure off and allowed me to start trying more new foods and eat more like a normal person (not that people on GAPS Intro aren’t normal.. well, maybe we aren’t, but you get what I mean).
Let me be clear, though- I didn’t cheat or go off the diet, I just moved on and skipped some of the raw vegetables, which I plan on reintroducing eventually.
What did I eat on Stage 5 & 6?
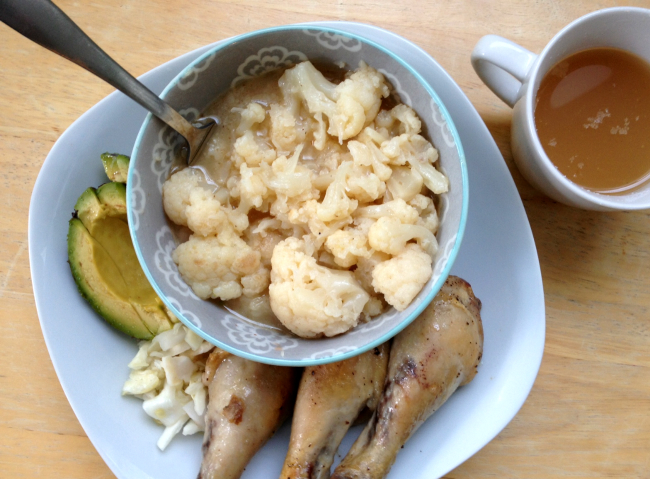
With Stage 5 came raw veggies, applesauce, honey and fruit for juicing. Stage 6 adds whole fruits.
- Scrambled Eggs in Ghee with Avocado and Sauerkraut (my typical breakfast.)
- Eggs with Ham and Asparagus
- Sausage Patties
- Pulled Pork with GAPS Barbecue Sauce (I skipped ahead again and added spices to the barbecue sauce.)
- Roasted Chicken and Vegetables
- Squash and Almond Flour Bread (Yellow Squash and Zucchini)
- New Cooked Vegetables- spaghetti squash, tomatoes, green peppers
- Raw Cucumber, Carrot, Celery
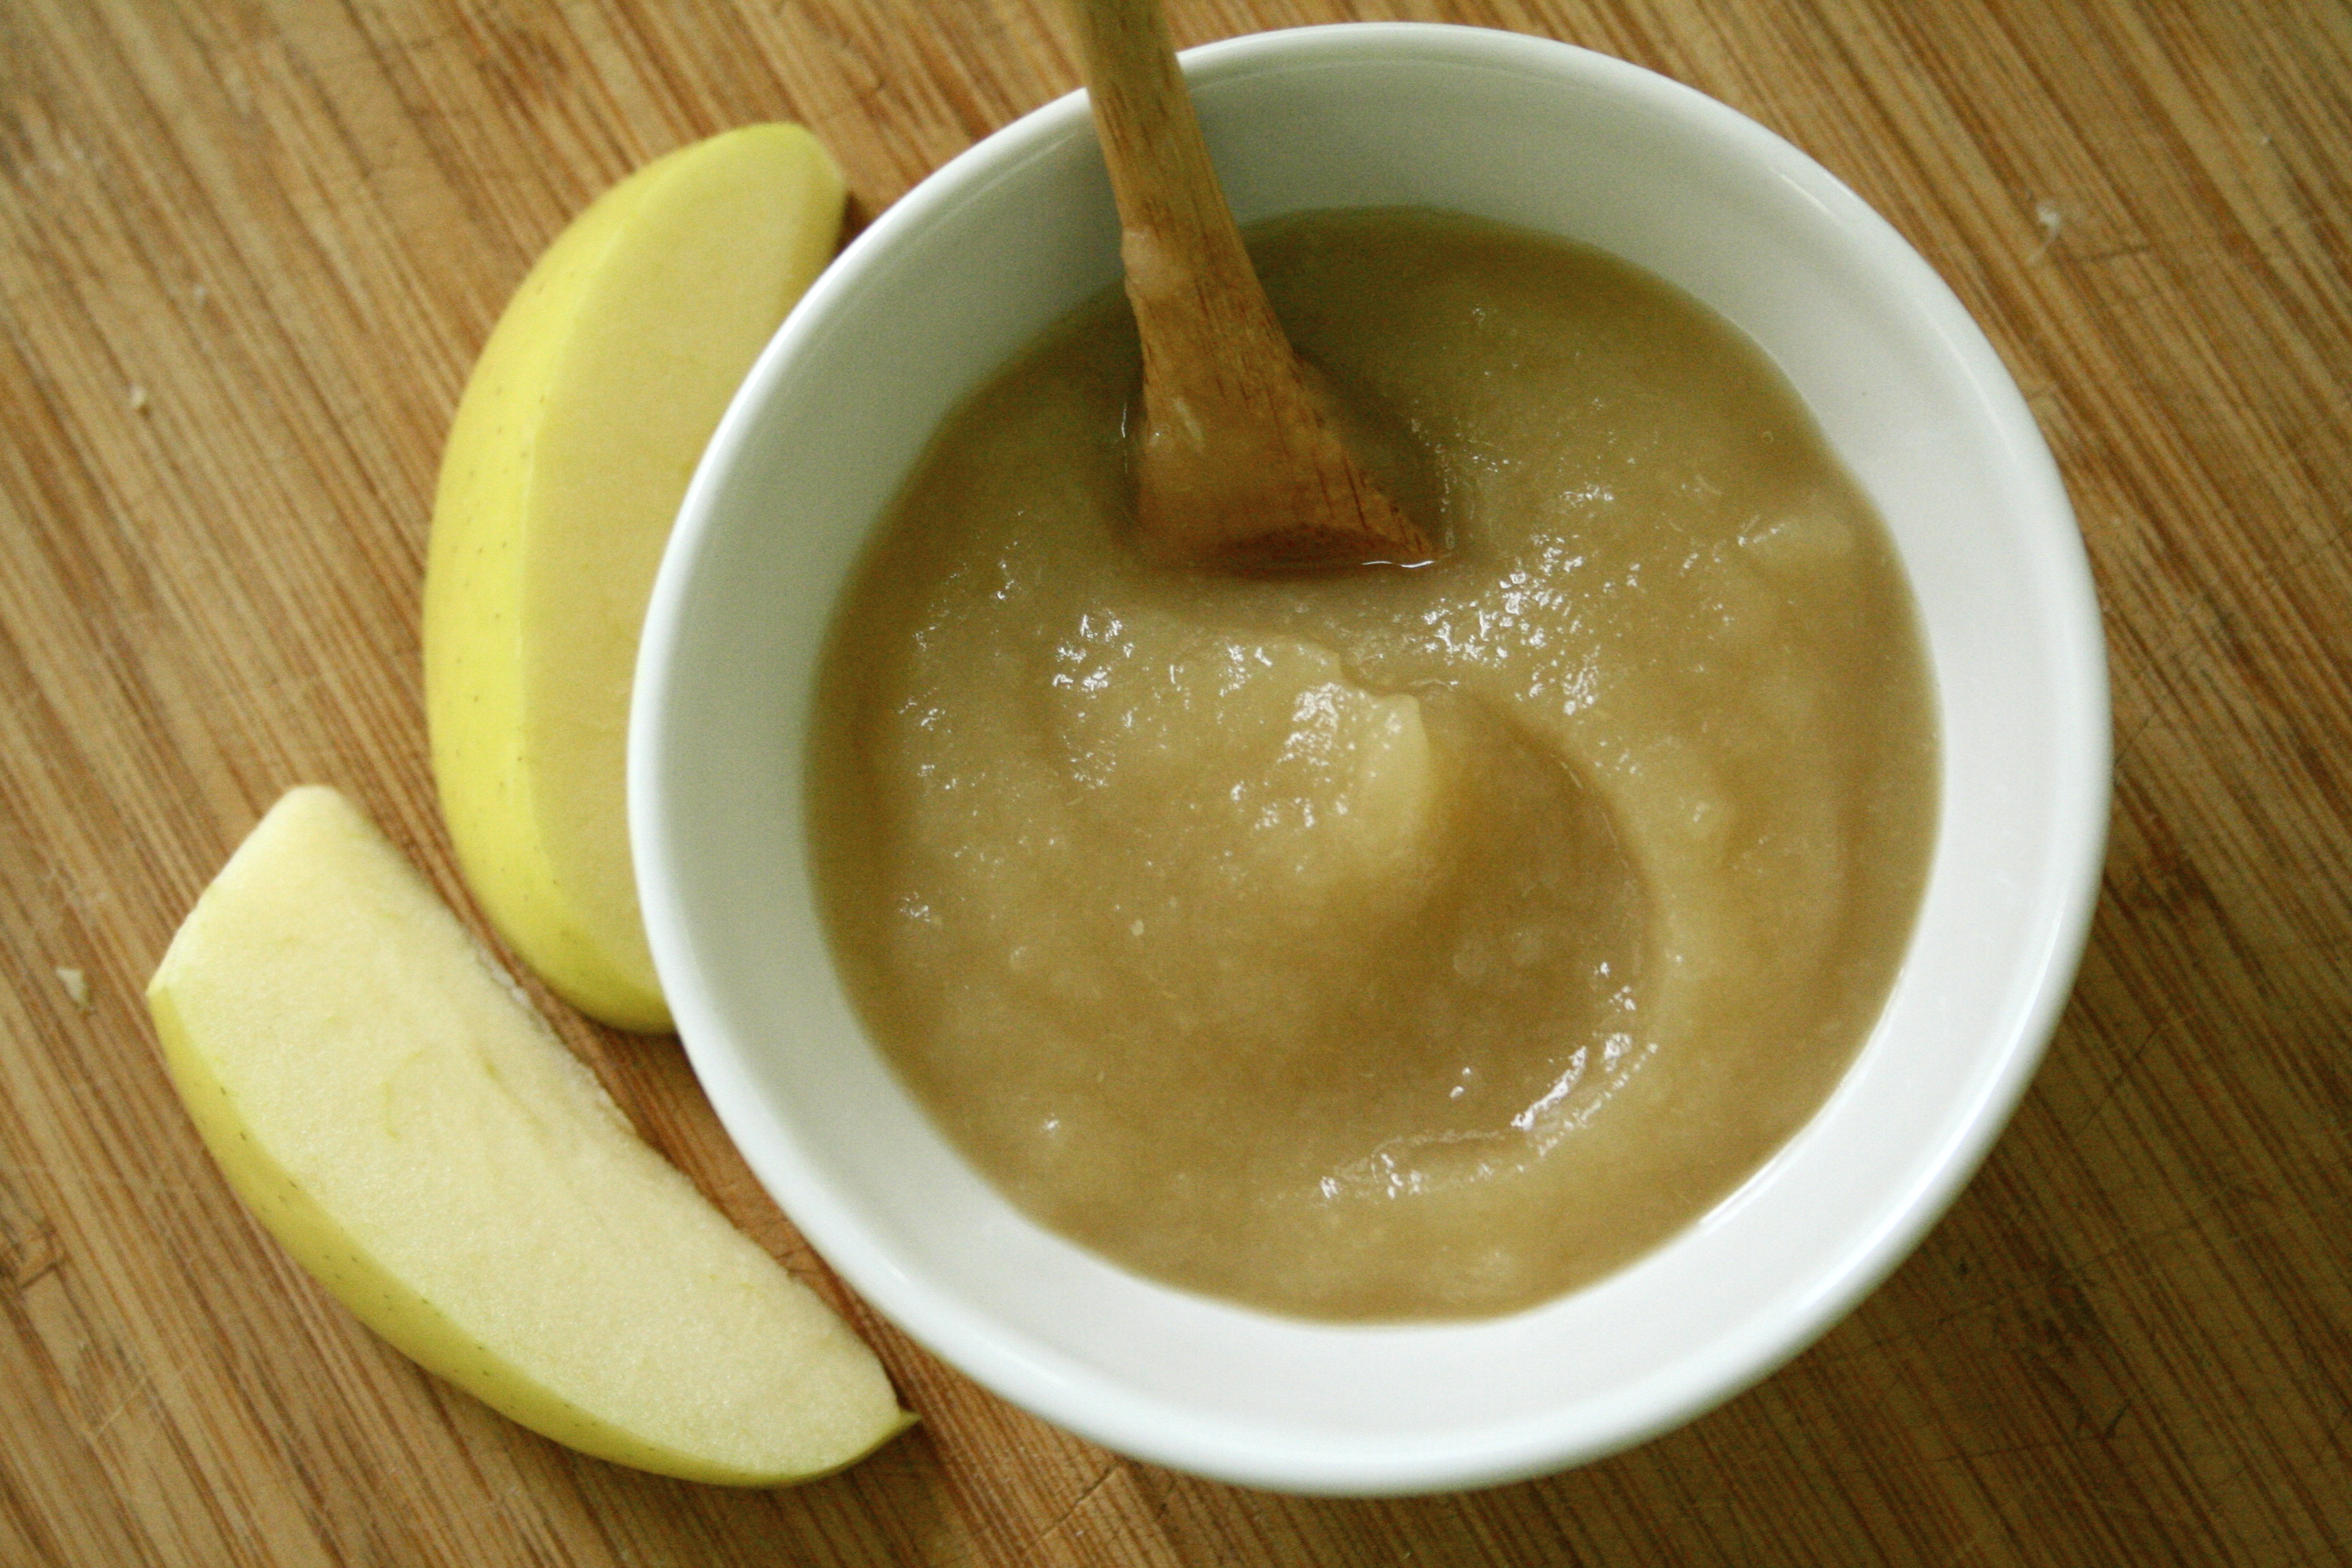
- Homemade applesauce (pictured above, small batch recipe here)
- Fresh Juice in lots of different combinations
- Crispy Nuts
- Butternut Squash Soup
- Lots of Bone Broth and Tallow and Salt and Garlic and Sauerkraut and Olive Oil
- Other things I can’t remember because I stopped writing my meals down in such detail!
Did I see any changes or patterns in my symptoms?
I had some trouble with introducing raw cucumber and butter lettuce at the beginning of Stage 5 (that was the problem food from my episode). Then I remembered that raw vegetables have often been a problem food for me, and like I said- I stopped freaking out about it. I have seen a few symptoms come back here or there, but nothing like the pain I used to experience. Plus, my supplements are really helping to reduce pain.
Any practical advice from Stage 5 & 6?
Don’t go crazy with the whole fruits and honey and baked goods- it can send you into a downward spiral really fast! Take advantage of juicing as a way to get in some tasty fruits (with your veggies, too, of course). Also, watch it with the nuts. It can be tempting to eat them for every snack and with every meal in your baked goods/bread; but they shouldn’t be the main part of your diet- that should still be meat and vegetables.
Also- keep up the broth and soup, don’t quit!!
Any encouragement for people in Stage 5 & 6?
Let the bumps in the road be okay. Let the little mistakes be okay. I’m not giving you carte blanche to start cheating (GAPS is not a diet you want to cheat on, since you would have to start from the beginning again to get your desired results), but do give yourself some grace. This is a hard journey and you’ve almost made it to the full diet. Keep up the good work and take your healing seriously- you are worth it.
A Little GAPS Real Talk and Friday Links
I am feeling a little bit stuck with the GAPS Intro diet this week. I need to vent about it. Just a little, if that’s okay.
I was making great progress until a few days ago. I had no trouble introducing new foods and my symptoms were mostly gone. I was feeling good, feeling ready to add back some of my problem foods (raw veg being an issue for me in the past.)
Enter the humble, unassuming (jerk of a) cucumber. (Don’t misunderstand, I really do love cucumbers.. I guess it’s my stomach that is actually the jerk.) It was the first raw vegetable I tried, and I got sick that day. I tried the cucumber again the next day with just a little butter lettuce, thinking that maybe it was something else I had eaten the day before, but I got sick again. And then I started planning my mental pity party, because, you know, it’s summer. And in summer, there’s fresh, delicious raw produce for salads and snacking and oh, what a joy it would be to eat salad again! How I miss the satisfying crunch of a salad! And other pitiful thoughts.
Then I continued to feel sorry for myself when we were headed to a friend’s house and we picked up pizza on the way. I had to roll down the windows because the scent of fresh dough and hot cheese was suffocating me (so dramatic). You guys, I really wanted some of that pizza. BAD. The pity party reached its peak when I had to feed the kids their pizza OUT OF MY HAND, which meant holding a pizza slice for about half an hour without stuffing it in my face. Yeah.
I don’t know why I am still bothered by this a few days later. I really have no reason to feel sorry for myself, because A) I have so much more than I deserve in this life and B) I am truly feeling better than I was before and C) it is not the end of the world because D) sticking to the plan means I will (probably and hopefully) be able to eat these foods again some day.
Enough feeling sorry for my little old self! Gotta keep the Gospel first in my mind. Less of me, more of Christ. He went through much, much worse on my behalf AND He is praying for me daily. I am blessed.
I hope all of you have a great weekend full of cucumbers and pizza. 😉 Here are some links for you, my darlings:
- this paleo banana cream pie. can’t get it out of my brain.
- coconut tres leches pancakes, i am coming for you.
- these rustic place settings have me ready to cut down the nearest tree.
- the J.Crew Factory sale – 30% off everything. lovely and dangerous.
- a basil creamsicle sounds so refreshing.
- these adorable shoes for baby girl. and these in gold.. and of course, these.
- mini button name tags– what would mine say?
- these bow ties are killin’ it.
Summer Lunch Inspiration
 It’s getting warmer.. that means many of us will be spending our days outside the house and away from the stove. I’m sharing some fresh ideas for your summer lunches over at MPMK today- come see what I’ll be putting in my lunchbox!
Surviving GAPS Intro: Stage 4
For the next 6 weeks, I’ll be chronicling my journey through the GAPS Intro Diet with a little self-made questionnaire.
What did I eat on Stage 4?
With Stage 4, I added olive oil, fresh juice, bread made with almond flour and roasted/grilled meats.
- Scrambled Eggs in Tallow with Avocado and Sauerkraut (my typical breakfast.)
- Poached Salmon and Chicken
- Carrot and Squash Soup with poached eggs and avocado (you might have seen this one on Instagram)
- Roasted Chicken and Vegetables
- Squash and Almond Flour Bread (you can see one of the muffins in the photo above)
- New Cooked Vegetables- spaghetti squash, tomatoes, green peppers
- Fresh Juice- plain carrot or a mixture of carrot/apple/celery
- Chicken Vegetable Soup with Turnips
- Butternut Squash Fries (so good to have roasted squash again!)
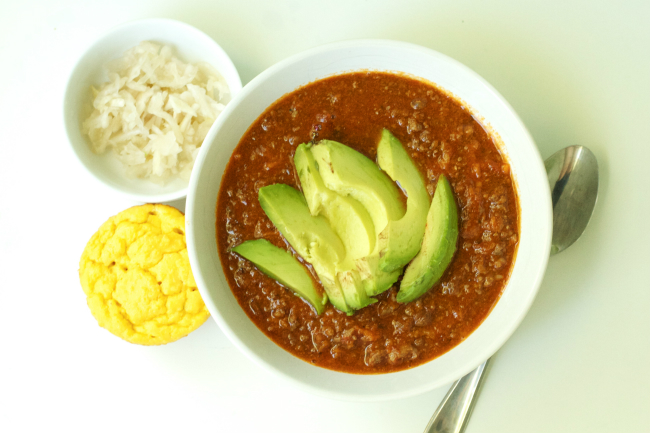
- High Protein Chili (pictured above, recipe below)
- Avocado Chicken Salad (just mashed avocado mixed with garlic, salt and cooked chicken)
- Lots of Bone Broth and Tallow and Salt and Garlic and Sauerkraut and Olive Oil
Did I see any changes or patterns in my symptoms?
For the most part, this stage went much better than expected. I have been fearful about trying new vegetables, but it seems to be going well. I did see a bit of a flare-up with my symptoms when I tried the almond flour bread. I tried a little bit at the beginning of the day and it went well, so then I had more later on.. but I think I overdid it. I’ll have to be careful about how much almond flour I take in.
I also feel like I am getting some real energy back- I actually thought about going out and exercising, which I haven’t felt like doing in quite some time. I’m looking forward to some exercise again after Intro is done- I don’t want to push it and start before my body is ready, since working out puts your body in fight-or-flight mode which interferes with proper digestion. And ya’ll know I don’t have time for that. 😉
Any practical advice from Stage 4?
Don’t assume that your body can handle any amount of new food, even if it tolerates a little bit. This was my lesson from the almond flour bread. It is just not worth it to overdo it and experience your symptoms again. Really try to savor the little bits of these foods that you do get to try, even if you end up deciding to leave it out of your diet for a while. You can always try it again later.
I wanted to note here that I did take some liberties with spices in Stage 4. In the recipe for chili posted below, I added some chili powder and paprika, which are not legal until Full GAPS. I was so excited to make chili with tomatoes that I couldn’t resist throwing the spices in. My advice here is that you know your body best. If you get to this point in the diet and you feel you can add in a few ingredients here or there that are allowed on Full GAPS, try it out. But use your judgement- if you have any symptoms, slow down.
Also, don’t quit your detox baths. They are worth doing! (I have been slacking a big- this is mainly a reminder for me.)
Any encouragement for people in Stage 4?
Don’t stop observing and listening to your body. Now that you are adding new foods so often, you want to be careful about recording your symptoms, looking for patterns and making changes accordingly. Hopefully you’ve gotten into a groove with the GAPS lifestyle and you’re making it work for you. But remember, this is a process. Every day will not be better than the last. Sometimes there are bumps in the road. Sometimes we mess up. Keep trying and don’t despair! You are on your way to better health and learning self-discipline along the way. (And don’t quit now- you’ll be able to eat fruit and honey in Stage 5!)
- 1 pound grass-fed beef liver (pre-soaked the night before in the juice of one lemon and then covered with filtered water; cover and keep in the fridge)
- 1 pound ground beef
- 1 pound ground venison, ground pork or other ground meat/sausage
- 1 onion, diced
- 3 cloves garlic, minced
- 3 cups crushed tomatoes (preferably homemade or not from a can with BPA)
- water or beef broth to cover
- 1 tablespoon chili powder (optional)
- 1 tablespoon smoked paprika (optional)
- 2 teaspoons sea salt
- cracked black pepper to taste
- 4 cups winter squash (optional)
- Drain the beef liver.
- In a blender or food processor, process the liver until it’s broken down (I like it pretty broken down, right before it reaches a paste. If you like it chopped, you can do that, too. I find it’s practically undetectable if you break it down in the blender first.)
- In a large stockpot or Dutch oven, cook the liver and ground meats until they are browned.
- Add onion, garlic, crushed tomatoes and mix. Add spices, if using. Cover with beef broth or water if necessary, stir, and bring to a boil. Reduce the heat and let it simmer for 30 minutes to 1 hour.
- If you are adding the squash (or any other uncooked vegetable), you can add it to the chili about 30 minutes before you plan to serve it.