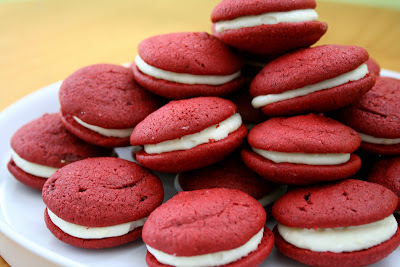
Red Velvet Whoopie Pies

May is all supposed to be all about pies around here, my darlings. I’m starting out with a bit of an unconventional pie post, though, just to keep things exciting for you.. with whoopie pies!
Have you heard about whoopie pies? They kind of had a moment in the foodie world recently, and it seemed like everyone was making them. This was crazy to me! I grew up in Lancaster County, PA, the Amish capital and home of the best whoopie pies around. As a kid, no one I met outside of CenPenn knew what they were. Now they are super popular, and rightly so. They are so good!
The typical flavors for whoopie pies that I remember from home are chocolate and cream, pumpkin with cream cheese, red velvet, and chocolate peanut butter. We’d get them at bake sales or any of the good markets- Central Market in Lancaster City, Saturday’s Market or Root’s. Man.. I’m getting nostalgic/hungry.

The cookies are the cakey type, so if you love cookies or cake or frosting, these are for you. You really can’t go wrong with the red velvet and cream cheese combo, either. There is a little effort involved if you want them to look good visually, but if you don’t care what they look like, the recipe is fairly straight-forward.
I must admit to you that I have some real Amish whoopie pie recipes, but I’m saving them up for later. I liked what I saw on Annie’s Eats, and I think they turned out similar to my hometown type, but they aren’t quite perfect. Guess I’ll just have to do some more experimentation/taste-testing..
What do you think about whoopie pies? Are you on board or already over it?
Red Velvet Whoopie Pies
Prep time
Cook time
Total time
http://www.annies-eats.com/2010/02/08/red-velvet-whoopie-pies/
Author: Annie’s Eats
Recipe type: Dessert
Serves: 12
Ingredients
- 2 cups all-purpose flour
- 2 tbsp. cocoa powder
- ½ tsp. baking powder
- ¼ tsp. salt
- 8 tbsp. unsalted butter, at room temperature
- 1 cup light brown sugar, packed
- 1 large egg
- 1 tsp. vanilla extract
- ½ cup buttermilk, at room temperature
- 1 oz. red food coloring
- 1 batch cream cheese frosting, recipe follows
Instructions
- Preheat the oven to 375˚ F.
- Using something round, trace evenly spaced circles onto pieces of parchment paper sized to fit two cookie sheets. Place the parchment on the cookie sheets so that the side you have drawn on is facing down; set aside.
- In a medium bowl, whisk together the flour, cocoa powder, baking powder and salt. In the bowl of a stand mixer fitted with the paddle attachment, cream together the butter and brown sugar on medium-high speed until light and fluffy, about 2 minutes. Beat in the egg until incorporated, scraping down the sides of the bowl as necessary. Blend in the vanilla. With the mixer on low speed, beat in about a third of the dry ingredients, followed by half of the buttermilk, beating each addition just until incorporated. Repeat so that all the buttermilk has been added and then mix in the final third of dry ingredients. Do not overbeat. Blend in the food coloring.
- Transfer the batter to a pastry bag fitted with a large plain round tip. Pipe the batter onto the parchment paper using the tracings as a guide. Bake 7-9 minutes or until the tops are set, rotating the baking sheets halfway through. Allow the cookies to cool on the baking sheets at least 10 minutes, until they can be easily transferred to a cooling rack. Repeat with any remaining batter. Allow cookies to cool completely before proceeding.
- Transfer the pre-made frosting (you can make while cookies are baking/cooling) to a clean pastry bag fitted with a plain, round tip. Pair the cookies up by shape and size. Flip one cookie of each pair over so that the flat side is facing up.
- Pipe frosting onto the flat-sided cookie of each pair, leaving the edges clear. Sandwich the cookies together so the flat sides are facing each other and press gently to help the filling reach the edges. To store, refrigerate in an airtight container.
Cream Cheese Frosting
Prep time
Cook time
Total time
Author: Oven Love
Recipe type: Dessert
Serves: 1
Ingredients
- 8oz cream cheese, softened at room temperature
- 5 tbs softened butter
- 2 tsp vanilla
- 2 cups powdered sugar (or more, if needed)
Instructions
- Beat cream cheese, butter and vanilla until smooth (no lumps!). Add sugar until you reach the desired consistency and sweetness.


Mmmm! Great start to a month of pies =)
Those seriously look delightful. And anything that can be red velvet AND pie has to be delicious!
like everything else you post, this is truly lovely. the red color is phenomenally achieved here and, frankly, who doesn’t love a whoopie pie? thanks for sharing, loves it 🙂
-meg
@ http://clutzycooking.blogspot.com
I have never seen whoopie pies in Canada. That’s a problem and needs to be rectified! I’ll definitely be baking these soon! Yum.
My.
Favorite.
Mommom used to buy me and Kristi these for our birthdays, in lieu of cake.
Thanks for the trip down memory lane 🙂
I for one will never be over Whoopie Pies. They’re like portable handheld cakes. I’ve never had red velvet but the pumpkin and cheesecake frosting have won over my heart! This looks DELICIOUS!
I am doing a dessert bar for a 50th wedding anniversary coming up in a couple of weeks. If I were to make something up like this ahead of time – could it be frozen? Perhaps the cake part frozen and then iced after thawing? Thoughts?
I haven’t frozen these specifically, but I have refrigerated/frozen whoopie pies before and they were fine after thawing. I would try doing a test portion of the recipe and freezing it just to check it out before you do it!