Posted by Natalie on June 25, 2009 · 4 Comments
Confession #1: I’ve never roasted a whole chicken before.
Confession #2: I now love roasting whole chickens.
It’s a pretty great deal these days. You can get lots of meals out of one chicken (especially this one- it was 8lbs for $8!). And don’t forget to save the carcass for making broth!
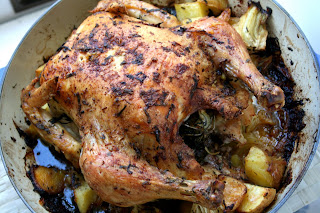
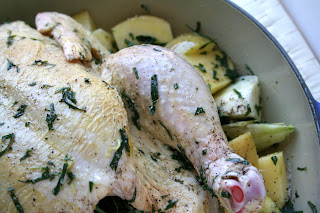
The chicken gets a quick rub down with salt, pepper, tarragon and lemon juice. Throw in some veggies along side it, and you’ve got a meal.
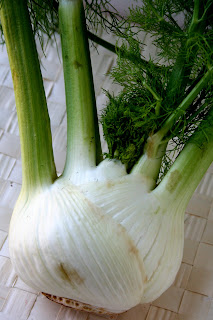
And by the way, fennel is great. When you roast it, it gets nice and sweet and pairs perfectly with the tarragon chicken. You won’t be sorry.
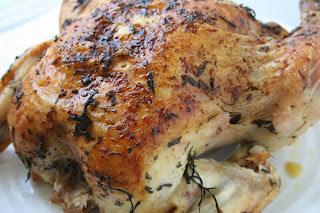
Roasted Lemon Tarragon Chicken with Fennel and Potatoes
1 whole chicken, thawed
olive oil
salt and pepper
a few stalks fresh tarragon, stripped and minced (save the stalks)
1 lemon, halved
1 fennel bulb, quartered (save the stalks)
3-4 potatoes, quartered (I used Yukon Gold)
1. Preheat the oven to directions on the package.
2. Place the whole chicken in a roasting pan. Rub it with salt pepper and tarragon, then squeeze the lemon juice on top. Place half the lemon in the chicken cavity along with the fennel and tarragon stalks. Cut up the other half of the lemon into quarters, and place in the pan along with the fennel bulb and potatoes. Cover with extra salt, pepper, tarragon and a little olive oil.
3. Roast the chicken according to package directions. Every 1/2 hour or so, baste the chicken with its juices. Let rest for 15 minutes before carving.
Posted by Natalie on June 23, 2009 · 13 Comments
The last few days in the kitchen have been a series of fails.
Left bagels in fridge longer than last time, didn’t bake properly. FAIL.
Dropped a hot pan on my arm and got burnt. FAIL.
Cut my finger while slicing a bagel. FAIL.
Making this TWD recipe. FAIL.
It’s cool, though. I usually have such good luck in the kitchen, and maybe it’s just my time to have a few fails in a row and get them out of the way.
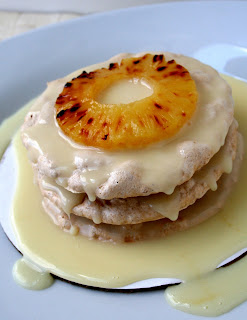
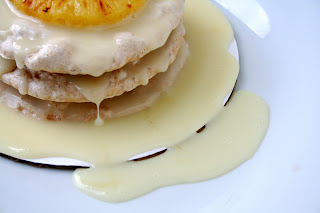
So the fail here was in the ganache. I sort of botched it from the start, using half and half instead of cream, and not measuring the correct ratio to reflect the recipe. I was just kind of hoping for the best. Maybe I didn’t wait for it to cool long enough, or maybe it was the half and half. Who knows.
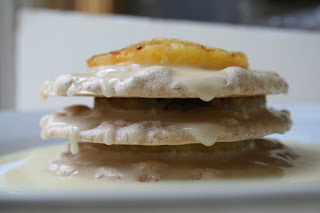
I made 1/4 of the recipe, and made little rounds of meringue, which only took about 1 hour to bake. And I cheated by using canned pineapple, since I already had them in the pantry. The components of the recipe taste good, they just didn’t play well together.
I haven’t tasted it yet, but it made for some fun drippy pictures! Hope everyone else had better luck. 🙂
*Find the recipe
here –
Andrea‘s dacquoise looks just like Dorie’s!
Posted by Natalie on June 22, 2009 · 4 Comments
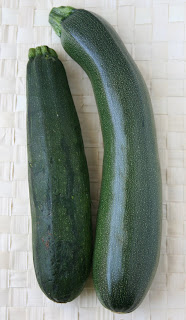
One of these zucchinis is homegrown. One of these zucchinis is from a farmer’s market.
Left- Farmer’s Market. Right- Homegrown.
How awesome is that? Notice how long and sleek and beautiful the one on the right is. Not a scratch on it!
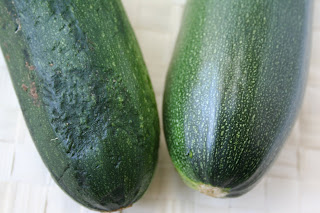
Notice how marked up the one on the left is. How disappointing.
Good thing this is only the first homegrown zucchini of the season- many more to come. Nick and I are really enjoying our patch in the community garden. It’s even more fun when there are things to harvest! If you aren’t a fan of gardening, you should try it. It’s so worth it.
Posted by Natalie on June 21, 2009 · 2 Comments
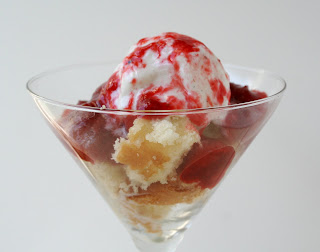
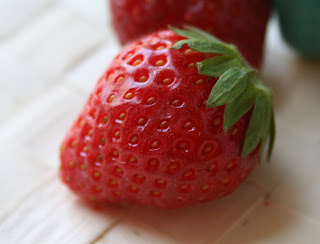
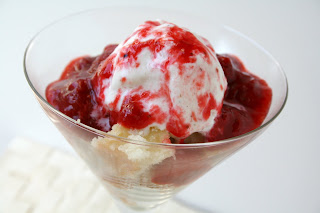
Summer entertaining sometimes calls for quick thinking. Yesterday, we had a few friends over short notice, and I wanted to throw together a quick dessert without having to bake anything. I had just returned from the farmer’s market with fresh berries and rhubarb, so I created a berry rhubarb sauce for parfaits.
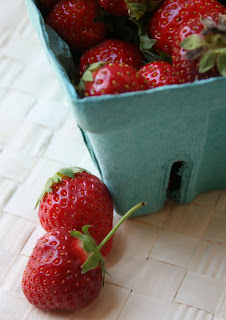
(hello? can we say gorgeous produce!?)
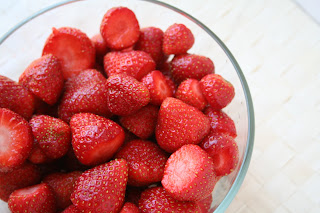
The recipe comes together quite quickly on the stove. I used about half the portions of the recipe below, but as always with me, this recipe is very customizable. The ratios of berry to rhubarb are completely up to you. (There are also raspberries in the recipe, I just didn’t get a photo of the little beauties.)

Now, please don’t be scared of our friend Rhubarb. It may look scary, like weird pink celery, but fear not- all you have to do is chop it up and cook it down, and it will give your sauce a deliciously sweet upgrade! (Rhubarb really complements berries and is great on its own, so you should definitely try to use it in your baking adventures!)
Once you’ve made the sauce, you can use it in a variety of ways. I made parfaits by cubing some leftover cake, adding a scoop of vanilla ice cream, and topping it with the sauce. Some other great uses: a mix-in for ice cream, or a topping shortcakes, biscuits, cake… and any other dessert, really. You could also top pancakes or waffles with it, switch it out for the jelly in your PBJ, throw it on your pork chops.. the possibilities are endless, I’d say. So next time friends come a calling on short notice, throw this sauce on the stove and relax- dessert is making itself.
Sweet Berry Rhubarb Sauce
(should make enough for 8-10 servings)
6oz raspberries, rinsed (I like to puree and strain my raspberries, but feel free to throw them in whole!)
1 pint strawberries, rinsed and hulled (half them if they’re large)
3-4 stalks rhubarb, rinsed and chopped
1/2 cup sugar
1/4 cup water
1. Puree raspberries in a food processor and strain (not necessary, but I prefer it because it gives the sauce a smooth base).
2. Combine raspberries (whole or puree), strawberries, rhubarb, sugar and water in a saucepan over medium heat. Bring to a boil. Reduce heat and let simmer for 10-15 minutes or until rhubarb is softened. Cool for 10-15 minutes before serving.
Posted by Natalie on June 19, 2009 · 4 Comments
For me, the day after vacation starts like this:
“What are we going to eat?”
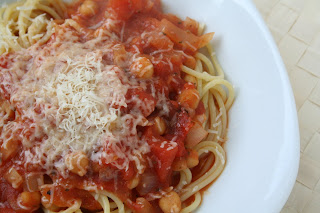
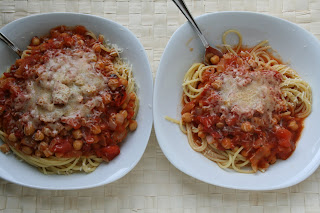
I usually don’t get to the store for a day or two, so I rely on our pantry for the first meal back. We’ve always got pasta, and we’ve always got canned tomatoes, so I threw together a quick but flavorful sauce to top some spaghetti.
Nick is a huge fan of chunky tomato sauces, a medium which lends itself well to creativity. I usually just chop up whatever veggies are around and we end up with something different every time. In this sauce, the chickpeas add a bit of protein and flavor, and the fire roasted tomatoes give it lots of depth. Add some parmesan, and it’s perfect.
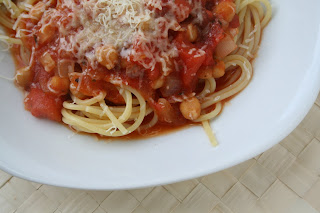
Mmm… love this meal. So easy and quick- and vegetarian!
This photo below is just to give you guys a glimpse into the Oven Love household. On the left is Nick’s portion, on the right is mine. We always laugh about how much I load him up at dinner.. I usually give him at least double what I eat. So now, when you’re looking at Oven Love pictures, you’ll be able to tell who’s plate has been photographed!
Fire Roasted Tomato and Chickpea Sauce
olive oil
1 onion, diced
2 cloves garlic, grated
salt and pepper
1-2 tsp dried oregano
1-2 tsp dried basil
1 can fire roasted tomatoes
1 can tomato puree
1 can chickpeas, drained and rinsed (feel free to sub other beans- I like white beans, too)
parmesan cheese, for grating
In a saucepan, saute onion and garlic until soft. Season with salt, pepper and herbs. Add tomatoes, puree and chickpeas and simmer for 10-15 minutes, or until your pasta is ready. Top pasta with sauce and fresh grated parmesan cheese.
Posted by Natalie on June 19, 2009 · 7 Comments
Oh, Oven Lovers. How I’ve missed you!
We’ve just returned from our sweet little anniversary trip to Florida. I’m sure you enjoyed the guest posts- they were all so mouth watering! We had a wonderful week, filled with sandy beaches, tubing down river, gator sightings, wine tasting and most importantly to this post- OUTLET SHOPPING.
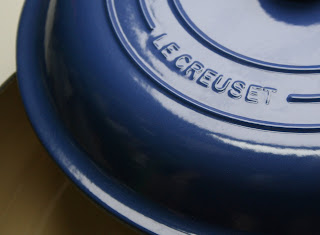
Say hello to my new favorite piece..
the Le Creuset 5 Quart Buffet Casserole (also called a Braiser).
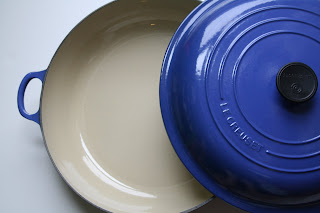
How lucky was I to find a Le Creuset outlet while on vacation? I didn’t actually own a Le Creuset before this trip, and it just seemed like a dream while we were in that store. The place was magical, and I wanted everything. Luckily, my level-headed husband asked me to find something that would last me a lifetime, and would always be useful.
BAM. This is it, people. Second only to the Dutch/French oven.
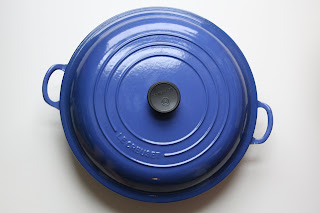
Best part:
Suggested Price: $325. Average Retail Price: $240. My Price: $120!
This is the beginning of a beautiful friendship.
I can’t think of a better way to celebrate my 200th post.
Now that I’m officially back, look forward to some great new recipes (and June’s PMOW challenge!). I’ll be trying my best to utilize this new piece as well as our new Weber charcoal grill. So much exciting summer food ahead! Now all I need is an ice cream maker..
Posted by Natalie on June 16, 2009 · 4 Comments
Hi everyone!
I wasn’t sure what to post for Miss Oven Love, but a late night email from Holly over at PheMomenon inspired me…Vanilla!
Last year, when I started my own blog, I’ll admit I was completely clueless. I kept reading all these other bloggers claiming to have made Homemade Vanilla. Yeah right, I thought. That doesn’t seem likely. But I did the research, and found it could, in fact, be done…and very easily!
If you already make your own vanilla extract, good for you! You know what I mean when I say how easy it is – and how impressive it tastes, right?! Feel free to leave your comments here on any tricks or tips you might have for any newcomers in the Vanilla Making Department. I’m sure they will appreciate it!
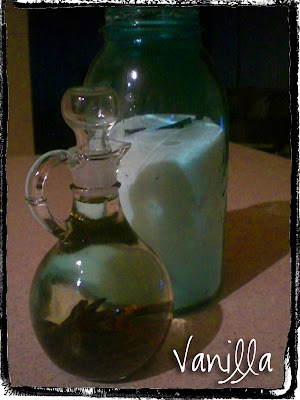
Now, here’s the DoughMessTic tutorial on Vanilla Extract Making…I hope you’ll give it a shot!
First, you’ll need some good quality Vanilla Beans. You can find them online, but I get mine
Here. For $25, you’ll get about 50 Grade A Madagascar Vanilla Beans, plus, they will send you close to 30 FREE Tahitian Extract Grade vanilla beans. So you’ll be set for quite some time in the Vanilla Bean department! Grocery stores don’t come close to competing with these prices – more likely than not, you’ll pay close to $5 for one bean.
Eeeeek.
Next, secure yourself a big bottle of GOOD vodka. I typically use Skye, but there are lots of choices. The better the quality, the less the taste will interfere with your vanilla beans, so choose wisely.
Find a bottle to pour your vodka into, Walmart sells little bottle with stoppers, or you could simply use something as ordinary as an empty water bottle. I tend to make about 10 ounces at a time. For this size, I cut 6 beans in half then split them lengthwise and place them into the vodka. Do not scrape them. No need for that. Just put them in the bottle and give them a good shake every few days…for the next THREE months. I know, I know…torture. But you’ll be so rewarded in the end!

Now that you have so many extra vanilla beans, you may want to up the ante a bit and make your own Vanilla Sugar as well. Why not? You can use the seeds in some icing or whathaveyou, and just place the discarded beans in a container of sugar. Or, go ahead and split a bean and toss it in – you’ve got plenty now, right? Just be sure to give the jar a shake now and then to spread out the flavor…and feel free to use it at any time. Sure, the longer you let it sit, the better it tastes, but you can use this pretty much immediately. And just keep topping it off with more sugar and empty beans as you get them…the flavor lasts and lasts.
Hope you’ll give these a shot and amp up your baking…if nothing else, it gives you something to brag about!
Posted by Natalie on June 15, 2009 · 1 Comment
Please welcome Mary the Food Librarian as today’s guest blogger. Enjoy her yummy summer recipe!
Hi Oven Love readers!
It’s Mary the
Food Librarian as today’s guest blogger. I’m a Los Angeles librarian (who would have guessed that?!), love the bundt cake a little too much, watch way too much television, and like to bake and eat. While Natalie is off having fun, she wanted to make sure all her readers had something to eat/read! Isn’t Natalie the nicest? Yes, she is!
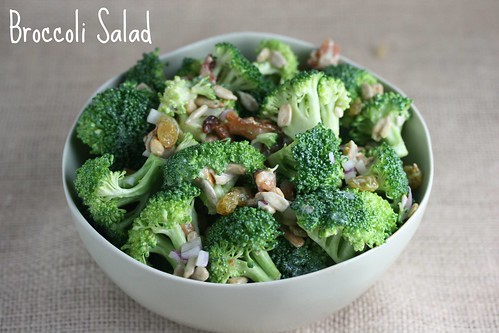
Today I’m sharing on of my favorite pot luck recipes. You know you are going to get invited to a zillion pot lucks this summer…and this dish is super easy and refreshing. (It does have mayo in it so I wouldn’t bring it to the 100 degree 4th of July outdoor pool party.)
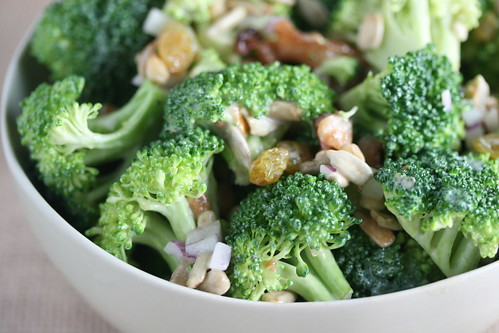
Broccoli Salad
This recipe is from an article in Los Angeles Times years ago and it never disappoints. It was submitted by reader, Lisa O’Kane of Toluca Lake and also appears in the great cookbook, Modern California Cookbook by the Los Angeles Times. (“The Best of Lucks” article by Jennifer Lowe, Los Angeles Times, December 08, 1999)
This salad is great with bacon or veggie style. If you get a vegan mayo, you can make it vegan as well. Regular or golden raisins can be used, and you can throw in a few dried cranberries as well. I’ve seen a version of this salad at Souplantation. It’s yum.
Broccoli Salad
Notes:
1. Make dressing and let chill for 2 hours.
2. Cook up bacon. I do this in the oven and it works great! Just place on foil lined pan and bake at 375 degrees until yummy.
3. All ingredients can be prepped and placed in baggies until ready to eat (or transported to pot luck)
4. Dress salad right before eating.
Dressing: Mix together and refrigerate for at least 2 hours:
1 cup mayonnaise
1 teaspoon white wine vinegar
1/4 cup sugar
Salad: Combine together:
1 1/2 to 2 pounds raw broccoli florets, cut into bite-size pieces (I buy the huge bag from Costco or purchase broccoli crowns)
1 cup golden raisins (or regular raisins)
1 cup salted sunflower seeds
1 small red onion, chopped
8 slices bacon, cooked and crumbled
Combine the salad ingredients. Dress with chilled dressing right before serving. Enjoy!!
Find other pot luck favorites in the Los Angeles Times article here.
Happy Vacation Natalie! Can’t wait to hear about your trip. Thanks for letting me visit your awesome blog. Happy Summer to all! – mary the food librarian
Posted by Natalie on June 14, 2009 · 3 Comments
Today’s guest blogger is Teanna from Spork or Foon. You’re going to love her and her delicious summer sweets!
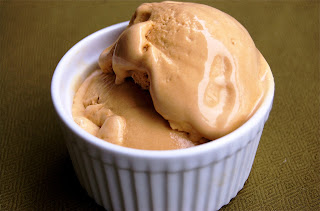
Salted Butter Caramel Ice Cream.
Take a look at that title right there. When reading the name of that ice cream, I knew what I was in for. Decadence. Creaminess. Sumptuousness. Diet-breaking-ness. But I did not care. Upon tasting this ice cream, all restraint went out of the window. I smiled. I squealed. I ate. I made a shrine to David Lebovitz around my ice cream maker.
Ok, I didn’t go that far.
This ice cream is the richest, most velvety, most luxurious, complex and flavorful ice cream that I have ever tasted. Typically, homemade ice cream tends to be hard as a rock after it is frozen, but because of the caramel, this ice cream stays soft and lush for days on end. In my case, that means it is easier to sneak a bite every now and then. And another. And another…
Salted Butter Caramel Ice Cream
Adapted from David Liebovitz
2 cups whole milk, divided
1½ cups sugar
4 tablespoons salted butter
1/4 teaspoon sea salt
1 cups heavy cream
5 large egg yolks
1 teaspoon vanilla extract
To make the ice cream, make an ice bath by filling a large bowl about a third full with ice cubes and adding a cup or so of water so they’re floating. Nest a smaller metal bowl (at least 2 quarts/liters) over the ice, pour 1 cup (250 ml) of the milk into the inner bowl, and rest a mesh strainer on top of it.
Spread 1½ cups sugar in the saucepan in an even layer. Heat the sugar over moderate heat until the edges begin to melt. Use a heatproof utensil to gently stir the liquefied sugar from the bottom and edges towards the center, stirring, until all the sugar is dissolved. (Or most of it—there may be some lumps, which will melt later.)
Continue to cook stirring infrequently until the caramel starts smoking and begins to smell like it’s just about to burn. It won’t take long.
6. Once caramelized, remove from heat and stir in the butter and salt, until butter is melted, then gradually whisk in the cream, stirring as you go. The caramel may harden and seize, but return it to the heat and continue to stir over low heat until any hard caramel is melted. Stir in 1 cup of the milk.
Whisk the yolks in a small bowl and gradually pour some of the warm caramel mixture over the yolks, stirring constantly. Scrape the warmed yolks back into the saucepan and cook the custard using a heatproof utensil, stirring constantly (scraping the bottom as you stir) until the mixture thickens. If using an instant-read thermometer, it should read 160-170 F.
Pour the custard through the strainer into the milk set over the ice bath, add the vanilla, then stir frequently until the mixture is cooled down. Refrigerate at least 8 hours or until thoroughly chilled.
Freeze the mixture in your ice cream maker according to the manufacturer’s instructions.
Posted by Natalie on June 13, 2009 · 2 Comments
Oven Love is excited to welcome Holly of PheMomenon to guest post today. Enjoy her summer treat!
Growing up in a small town in Wyoming, there were really two things that always said “SUMMER” to me – quite probably because they were usually my two favorite events of the summer.
First, we would always take a trip to visit family here in Utah (which is probably the main reason I moved here) and it was almost always the main highlight of my summer. We would play outside in the sun – much warmer than Wyoming – and we would eat lots and lots of ice cream.
This CHERRY GELATO I made last summer really caught my eye because of all the summers I spent in Utah. My relatives house has a big cherry tree in the front yard and it was so stunning and gorgeous to me. There is just something so amazing about fruit bearing trees in my opinion.
The other highlight of summertime for me growing up was always the County Fair – since it was Wyoming and all it came complete with rodeos, concerts, demolition derbies, booths, games, rides, etc. – pretty much just like in the movies. Add to that that the town, usually roughly around the same time, would hold street dances – where they would rope off a section of the streets in town and there was literally dancing and music in the streets – and barbecues in the park and it really isn’t any big surprise that it was my favorite local event of the summer.
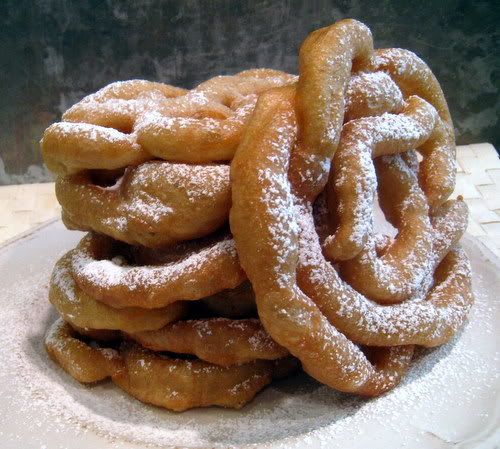
Of course, a main draw to the fair for me (yes, besides seeing and being seen – it was a small town after all, so this was where everyone went to flirt!) was the FOOD! There is just something about a fair that makes everything taste better. Not the least of which would be getting a funnel cake when they had them.
I just got home from three days in the town where I grew up. I was visiting my oldest friend, literally my BFFL. I’ve known her since first grade, and though we didn’t really become close friends until high school, she has been a part of my world for as long as I can really remember.
It was so great to see her and her family. It was wonderful to watch our kids play together and have so much fun and build memories of their own.
If I could send out one wish to all of you it would be to have a summer like this – with sunny days having fun and building memories with your families and friends – maybe evening sharing a funnel cake or two and getting the sugar all over your clothes – or eating a big bowl of homemade ice cream. After all, there is a reason they always say the simple things in life are often the best.
Thanks for having me guest blog Natalie! I hope your vacation is fantastic!
Choux Funnel Cakes
– Approximately 10 depending on size – mine were about 6 inches across
1 cup (8 fl oz) water (240 ml)
100 grs (3 ½ oz) unsalted butter
¾ cup (112 ½ grs / 4 oz) plain all-purpose flour
5 eggs
1 teaspoon vanilla
1 Tablespoon sugar
1/2 teaspoon ground cinnamon
1/8 teaspoon ground ginger
Confectioners’ sugar for dusting, if desired
Place the water and butter in a saucepan over high heat and bring to the boil. In a small bowl whisk together the flour, sugar, cinnamon and ginger. Add flour mixture and beat with a wooden spoon until smooth. Cook, stirring over low heat until the mixture leaves the side of the pan. Remove from the heat.
Place in an electric mixer and beat on high, gradually adding the eggs until well combined. Beat in the vanilla.
Once all eggs have been added and mixture is smooth, put dough in a piping bag fitted with a number 12 tip. Heat about 1 1/2 inches of oil in a heavy pan. Pipe dough into oil, making a free-form lattice pattern; cook until browned, flipping once. Remove cake from oil, drain on paper towels, and top with powdered sugar. Continue until all of the batter is used.