Inside the Oven [Vol. 5]

- How yummy does that sandwich look? I just finished working on a fun little sandwich post for MPMK and that’s just a preview. Hungry yet? That’s a whole wheat english muffin with spinach, sliced ham, avocado, a squeeze of lemon juice and salt/pepper. Can’t wait to show you the rest on Tuesday.
- I just got an iPhone! (I am SO not an early adopter. haha) The whole thing is pretty cool, but I think the thing I’m most excited about is using Instagram (you can follow me @natalieherr). Can’t wait to share some Instas with you.. once I figure out how to do that. Ha! Anyone have an iPhone tips to share or favorite apps to recommend? I’m all ears.

- I’m loving this geometric necklace (above) on Etsy. I have lots of jewelry wishes but I never pull the trigger. This one is very affordable so maybe I will!
- Does anyone else hoard ripped-out recipes from magazines? I am in the process of going through my stash and pinning dishes I actually like. I found this recipe of Dorie’s in Food & Wine for Chocolate Cayenne Cocktail Cookies (below). I love the cocktail cookie concept- we should really start adding cookies to everything.

- Also- a momentary ‘boo hoo’ that I’m not at BlogHerFood this year. Hope everyone is having fun out there in Seattle! I’ll be here trying not to mope. 🙂
Orange Creamsicles


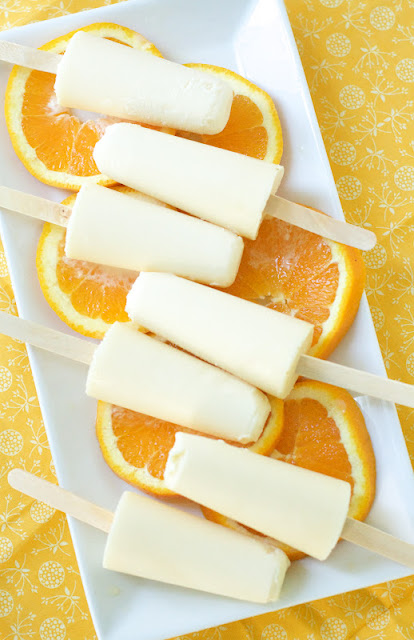
- 1 cup orange juice (fresh or frozen. you could also use orange juice concentrate for a stronger orange flavor)
- 1 cup heavy cream or full fat coconut milk (you could also substitute melted/very soft vanilla ice cream)
- 3 tablespoons honey
- ¼ teaspoon orange extract
- ½ teaspoon vanilla extract
- In a medium bowl, whisk all ingredients together.
- Pour mixture into popsicle molds. Let set for 30-60 minutes, then add popsicle sticks. Freeze for another 4-6 hours or until frozen.
- When you’re ready to serve, run some warm water along your popsicle mold to loosen the popsicles and serve immediately.
Cookie Butter Parfaits with COOL WHIP Whipped Topping


While you ponder how to win that cool $500, you’re only six ingredients away from a summer dessert that looks lovely without a lot of work (or any extra heat). Sometimes, it’s the simplest desserts that end up being showstoppers.
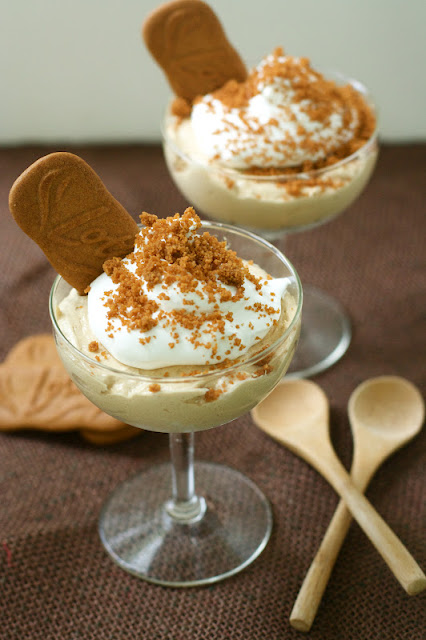
- 16 Speculoos cookies (such as Biscoff*), plus more for serving
- 3 tablespoons butter, melted or very soft
- 4 oz cream cheese, softened
- ½ cup Speculoos spread (such as Biscoff or TJ’s Cookie Butter*)
- ⅓ cup sugar
- 1 cup COOL WHIP Whipped Topping, plus more for serving
- In a food processor, pulse cookies into fine crumbs. Add butter and pulse until combined. Set aside.
- In a stand mixer, beat cream cheese until there are no lumps. Scrape down the sides of the bowl and add the spread; mix until combined. Add sugar and beat 2-3 minutes. Scrape down the sides of the bowl and fold in the COOL WHIP with a spatula.
- Gather your parfait glasses. Line the bottom with the cookie crumb mixture and top with the mousse (feel free to do more than one layer), leaving a small amount for garnish. Let set in the refrigerator for 1-2 hours (this is a just a suggestion, you can eat it right away if you like). When you’re ready to serve, add a dollop of COOL WHIP, sprinkle with remaining cookie crumbs and add a cookie to the bowl. Enjoy!
Greek- Inspired Slow Cooker Chicken

One of the easiest ways to start freezer cooking it to use a marinade. When you freeze fresh meat with a marinade, it starts marinating as it freezes. Then, when you are ready to use it, toss in the fridge the day before and it marinates as it thaws. So simple!
I love that marinated meats are usually cooked on the grill or in the slow cooker. My house doesn’t get heated up this way. When preparing a meat and marinade recipe, I like to follow this plan:
- Mix up all the marinades I will be using.
- Label the freezer bags I will be using with name of recipe, date, and reheating instructions.
- Divide up the meat between the freezer bags.
- Divide up the marinade between freezer bags.
- Seal and freeze flat.
- Use a bottle of Italian dressing (I like Seven Seas Viva Italian by Kraft.) Grilled chicken tastes great in Italian dressing- it’s especially tasty on salads.
- We really enjoy the homemade Teriyaki marinade recipe in Mary Beth Lagerborg’s Once a Month Cooking, however it suggests baking, not grilling. I think Teriyaki flavors would also be good for pork kabobs or some cuts of beef. (Here is a similar Teriyaki recipe from Once A Month Mom.)
- This garlic balsamic marinade recipe comes from Once a Month Mom. It is delicious and the pork cooks so moist when grilled. The flavors would be great on chicken, too.
- We also like marinating steaks or London Broil in Worcestershire sauce. So simple and so tasty.

- 1 Lemon, Juiced
- 4 Garlic Cloves, Minced
- ¼ Cup Olive Oil
- ½ Cup White Wine
- ¼ Cup Chicken Broth
- 1 tsp Dill
- 1 tsp Rosemary
- 1 Tbsp Balsamic Vinegar
- ¼ tsp Pepper
- ½ tsp Salt
- 1 Whole Chicken, Broken into it’s Respective Pieces (Or 4 chicken breasts or thighs. If you’re using chicken breasts, they will likely fall apart because they get so tender- that’s why the chicken above looks shredded and the one in Mommie Cooks’ post is not.)
- Egg noodles, black olives and Feta cheese for serving
- Add all the ingredients with the exception of the chicken to the marinade.
- Mix up well.
- Add in the chicken and coat all the pieces completely.
- *If freezing, freeze now. You can put it directly from the freezer to the slow cooker, just add about 2 hours to the cooking time.*
- Cook on low for 6 to 8 hours or on high for 4 to 6 hours.
- Serve over noodles with sauce from the slow cooker spooned over the noodles and a little feta and olives for good measure.
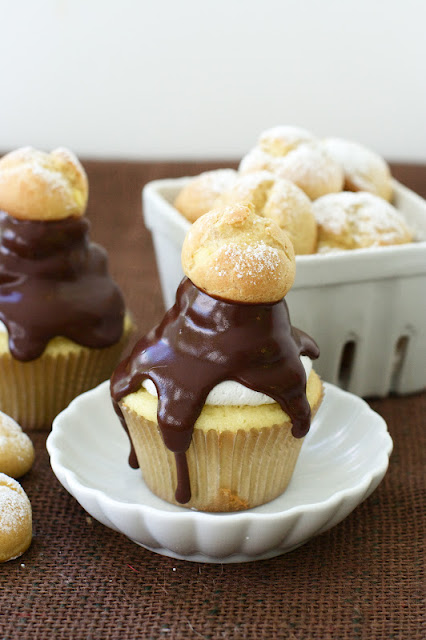
Cream Puff Cupcakes [My 500th Post!]


- 4 oz bittersweet chocolate, finely chopped
- ½ cup heavy cream
- 2 tablespoons sugar
- 2 tablespoons water
- Put the chopped chocolate in a heatproof bowl.
- Bring the cream, sugar and water to a full boil, then pour the liquid over the chocolate and let sit for 30 seconds. Working with a whisk or rubber spatula, gently stir the chocolate and cream together in small circles, starting at the center of the bowl and working your way out in increasingly larger concentric circles.
- If you are pouring the glaze over a chilled cake or cupcakes that is already frosted, the glaze can be used soon after it is blended. If you are pouring it over a room temperature cake or cupcakes, leave the glaze on the counter until it thickens just enough to pour in a ribbon.
- 2 cups whole milk
- 6 large egg yolks
- ½ cup sugar
- ⅓ cup cornstarch
- 1½ teaspoons pure vanilla extract
- 3½ tablespoons unsalted butter, cut into bits, at room temperature
- Bring the milk to a boil in a small saucepan.
- Meanwhile, in a medium heavy-bottomed saucepan, whisk the yolks together with the sugar and cornstarch until thick and well blended. Whisking without stop, drizzle in about ¼ cup of the hot milk- this will temper, or warm, the yolks- then, still whisking, add the remainder of the milk in a steady stream. Put the pan over medium heat and, whisking vigorously, constantly and thoroughly (make sure to get into the edges of the pan), bring the mixture to a boil. Keep at a boil- still whisking- for 1-2 minutes, then pull the pan from the heat.
- Whisk in the vanilla extract. Let stand for 5 minutes, then whisk in the bits of butter, stirring until the butter is fully incorporated and the pastry cream is smooth and silky. Scrape the cream into a bowl. You can press a piece of plastic wrap against the surface of the custard to create an airtight seal and refrigerate the pastry cream until cold (at least an hour).
- ½ cup whole milk
- ½ cup water
- 8 tablespoons unsalted butter, cut into 4 pieces
- 1 tablespoon sugar
- ½ teaspoon salt
- 1 cup all-purpose flour
- 4 large eggs at room temperature
- Bring the milk, water, butter, sugar and salt to the boil in a heavy-bottomed 2-quart saucepan. When the mixture is boiling rapidly, add the flour all at once, reduce the heat to medium and, without a second’s hesitation, start stirring the mixture like mad with a wooden spoon. The dough will come together very quickly and a slight crust will form on the bottom of the pan, but you have to keep stirring – vigorously – another 2 to 3 minutes to dry the dough. At the end of this time, the dough will be very smooth.
- Turn the dough into the bowl of a mixer fitted with the paddle attachment or, if you’ve still got some elbow grease left, you can continue by hand. One by one, add the eggs to the dough, beating until each egg is thoroughly incorporated. Don’t be discouraged – as soon as you add the first egg, your lovely dough will separate. Keep working and by the time you add the third egg it will start coming together again. When all the eggs are incorporated, the dough will be thick and shiny and, when you lift some of it up it will fall back into the bowl in a ribbon. The dough will still be warm – it’s supposed to be – and now is the time to use it. ]
- Using about 1 tablespoon of dough for each puff, drop the dough from the spoon onto the lined baking sheets, leaving about 2 inches of space between each mound of dough.
- Slide the baking sheets into the oven, bake for 15 minutes, then rotate the sheets from top to bottom and front to back. Continue baking until the puffs are golden and firm, another 10 to 15 minutes. Transfer the cream puffs to a cooling rack.
- When the puffs are cool, use a pastry bag with a small tip to poke a hole into each cream puff and fill them with Vanilla Pastry Cream (see recipe below). Store in the refrigerator or freezer until ready to eat.
- 16 large egg whites (30g each–total 450g, or 2 cups)
- 4 cups granulated sugar (800g)
- 5 cups (2.5 lbs, 10 sticks) of unsalted butter, softened but cool, cut into cubes
- 30 ml (2 tablespoons) pure vanilla extract
- ¼ tsp salt
- Wipe the bowl of an electric mixer, whisk attachment, small bowl, and whisk with paper towel and lemon juice (or vinegar), to remove any trace of grease. Add egg whites and sugar, and simmer over a pot of water (not boiling), whisking constantly but gently, until temperature reaches 140 degrees F, or if you don’t have a candy thermometer, until the sugar has completely dissolved and the egg whites are hot (you can feel a drop in between your fingers to ensure no granules.).
- Take off of stove, and place bowl back on electric mixer fitted with whisk attachment, begin to whip until the mixture is thick, glossy, and neutral (you can feel outside of the bowl to test temperature).
- Switch over to paddle attachment and, while mixing on low speed continously, add butter one cube at a time until incorporated, and mix until it has reached a silky smooth texture (if curdles, keep mixing and it will come back to smooth).
- Add vanilla and salt, mix well. If buttercream is too runny, the butter was possibly too soft–place into the refrigerator for about 15 minutes, then beat again. If still too runny, add a few more cubes of butter and keep beating until it reaches Use immediately, or refrigerate/freeze.
- 1¾ cups (175 grams) cake flour, not self-rising
- 1½ teaspoons baking powder
- ½ teaspoon baking soda
- ½ teaspoon salt
- 1 cup (225 grams) granulated sugar
- ¼ cup (57 grams) unsalted butter, room temperature
- 2 large eggs, room temperature
- ⅓ cup (75 grams) full-fat sour cream
- ¼ cup canola oil or vegetable oil (60 ml)
- 1 tablespoon pure (not imitation) vanilla extract
- ⅔ cup (160 ml) whole milk
- Preheat oven to 350 F.
- In a medium-sized mixing bowl or bowl of a stand mixer, mix together cake flour, baking powder, baking soda, and salt.
- Add the sugar and mix until well combined.
- Add butter and mix on medium-low speed for three minutes. Because there is so little butter, you’ll end up with a very fine crumb texture.
- In a small mixing bowl, whisk together eggs, sour cream, oil, and vanilla extract until smooth.
- Add the egg mixture to the flour mixture and beat on medium speed until just combined.
- Slowly add milk and mix on low speed until just combined. The batter will be liquid. (Don’t worry, you didn’t do anything wrong. It’s supposed to be that way.)
- Fill cupcake liners just over ½ full.
- Bake for 14 minutes and then test to see if they are done. They are done when a toothpick comes out without wet batter stuck to it. The cupcakes should appear white with specks of vanilla bean. They should not turn a golden brown. If they are not done, test again in two minutes. If they are still not done, test again in another two minutes.
- When the cupcakes are done, remove them immediately from the tins and leave them on a cooling rack (or just on your counter if you don’t own a cooling rack) to cool.
- 1 batch Vanilla Cupcakes, baked and cooled
- 1 cup Vanilla Pastry Cream (in addition to the pastry cream used to fill the cream puffs, if you are making them from scratch)
- 1 batch Vanilla Swiss Meringue Buttercream
- 2 batches Chocolate Ganache Glaze, cooled slightly (2 batches is an estimate, you made need more/less)
- 16 Cream Puffs (purchased or made with the Cream Puff Dough and Pastry Cream below)
- powdered sugar, for dusting
- Use a small, serrated knife to cut a round hole into the top of your cupcake. Remove cake from the hole with a spoon.
- Fill the cupcake with pastry cream. You can do this with a spoon or with a pastry bag.
- Pipe the buttercream in a circular motion on top of the cupcake, covering the pastry cream filling. Let set in the refrigerator until frosting seems firm.
- Remove the cupcakes from the fridge. Using a spoon, drip the ganache on top of the cold buttercream and top with a cream puff. Let cool in the fridge until set. These cupcakes are best enjoyed at room temperature, so if you are storing them in the refrigerator, allow them to come to room temperature before you serve them. Add a dusting of powdered sugar and enjoy.
Inside the Oven [Vol. 4]

Happy Memorial Day Weekend!
Hope you’re enjoying the extra time with your family. Here’s what’s new around here.
- As an Air Force family, this holiday is always a good one for us (four day weekend, baby!), but this year is extra cool because it includes a promotion. The hubs is being promoted to Captain! This is cool for many reasons, my favorites being the extra money in the budget and the excuse to call him Captain-related nicknames whenever I please. Congratulations, honey! We appreciate all your hard work and I know the AF does, too.
- We had a pickling marathon here a few nights ago. We’ve had a major cucumber crop and decided to get ahead of it before we’re up to our eyeballs in cukes. We made bread & butter pickles (pictured above) and dill pickles from an excellent canning book called Put ‘Em Up!– it’s divided by specific fruits and veggies so you can just grab the book when you have a big pile of (insert fruit/veggie here) and go to town. I previously thought canning was too hard and not to be messed with, but it’s not as bad as it seems. It was a fun little bonding activity. Nothing brings people together like hot brine and mason jars, am I right?

- Did you guys catch that I am now contributing to an excellent blog called Modern Parents Messy Kids? I am super-pumped about it and swimming in new ideas to share. I feel like Oven Love is all about the recipes, so it’s going to be fun for me to talk more about how I spend the days with the kids, doing silly stuff in the kitchen and making little bellies happy.
- I just read that I have 1200 pins on Pinterest. How is that possible?? I have always used Pinterest as a mental bulletin board of things I want to do/recipes I want to make.. like a really, big to-do list. I guess that means I have 1200 things to do. Better get crackin’.

- Speaking of the big P– my favorite pin lately is this recipe for Banana Split Pancake Stackers. I wish I had thought of this!! It’s the happiest little breakfast.
- Lastly, I added a few new blogs to my reader this week. Maybe you’ve heard of them, maybe not. They are full of happy inspiration. Here, here, here, here.
A Rainbow Lunch on MPMK

On My List: Pizza


Stuffed French Toast Cupcakes

Stuffed French Toast Cupcakes
by Oven Love
makes about 16 cupcakes
For the cupcakes (adapted from Cupcake Project):
- 1 3/4 cups (175 grams) cake flour, not self-rising
- 1 1/2 teaspoons baking powder
- 1/2 teaspoon baking soda
- 1/2 teaspoon salt
- 1 teaspoon cinnamon
- 1 cup (225 grams) granulated sugar
- 1/4 cup (57 grams) unsalted butter, room temperature
- 2 large eggs, room temperature
- 1/3 cup (75 grams) full-fat sour cream
- 1/4 cup canola oil or vegetable oil (60 ml)
- 1 tablespoon pure vanilla extract
- 1 teaspoon maple extract
- 2/3 cup (160 ml) whole milk
- Preheat oven to 350 F.
- In a medium-sized mixing bowl or bowl of a stand mixer, mix together cake flour, baking powder, baking soda, salt and cinnamon.
- Add the sugar and mix until well combined.
- Add butter and mix on medium-low speed for three minutes. Because there is so little butter, you’ll end up with a very fine crumb texture.
- In a small mixing bowl, whisk together eggs, sour cream, oil, vanilla extract and maple extract until smooth.
- Add the egg mixture to the flour mixture and beat on medium speed until just combined.
- Slowly add milk and mix on low speed until just combined. The batter will be liquid. (Don’t worry, you didn’t do anything wrong. It’s supposed to be that way.)
- Fill cupcake liners just over 1/2 full.
- Bake for 14 minutes and then test to see if they are done. They are done when a toothpick comes out without wet batter stuck to it. If they are not done, test again in two minutes. If they are still not done, test again in another two minutes.
- When the cupcakes are done, remove them immediately from the tins and leave them on a cooling rack (or just on your counter if you don’t own a cooling rack) to cool.
For the filling:
- 8 oz cream cheese, softened
- 6-8 strawberries, diced
- 3 tablespoons strawberry or raspberry jam
- In a small bowl, mix together cream cheese, diced strawberries and jam. To fill the cupcakes, cut a circle in the center of the cupcake to make a hole and remove the excess cake with a spoon. Spoon the filling into the hole.
For the frosting:
- 12 oz cream cheese, softened
- 8 tablespoons butter, softened
- 3 teaspoons pure vanilla extract
- 3 cups powdered sugar, sifted
- 1-2 tablespoons strawberry or raspberry jam
- In a stand mixer, mix cream cheese until smooth- no lumps. Scrape down the sides of the bowl and add the butter, mixing again until smooth. Add the vanilla and powdered sugar and mix until smooth. If the mixture is too soft, add additional powdered sugar or chill in the refrigerator before piping.
- To frost the cupcakes using the swirl effect, prepare a pastry bag with a large round tip. Using a spoon, smear a few lines of jam up the sides of the pastry bag. Fill the bag with the cream cheese mixture. Pipe onto the cupcakes in a circular motion.
For the toppings:
- 1 tablespoon butter
- 1 egg
- 1/3 cup milk
- 1 teaspoon vanilla
- 1/2 teaspoon cinnamon
- 2 thick slices french bread
- 4 strawberries, sliced
- Heat a small frying pan over medium heat. Meanwhile, whisk together the egg, milk, vanilla and cinnamon in a shallow bowl. Dip the slices of bread into the mixture until soaked through. Add the butter to the pan and fry the slices until golden brown. Let cool, cut into cubes and top each cupcake with a french toast cube and a strawberry slice. (Tip: slice the strawberries first and let them sit out a bit on a paper towel so their juices evaporate and you don’t have a soggy mess on your cupcake.)
Mint Cookies and Cream Ice Cream


- 1 cup whole milk
- ¾ cup sugar
- 2 cups heavy cream, divided
- pinch of salt
- 2 cups packed fresh mint leaves
- 5 large egg yolks
- 10-15 mint cream-filled chocolate cookies, like Newman-O’s Hint-O-Mint
- In a medium saucepan, warm the milk, sugar, 1 cup (250 ml) heavy cream, salt, and mint.
- Once the mixture is hot and steaming, remove from heat, cover, and let stand for an hour to infuse the mint flavor.
- Remove the mint with a strainer, then press down with a spatula firmly to extract as much mint flavor and color as possible. (You can also use well-washed hands to do it as well, making sure the mixture isn’t too hot to safely handle.) Once the flavor is squeezed out, discard the mint.
- Pour the remaining heavy cream into a large bowl and set the strainer over the top.
- Rewarm the infused milk. In a separate bowl, whisk together the egg yolks, then slowly pour some of the warm mint mixture into the yolks, whisking constantly, then scrape the warmed yolks back into the saucepan.
- Cook the custard, stirring constantly with a heatproof spatula, until the mixture thickens and coats the spatula. If using an instant read thermometer, it should read around 170ºF (77ºC).
- Immediately strain the mixture into the cream, then stir the mixture over an ice bath until cool.
- Refrigerate the mixture thoroughly, preferably overnight, then freeze it in your ice cream maker according to the manufacturer’s instructions.
- While the mixture is freezing, melt the chocolate in a small bowl over a pot of simmering water, or in a microwave oven on low power, stirring until smooth. Place a storage container in the freezer.
- When the ice cream in the machine is ready, scribble some of the chocolate into the container, then add a layer of the just-churned ice cream to the container. Scribble melted chocolate over the top of the ice cream, then quickly stir it in, breaking up the chocolate into irregular pieces. Continue layering the ice cream, scribbling more chocolate and stirring as you go.
- When finished, cover and freeze until firm.