A Monday Morning Giveaway
It’s Monday. AGAIN.
I think we need a giveaway!
Are you familiar with Rudi’s Organic Bakery? If you’re not, you should be! I am a big fan. In a perfect world, I’d all have my own fresh baked bread handy at all times. But, since most days I’m a hot-mess mommy just trying to keep it together, I need a good bread company like Rudi’s to rely on.

Rudi’s breads are free of chemicals, preservatives and pesticides. They offer gluten-free varieties, sprouted varieties (yay!) and you can find them in the commissary! Like I said- I’m a big fan.
Rudi’s just finished up a fun sandwich-box-designing contest on Facebook. Check out the winning sandwich box below- how cute! Looks like it would be perfect for those back-to-school lunches.

Lissy’s sandwich boxes are available via Rudi’s Facebook page with the purchase of three loaves of Rudi’s bread. With every sandwich box ordered, Rudi’s is donating $1 to the Lunch Box, a non-profit working toward healthier school lunches for kids. Love that!
In honor of all those artsy sandwich box entries, we are giving away a prize package for your little artist. The package includes an art kit, a sketch pad, two product coupons (just one more loaf and you can get your sandwich box!), a reusable bag to carry it all in and –wait for it– a beret! Adorable, right?

If you or your little ones love art and/or sandwiches, here’s how to enter:
Simply leave a comment with your name and email below. That’s it!
You’ve got until Wednesday at midnight EST to enter. Until then, go grab some Rudi’s and make yourself a sandwich! You’ll be glad you did.
Roasted Chickpeas: 4 Ways
Come visit me at Modern Parents Messy Kids today!

I’m sharing four variations on one of my new favorite snacks.
It’s sure to make all the (big and little) tummies in your house very happy..
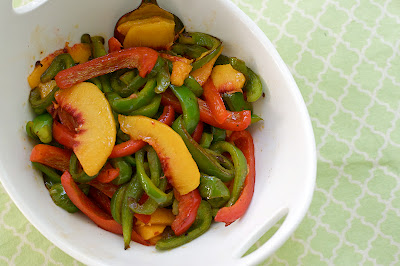
Peaches and Peppers

What I have for you today is simple.
Just peaches and peppers. An easy side dish.
It never occurred to me before that peaches might complement peppers, but somehow they do. I sauteed the peppers in grapeseed oil (you can use whatever fat you fancy) until soft and added in the thinly sliced peaches just before the peppers were done.
This is a smart combination for the grill, too- you can drizzle halved peppers and peaches with oil, grill them until they’re soft, then slice up and serve alongside your main dish if you’re not in the mood to use the stovetop.
Keeping it simple today.
No muss, no fuss.
Peaches and Peppers
Prep time
Cook time
Total time
Author: Oven Love
Ingredients
- 3 medium/large bell peppers, cored and thinly sliced
- 1-2 tablespoons extra virgin olive oil, grapeseed oil, butter, lard, coconut oil or other cooking fat
- 2-3 peaches; peeled, pitted and thinly sliced
Instructions
- Heat a medium skillet over medium heat. Add cooking fat to the pan and heat through (when the fat is hot enough, it will sizzle when you flick a little water into the pan). Add peppers and cook until soft. When the peppers are just about done, add in the sliced peaches, toss, and heat through. Serve immediately
Inside the Oven [Vol. 6]
Happy Monday to all of you out there!
It’s a fine evening to be scrolling the interwebs.
I haven’t caught you up on all of the (super interesting) goings-on of the past few weeks, so get yourself a snack and settle in for some good, old-fashioned over-sharing!

- I have been hitting the ‘ol Instagram app pretty hard, you guys. The iPhone is a fantastic time waster, is it not? If you want to see pictures of blurry, moving children and my lunch and dinosaur staring contests and other little snippets around the Oven Love household, follow me on Instagram (and Twitter, too!) @natalieherr. Let’s be pals.

- I just purchased this print above (like 20 minutes ago, seriously) and I’m in love! Reasons why- it’s an excellent verse, you can print it at home and your purchase of just one little print provides 83 MEALS for families in need in the Sudan. How cool is that? Visit Joy’s Hope to see all of her designs.
- The Great Sugar Reduction Project (worst made-up project name ever) is continuing along. We’ve gotten most of the processed “health” foods out of the house- I was fooled into thinking some of it was good for us just because it was organic or whatever. False! As an ex-PR person, I should know that it’s all smoke and mirrors. So now I’m re-learning how to be patient in preparing food. Slow food is good food. Unless you’re hungry.. then slow food is irritating/why-won’t-you-cook-faster food. Working on it.
- Speaking of the sugar thing, Heather from Southern Pink Lemonade and I are hatching up a plan for a great blog event centered around eating real food. I think it will be great for people who are looking to get into it but don’t know where to start. Look for more info soon!
- Did I tell you we lost a few chickens to that nasty heat wave a few weeks back? Our flock is down to 7 ladies. We are hoping to add some more soon.. mama needs some eggs!

- Baby girl just turned six months and we’ve started solid foods. I forgot how messy/gross/seriously messy the whole process is.. but she’s my child, so naturally I think she is too cute with all that mess on her face (somehow this does not apply with other people’s children). We’ve been going heavy on the bananas, avocado and egg yolks. And by heavy, I mean her bib after she’s done spitting out all her food.
That’s all the over-sharing I’ve got in me today, you little dream boats!
I’ll be back tomorrow to link you up to MPMK for some good snacking. See you then!
I’ll be back tomorrow to link you up to MPMK for some good snacking. See you then!
Banana Carob Brownies

I’ve been a little scared to get back to baking. My brain is trained to grab the sugar immediately!
But I am retraining.. and grabbing the honey instead.
These brownies came about after a long internet search for a brownie recipe without refined sugar. I found black bean brownies, gluten-free brownies, vegan brownies.. but nothing seemed to be appropriate for me. So I started my own little brownie experiment.
These brownies are made with whole wheat flour, carob powder, mashed banana, honey and olive oil- a little different than your typical ingredients. The texture is not like your traditional brownie (I don’t know if you can ever really get that signature brownie bite without refined sugar), but it is pleasing, and doesn’t leave that sugary coating on your mouth.
I hesitate in calling these “healthy” – I am finding that word means many different things to different people and doesn’t really define food anymore. I do believe they are nourishing, won’t give you a crazy sugar rush and are appropriate as a daily treat or snack. If you want to cut back on the sugar a bit, these are a good way to ease into it.
I’m getting back in my baking groove..
surely some sweet, strange concoctions are on the way.
Banana Carob Brownies

Prep time
Cook time
Total time
Author: Oven Love
Ingredients
- 1 cup whole wheat flour
- 1 cup carob powder (cocoa powder can be substituted, carob is what I had on hand)
- 1 teaspoon cinnamon
- 1 teaspoon baking powder
- ¼ teaspoon sea salt
- 1 cup mashed banana (about 3 small bananas)
- ½ cup honey
- ¼ cup olive oil
- 2 teaspoons vanilla extract
- 2 eggs
- ¼ cup mini carob or chocolate chips, or chopped chocolate
- ½ cup chopped nuts (optional)
Instructions
- Preheat oven to 350 degrees. Line a 8×8 pan with parchment paper.
- In a large bowl, combine whole wheat flour, carob powder, cinnamon, baking powder and salt. In another medium bowl, whisk mashed banana, honey, olive oil, vanilla and eggs. Pour wet ingredients into dry ingredients and mix until just combined. Add the carob/chocolate chips and/or nuts. Spread into the prepared pan
- Bake brownies for 20-30 minutes or until a toothpick inserted in the center comes out clean. Pull the full pan of brownies out to cool completely on a rack. Cut brownies when cool and serve. Keep in an airtight container.
Homemade Honey Ketchup

You guys. I have actually processed and put up almost all of the tomatoes that came out of the garden this year. This is MAJOR. I typically get so overwhelmed with the produce that some of it (okay, a lot of it) goes to the chickens. But this year, I’ve been on the top of my game with a new tomato recipe for each giant basket that ends up on the counter. We’ve done tomato puree, roasted tomato sauce/soup and this homemade honey ketchup so far.
I was a little weirded out by homemade ketchup before (why give up my Heinz?), but the last mountain of tomatoes had me thinking otherwise. I think I was most afraid that I wouldn’t like the consistency or it wouldn’t taste enough like ketchup and all the work would be for nothing.
Wrong-o.
Homemade ketchup is so worth it.
My favorite part was using honey in the recipe instead of white sugar. I was the little girl at McDonalds who dipped her McNuggets into ketchup AND honey. What better way to satisfy my tendencies than to just add honey into the mix in the first place? Stroke of genius, I tell ya.
And who knew that the spices are what make ketchup taste like ketchup? I had no idea that cloves, cinnamon and celery seed were behind that classic ketchup taste. Kudos to you, “spices.” You never get enough recognition on those food labels.

This recipe is ready for canning or freezing, whatever you fancy. As you can imagine, it takes a lot of tomatoes to make a small amount of ketchup, so this recipe is best left for those of us who are searching for ways to use up our garden excess. If you’re looking for a less labor/time intensive homemade ketchup recipe, check out Joy the Baker’s Homemade Curry Ketchup.
(Recipe adapted from Canning.)
Homemade Honey Ketchup

Prep time
Cook time
Total time
Author: Oven Love
Recipe type: Condiment
Ingredients
- 8 lbs. tomatoes
- 1 medium onion, chopped
- ¼ teaspoon cayenne pepper
- ½ cup honey
- 1 cup white vinegar
- 1 stick cinnamon
- 1½ teaspoons whole cloves
- 1 teaspoon celery seeds
- 1 tablespoon sea salt
Instructions
- Wash tomatoes. Remove stem ends and cores. Cut tomatoes into quarters. Transfer to a large colander in the sink; drain. In a 8-10 quart non-reactive pot, combine tomatoes, onion and cayenne pepper. Bring to boiling, stirring often; reduce heat. Simmer, covered, for 15 minutes, stirring often.
- Press tomato mixture into a food mill. Discard seeds and skins. (If you don’t have a food mill, I would think you could blend or process the tomatoes and strain them, but I haven’t tested this method.) Return tomato mixture to the same pot. Add honey. Use a ruler (or wooden spoon and rubber band) to mark the depth of the mixture. Make a note of the depth- you will want to reduce it by at least half, if not more. Bring to boiling, stirring until the honey dissolves; reduce heat. Simmer, uncovered, for 2-3 hours or until mixture is reduced by half.
- In a small non-reactive saucepan, combine vinegar, cinnamon, cloves and celery seeds. Bring a a boil, then remove from heat. Strain vinegar mixture into the tomato mixture, discarding the spices. Add the salt. Simmer, uncovered, until the ketchup is at your desired consistency- anywhere from 30 more minutes to 3 more hours.
- TO CAN: Ladle hot ketchup into hot, sterilized half-pint canning jars (pints work, too). Leave ½-inch headspace. Wipe jar rims and adjust lids. Process filled jars in a boiling water canner for 15 minutes. Remove jars from canner, cool on wire racks. Makes 4 half-pints or 2 pints.
- TO FREEZE: Place pot in a sink filled with ice water, stir mixture to cool. Ladle ketchup into half-pint freezer containers, leaving ½-inch headspace. Seal and label. Freeze for up to 10 months.
Pineapple Orange Julius

The last time we met, I told you about my sugar crisis.
How’s it going, you ask?
Well, here’s what I’ve been doing.
- Trying to eat whole foods as much as possible.
- Trying not to eat sugar or drink juice. Eating honey/maple syrup in moderation.
- Eating plenty of fruit. I couldn’t hack it without fruit (and a little bit of dark chocolate).
- Not drinking any Pineapple Orange Juliuses. Boo!

So, it’s going pretty well, you guys. I haven’t caved and baked a giant cake yet, so that’s positive. I debated whether or not to share these yummy drinks with you, but I hate to withhold a good recipe from my treat-loving people, so here we are. I made these before my foray into more healthful eating, but I don’t think they’re too terribly bad. Unless you count the juice concentrate (check your labels to make sure you’re actually buying juice and not just frozen HFCS).
Whatever the sugar content, they’ll definitely take you back to your middle school days, most likely spent roaming the nearest mall with your girlfriends and talking about your crushes until your mom picks you up (just me?).

If you aren’t into the pineapple, stick to plain orange juice concentrate. Or mix it up with some other flavor to build your dream Julius- sky’s the limit.
PS- I finally joined Instagram! If you want to see random pictures of food and my children, find me at @natalieherr (same as my Twitter handle).

Prep time
Cook time
Total time
Ingredients
- 6 ounces pineapple orange juice concentrate (you can make the rest of the can into juice or save for later)
- 2 cups whole milk
- 1 teaspoon vanilla extract
- ½ teaspoon orange extract (optional)
- 2 tablespoons honey (use a light-colored honey if possible)
Instructions
- Place all ingredients in your blender. Add ice to fill and blend until frothy. Serve immediately and enjoy!
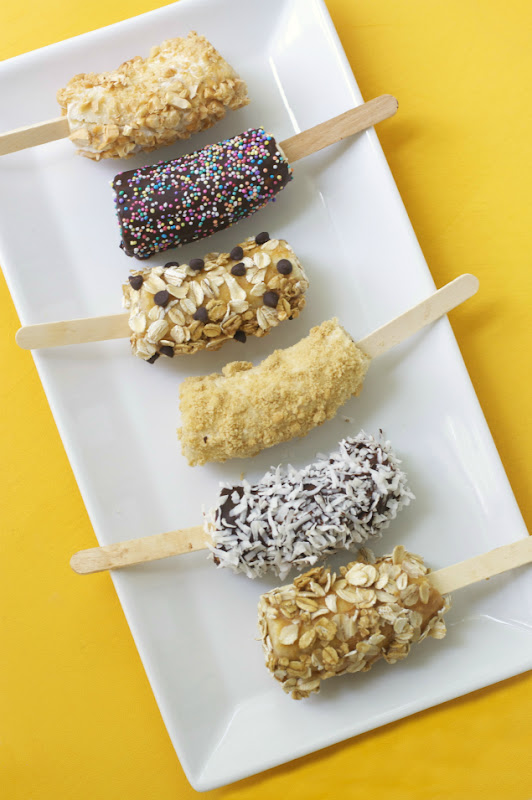
On My List: Popsicles
I know I’ve already shared some popsicles with you this summer (orange creamsicles and frozen banana pops), but I have been making way more pops than I’ve been able to photograph. They are a such a refreshing treat in these dog days- I can’t get enough of them!
Here are some popsicles that are on my list.


(I would substitute yogurt for the ice cream.)


You can pick up cheap popsicle molds from Target, Wal-Mart or your local kitchen supply store. There are tons available online, too. If you want to go old school, some Dixie cups and popsicle sticks will do the trick. I don’t know about you, but I can’t wait to try some of these flavor combinations!
Frozen Banana Pops on MPMK
Come on over to MPMK today for some fun frozen treats!
Some of them are even healthy enough to eat for breakfast. 🙂
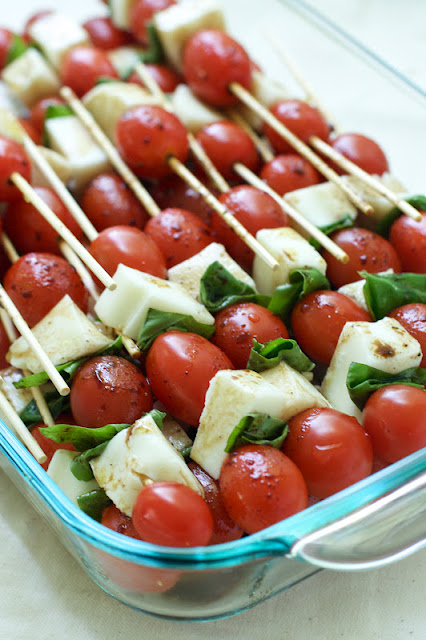
Caprese Salad Skewers

You guys.
I am having a major food-related crisis!
If you have been reading the ol’ blog for a while, you probably know these things about me:
A) I enjoy healthy foods and attempt to live a healthy lifestyle.
B) I enjoy baking and creating desserts that are often FULL. OF. SUGAR.
I have discovered in the last day or two that I have convinced myself that I eat healthily, but I actually consume a lot of sugar in my daily diet. I don’t eat a lot of processed food (I make most of our treats from scratch), but that alone doesn’t mean I’m a picture of health. I have made a lot of changes in the way we eat over the past few years, but I haven’t been able to let go of sugar.

OF COURSE, sugar is bad for you. I am on-board with this, aren’t we all? We know the terrible stuff that happens when you eat tons of sugar. I thought since I don’t drink soda and don’t eat Twinkies that I was in the clear, but in fact, I’m probably a sugar-crazy-zombie, too.
So, I haven’t officially quit sugar (ahhh!!) but I am thinking about it and doing my research, and trying to get my head around the idea of not baking cakes whenever I want. The past day or two, I’ve been making the conscious effort to avoid processed sugar and I do feel a difference. My self-control needs some work, though- maybe this is God’s way of working on me in that area.
You guys, I just love treats. I’m going to have to find a way to work treats into this whole low-sugar idea, because I think we’re meant to enjoy sweet things.. at least sometimes. Why else would God have given us such amazing treats like fruit and honey? I still have to get my head around it, so while I do, let’s focus on something sugarless, but still sweet in their own way..
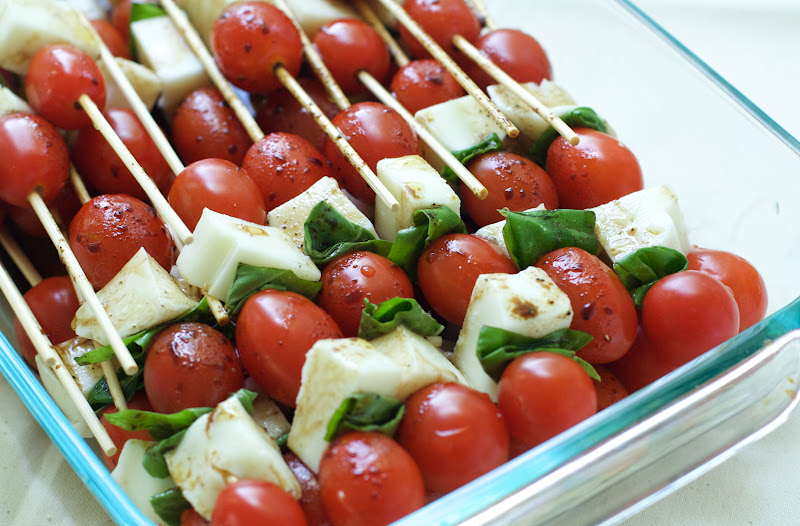
Caprese salad skewers.
Easy, easy, easy. And healthy, too. (I think, but what do I know?)
These little guys are make-ahead, party-ready, easy-to-snack-on-while-having-a-long-conversation kind of food. Just put the stuff on a stick. It’s not rocket science. People love things at least 2-3 times more when it comes on a stick, trust me.

Anyone out there have any wisdom about the sugar thing? I am planning on reading Nourishing Traditions this weekend- I’ll be sure to report back. If I go forward with this nonsense, will you guys still read the blog? You won’t leave me if I stop making baking giant cakes, will you?
I hope you’ll stay- you’re my faves.
Prep time
Total time
Ingredients
- 2 pints cherry tomatoes, washed
- 1 lb fresh mozzarella cheese, cut into cubes
- 1 bunch fresh basil (I just pulled out a large stalk from the garden, you can use full leaves or tear them into smaller pieces depending on how much basil you have)
- ¼ cup extra virgin olive oil
- 2 tablespoons balsamic vinegar
- salt and pepper to taste
Instructions
- To assemble the skewers, place the tomatoes, cheese and basil alternately on the skewer (tomato, cheese, basil, tomato, cheese, basil, tomato). Repeat until you are out of ingredients. Lay skewers in a shallow baking dish.
- In a small bowl or measuring cup, whish the olive oil, vinegar, salt and pepper. Pour over the skewers to coat. Serve immediately or let the skewers marinate in the refrigerator for up to 2 days (haven’t tested this, but I imagine they will stay in tact for a day or two). Serve cold.