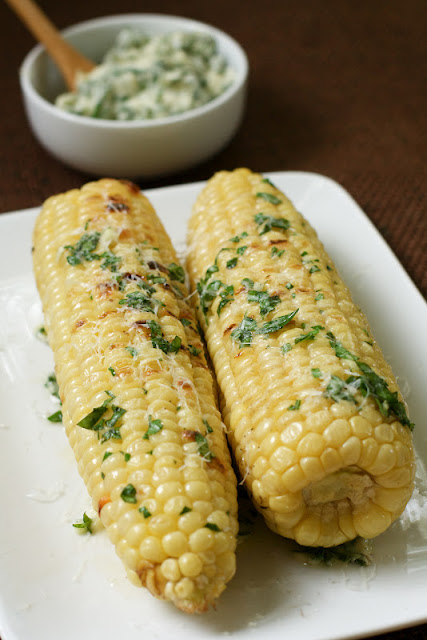
Grilled Corn with Garlic Herb Butter

It’s still summer, right?
It seems like everyone in the food blogging world (maybe the real world, too?) is already making fall comfort foods and pumpkin desserts and back-to-school lunch ideas.. but in my world, it’s still, like, 90 degrees every day.. so I’ma keep grilling. Cool? Cool.
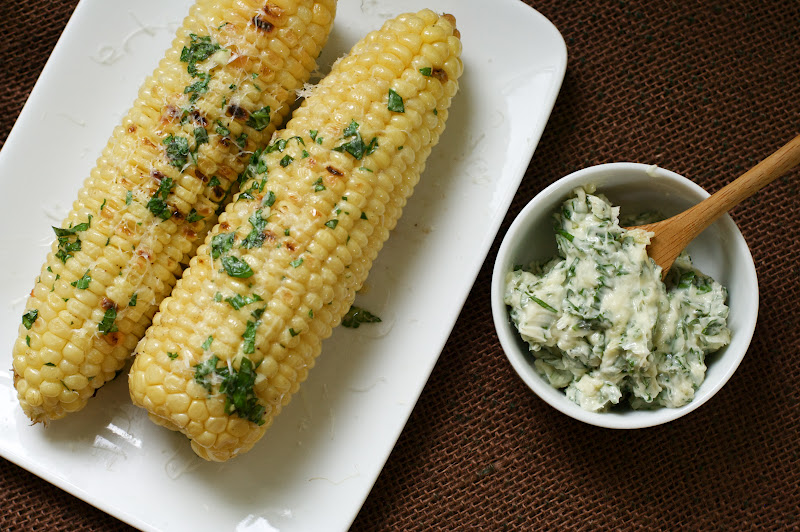
I like my corn just lightly grilled.. not charred like crazy. Just a personal thing. I also like slathering it in butter. Garlic herb butter. And covering it with cheese. Are you with me?
Garlic herb butter sounds and feels fancy, but all I did while the corn was grilling was grab a handful of herbs from outside, chop them up, mix them into some softened butter and added some fresh garlic. Good to go. All that’s left to do is spread on the butter and sprinkle with your favorite cheese. We chose Romano because we had it in the fridge, but you can go with Parmesan, Feta, goat cheese.. anything you like.

We had plenty of the herb butter left over, so I’m looking forward to using it to saute other fresh veggies this week or make some impromptu garlic bread. You could use it for anything, really. Cook your eggs in it. Spread it on your sandwich. Just don’t waste that precious stuff!
And let’s face it- if you’ve already packed up the grill for the year, you can make the corn on the stove top with perfectly lovely results. We’ll only have fresh corn for a little while longer, so let’s take advantage before fall actually appears.

Grilled Corn with Garlic Herb Butter
Prep time
Cook time
Total time
Author: Oven Love
Ingredients
- 6-12 fresh ears of corn, shucked
- olive oil, for grilling
- 1 stick butter, softened at room temperature
- 1 clove fresh garlic, minced
- ¼-1/2 cup fresh herbs, minced (I would just eyeball it- I used a handful of fresh basil and parsley)
- sea salt and fresh cracked pepper
- grated or crumbled cheese of your choice (Parmesan, Romano, Feta, Goat Cheese, etc..)
Instructions
- Heat up that grill!
- Rub the ears of corn with some olive oil. Grill until they are browned/charred to your liking.
- While the corn is grilling, mix butter, garlic and herbs. Season with salt and pepper.
- Take the corn off the grill and slather with herb butter while still hot. Cover with cheese and eat ASAP!
Sesame Quinoa with Chicken and Snap Peas

I’m not sure what took me so long, but I am on board with this quinoa business.
I’m pretty late to the party, I know.
You might have seen the salmon/spinach/feta/quinoa concoction on MPMK last week?
Since I’m on this quinoa kick, I pulled up Jessica’s recipe (which I’ve had pinned for aaaaages) and had to make it happen.
(My sesame kick is a close second to my quinoa kick.)
The recipe was genius to start- all I did was add some snap peas, a teensy bit more soy sauce and another handful of sesame seeds and I was good. to. go.
I am not ashamed to say I scarfed this down in under five minutes.
Mostly because there was a little baby trying to pull it directly away from me and onto the floor, but also because it tasted amazing. Or as Elliott would say- “Mama, it’s dewishus!”

Sesame Quinoa with Chicken and Snap Peas

Prep time
Cook time
Total time
adapted from How Sweet It Is
Author: Oven Love
Serves: 4
Ingredients
- 1 cup uncooked quinoa, rinsed
- 3 garlic cloves, minced
- ½ tablespoon toasted sesame oil
- ½ tablespoon olive oil
- 2 cups low-sodium chicken stock
- 2 boneless, skinless chicken breasts, cooked and shredded
- 1 cup sugar snap peas, rinsed and rough chopped
- 6 green onions, sliced
- 2 tablespoons toasted sesame seeds, plus more for serving
- 3 tablespoons olive oil, for dressing
- 2 tablespoon toasted sesame oil, for dressing
- 1 Tablespoon low-sodium soy sauce, for dressing (gluten-free if necessary)
Instructions
- Heat a saucepan over medium heat and add ½ tablespoon of sesame and olive oil. Add in garlic and quinoa and stir to coat, then toast for 3-4 minutes, stirring occasionally. Add in chicken stock and increase heat to high, bringing the quinoa to a boil. Reduce to a simmer and cover, cooking for 15 minutes, or until water is absorbed and quinoa can be fluffed with a fork. Whisk together dressing ingredients and set aside.
- Add in chicken, snap peas, green onions and dressing, tossing well to coat. Add in sesame seeds and toss once more. Top with more sesame seeds and serve.
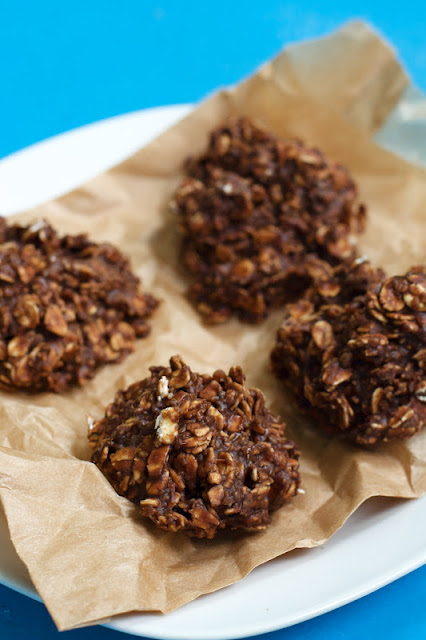
Banana No-Bake Cookies (No Refined Sugar)

I’ve got another sugarless baking experiment for you today, imaginary internet pal!
I know you’ve been there- middle of the afternoon, no snacks handy, craving hits.. and you think to yourself, “how can I make myself a treat before the kids wake up??”
I immediately thought of no-bake cookies (and also thought I was some kind of genius for coming up with that.. DUH, Natalie.). The banana takes the place of refined sugar in this recipe. If you’re not into the whole sweeten-stuff-with-bananas thing, this recipe isn’t for you. The banana isn’t overpowering, but you can taste it in there.
I was a fan, husband was a fan, toddler was a fan. They tasted plenty sweet to us without the sugar, but that could be because we aren’t eating any real sugar and our taste buds have changed. I had a little cookie-fruit-pizza-bite-thingy yesterday morning at MOPS (you’ve been on Pinterest, you know what I’m talking about) and it tasted SO SWEET. A month ago, I would have downed a handful of them and started looking for something else. Hooray for detoxing!
If you’re looking for a quick and refined-sugar free cookie, give this one a try. But it’s okay if you don’t- I know my girl Marianne will (this post is really just for her anyways). Better get crackin’- nap time is almost over..
Banana No-Bake Cookies (No Refined Sugar)
Prep time
Cook time
Total time
adapted from Back to Her Roots
Author: Oven Love
Ingredients
- 1 medium banana, cut into chunks
- ½ cup chocolate chips/chunks
- 3 tablespoons nut butter (I used PB)
- 1 tablespoon chia seeds
- 3 tablespoons milk
- Pinch of salt
- 1 teaspoons vanilla extract
- 1 to 1½ cups rolled oats (gluten-free if necessary)
Instructions
- In a medium saucepan over low heat, combine banana chunks, chocolate chips, nut butter, chia seeds, milk and salt. Heat for 2-3 minutes or until just beginning to bubble.
- Using a fork, mash the bananas in chocolate mixture until smooth. Bring mixture to a boil and boil for 2-3 minutes. Remove from heat, add in vanilla.
- Stir in 1 cup oats until well-coated. If the mixture seems a bit runny, add up to ½ cup more oats until the mixture is scoop-able.
- Spoon rounded tablespoonfuls onto waxed paper and let cool in the fridge or freezer until firm. Enjoy the cookies right away or keep refrigerated.
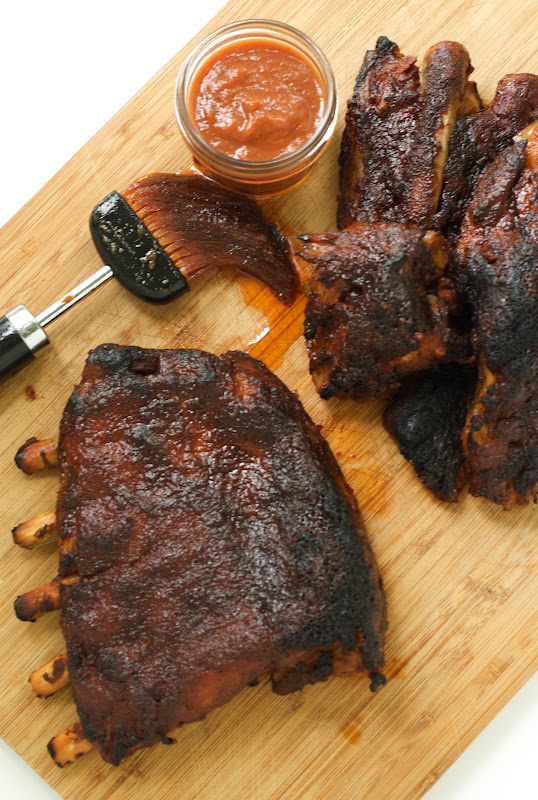
Slow Cooker (Crockpot) BBQ Ribs

Yesterday was an exciting day in the Oven Love house!
I made RIBS. On a MONDAY. With little to no effort.
It was like the Twilight Zone.
Blogger confession: I think I’ve only eaten ribs, like, 2 times in my life before this?
They always seem like they would be tasty.. but when I see people eat ribs, it just looks like more trouble than it’s worth. And a mess. And fatty, low-quality meat. Ugh.
But THESE ribs.. they are something to write about. They came from our grass-fed half-hog, so no worries about low-quality for us. There is usually a little more time between when we eat a meal and when it gets posted, but I had to share these with you ASAP. You need them in your life!

Here’s what to expect: rub the ribs with spices, let cook all day, then reduce your sauce, baste your ribs and broil for less than 10 minutes. Minimal effort for you, big reward for your tummy.
I had to be super careful getting these out of the slow cooker because they were so tender (notice the pile of meat in the background of these pictures- that rack did not make it out without falling apart completely.. YUM). You could probably skip the broiling step if you’re pressed for time, but I wouldn’t if I were you- the natural sugars in the sauce carmelize and make the most amazing crust. You don’t want to miss it.
Needless to say, I am a big fan of this method!
Ribs will probably still be a rarity around here, but the next time I find myself with some.. you better believe they’re headed straight for the slow cooker.
Slow Cooker (Crockpot) BBQ Ribs

Prep time
Cook time
Total time
Author: Oven Love
Ingredients
- 1 full rack or 2 half racks pork ribs, preferably pastured (or whatever fits in your slow cooker!)
- 1 tablespoon paprika (I used sweet this time, but you can use a combo of sweet and smoked paprika)
- 1 tablespoon unrefined sugar (like Sucanat)
- ½ teaspoon black pepper
- ¼ teaspoon chile powder (I used Ancho chile powder)
- ½ teaspoon garlic powder
- ½ teaspoon onion powder
- 1 teaspoon salt
- ¼ teaspoon cumin
- ¼ teaspoon oregano
- 1 cup of your favorite barbecue sauce (I used my homemade peach and plum BBQ sauce- I wish I had written down the recipe, it is so good!)
Instructions
- Pat your ribs dry with a paper towel. Combine all of the spices (paprika through oregano above) and rub onto the ribs. Place dry ribs (no water needed) in your slow cooker with the meaty side facing the heat.
- Cook your ribs on low for 6-7 hours total. About half way through cooking, pour your barbecue sauce over the ribs and continue cooking.
- When you’re ready to finish your ribs, preheat your oven’s broiler and place your oven rack about 10 inches below the heating element. Remove the ribs carefully from the slow cooker and place on a baking sheet with aluminum foil and a cooling rack (so any fat will drip off of the ribs and onto the foil). Set aside.
- Pour the liquid from the slow cooker into a small pot and bring to a boil. Let the sauce thicken and reduce by about a third- this will take 10-15 minutes. When the sauce has reduced, brush onto the ribs and broil for 3-4 minutes. Baste with sauce and broil another 3-4 minutes. Remove and serve at this point, or continue to baste and broil until you reach your desired carmelization. Serve with any extra sauce.
Salmon Quinoa Salad

Hop on over to MPMK today- I’m sharing this simple salmon quinoa salad. Yum!
Sunflower Sesame Granola Bars

That old Quaker and his granola bars got nothin’ on these.
For. Reals!
Sunflower and sesame might sound like a crazy combination of flavors, but I swear.. these bars are addicting! I came across a very forgiving formula for chewy granola bars and proceeded to raid my fridge and cabinets for ingredients straight away. (I had no plan, as usual.)

I’m glad to say these are a huge improvement on my last granola bar effort. They only have natural sweeteners (honey and barley malt syrup) and they actually stay together, instead of crumbling the minute you remove them from the fridge.
I wasn’t sure the miniature food critic in the house would like the flavor combo, but he gobbled them up every day of the week. I cut them up into tiny squares for him so he could grab and go and he was all over that- kid doesn’t slow down for anything (but the iPad.. umm, quit it with all the new kid-luring technology, Apple!).
These would be a solid post-workout snack, too- when cut up, they actually remind me of those little marathon squares they sell in the bulk food section at Whole Foods.

These bars have a kind of roasty/toasty taste to them and aren’t sickly sweet. If you’re into that, just use chocolate instead of dried fruit- that’ll give you a proper sugar rush. I prefer the little pops of sweetness from the dates and figs. (Who knew about dried figs and didn’t tell me?? They are so good! My childhood self would be stunned at the thought- remind me to tell you my Fig Newton story another time.)

Blogging has turned me into a crazy, dried fig-loving, granola bar mastermind.
Who knows what will come out of the oven next.
Homemade Fig Newtons, I’m coming for you!
Sunflower Sesame Granola Bars

Prep time
Cook time
Total time
based on a basic granola bar formula from Good Life Eats (by way of Brown Eyed Baker)
Author: Oven Love
Ingredients
- ⅓ cup honey
- ¼ cup barley malt syrup (gives it a ‘toastier’ flavor, but more honey is a fine substitute)
- ¾ cup sunflower seed butter
- ¼ cup tahini (sesame seed paste)
- 1 teaspoon cinnamon
- 1 teaspoon sea salt
- ⅔ cup almonds, chopped
- 3 tablespoons sunflower seeds
- 2 tablespoons sesame seeds
- 2½ cups old-fashioned or thick-cut rolled oats
- ⅓ cup dried pitted dates, diced
- ⅓ cup dried figs, diced with stems removed
- ⅓ cup raisins
Instructions
- Preheat the oven to 325 degrees. Prepare an 8×8 pan with parchment paper.
- In a large bowl, whisk together honey, barley malt syrup, sunflower seed butter, tahini paste, cinnamon and sea salt until combined. Fold in chopped nuts and oats, followed by the dried fruit until all is well combined.
- Spread the mixture into the pan with a spatula or your fingers. Make sure it press it firmly into the pan so the bars don’t crumble after they are baked.
- Bake at 325 for 25 minutes or until the edges begin to brown. Remove from the oven and let cool at room temperature for about 30 minutes. When the pan is cool to the touch, move to the freezer or refrigerator for 1 hour, or until firm. Cut into bars with a very sharp knife (I cut 16 bars). Store in an airtight container in the refrigerator.
Raspberry Ice Pops

I wish I had a separate freezer that I could dedicate to frozen treats.
Or maybe an ice cream cart right in my living room? Umbrella and all.
Sounds completely normal.I had to do some major freezer reorganizing last week- not due to popsicle excess (I wish!), but because we bought a 1/4 cow and that baby needed some space. I took out all of our ice packs, the ice cream machine insert, some old freezer burned stuff and a bag of frozen raspberries.As you can guess, those raspberries turned into popsicles and went right back into the freezer.
What can I say? I needed a reward for my hard work.

All I did for these pops was spin up the frozen raspberries in a food processor with a banana and a little bit of honey. You can add a bit of yogurt, too, if you like. We ate some of it straight out of the food processor- it was like sorbet and completely divine. So if you want to forgo the popsicle process all together, I don’t blame you. Why wait?

Now, if you’ll excuse me, I’m going to go google “living room ice cream cart” and “gourmet popsicle freezer.”
Raspberry Ice Pops

Prep time
Cook time
Total time
Author: Oven Love
Recipe type: Dessert, Snack
Ingredients
- 1½ cups frozen raspberries
- 1 banana (may or may not be frozen)
- 1-3 tablespoons honey
- a few spoonfuls of yogurt (optional)
Instructions
- In a food processor, combine raspberries and banana and puree until smooth. Add honey to taste and yogurt (if using) and puree to combine. Pour into popsicle molds and freeze until firm or eat right away (it will have the consistency of soft serve sherbet).
Avocado Banana Bread

Something strange happened last week.
I had leftover AVOCADOS. That never happens, like, ever.
We were heading out of town for a few days and I needed to use them up quickly. While I have used frozen avocado before with success (just mash and freeze flat in a freezer bag), I wanted to make something we could snack on in the car and for breakfast during our trip (breakfast guac?). I also had a borderline-gross banana looking to be used, and I thought.. avocado banana bread? Why not?
Why not, indeed!

It may seem like there are a lot of ingredients, but it’s worth rummaging around your cupboards to find everything. The avocado gives the bread richness and color- I love the bright specks of avocado peeking out in each slice. They almost remind me of pistachios- next time I’ll throw some of those in, too.

The ingredients come together quickly, but of course, it takes an hour to bake, plus cooling time.. so you’ll have to wait a bit before you dig in. I know they call them quick breads because they mix up quickly, but they should really be called it’s-going-to-be-really-hard-to-wait-for-this-to-cool-before-you-stuff-your-face breads. Just my opinion.

Hopefully you have an extra avocado around waiting to be baked up into this bread.
I would also recommend just smashing it up on some toast with sea salt.
And I’ll bring the breakfast guac back on the table- that’s a solid option, too.
Avocado for president!
Avocado Banana Bread

Prep time
Cook time
Total time
inspired by Kale & Cardamom
Author: Oven Love
Ingredients
- 2 cups whole wheat flour (freshly ground, if possible)
- 1 teaspoon baking soda
- 1 teaspoon cinnamon
- ½ teaspoon sea salt
- 2 eggs at room temperature
- ½ cup roughly mashed avocado
- ½ cup mashed banana
- ½ cup Greek yogurt at room temperature
- ¼ cup coconut oil (in liquid state)
- ½ cup honey
- 1 teaspoon vanilla
- 1 Tablespoon lemon juice
- ½ cup chopped nuts (I used walnuts)
- ¼-1/2 cup chocolate chips (I used minis)
Instructions
- Preheat the oven to 350. Line a 9×5 loaf pan with parchment paper rubbed lightly with oil.
- Whisk together flour baking soda, cinnamon and salt in a bowl. In another bowl, whisk eggs, avocado, banana, yogurt, oil, honey, vanilla and lemon juice until combined, making sure all ingredients are at room temperature so the coconut oil doesn’t harden.
- Add the wet ingredients to the dry, being careful not to overmix. Stir in the nuts and chocolate chips.
- Pour the batter into the prepared pan. Bake for about an hour or until a toothpick comes out clean. Cool completely before slicing.
Rudi’s Giveaway Winner
And the winner of Monday’s giveaway is..

Renee!

Congrats! We’ll be in touch via email.
Hope everyone is having a lovely Saturday.
White Bean Cookie Dough
White bean cookie dough.

What. What???
That sounds totally weird.
Are you wondering how white beans and cookie dough could possibly be friends?
I applaud you for actually reading this post and not just moving on to the next blog.
After stumbling upon lots of bean-related desserts in the blog world- black bean brownies, white bean bundt cake, etc- I figured it was time to jump on the bandwagon. With some inspiration from Idlewife, I raided my pantry and whipped up some white bean cookie dough.

Now, I know you have some questions, so let me answer them.
1. No, this does not taste exactly like regular cookie dough. How could it? It’s base is 2 cups of beans, not 2 cups of granulated sugar. Come on now.
2. No, this does not taste like hummus. Sure, it’s made of beans, but there’s other stuff in there, too!
3. Yes, it tastes really good. I like to spread it on apples or just eat it with a spoon, frankly.
This is a nice transition treat if you’re looking to cut down on the sweets but still want to enjoy something special to eat. It keeps well in the fridge and it’s good in the freezer long term, but it gets too hard for ready snacking.
I know it seems strange.. but you should give this one a try. It takes less time than baking cookies and is pretty good for you, all things considered. If not for you, maybe use your husbands and kids as guinea pigs. Mine couldn’t tell the difference.
White Bean Cookie Dough

Prep time
Total time
adapted from Idlewife **NOTE: This “dough” is not meant to be baked, just to be enjoyed as a snack/dip. It will not bake up as a cookie would.**
Author: Oven Love
Ingredients
- 1 can white beans, rinsed, drained and patted dry (chickpeas work, too) or about 2 cups cooked beans from dried
- ⅛ teaspoon Celtic sea salt
- ⅛ teaspoon baking soda
- 1 tablespoon vanilla extract
- 3 tablespoons peanut butter, almond butter (or your nut butter of choice)
- 1-2 tablespoons milk or non-dairy sub (coconut or almond milk)
- 1-2 tablespoons honey
- ¼ cup mini chocolate chips
Instructions
- Puree the first 5 ingredients together in a food processor. Blend thoroughly until well combined and all of the chickpeas have been pureed. Add the milk a tablespoon at a time until you reach your desired consistency (mine was a little more like dough than dip; add more milk if you want to dip into it). Add the honey one tablespoon at a time until you reach your desired sweetness.
- Mix in your chocolate chips. Enjoy! (Store in the fridge in a covered container.)